The Add Free, Easy printable, instant download pdf version of this pattern is available in my shop
or
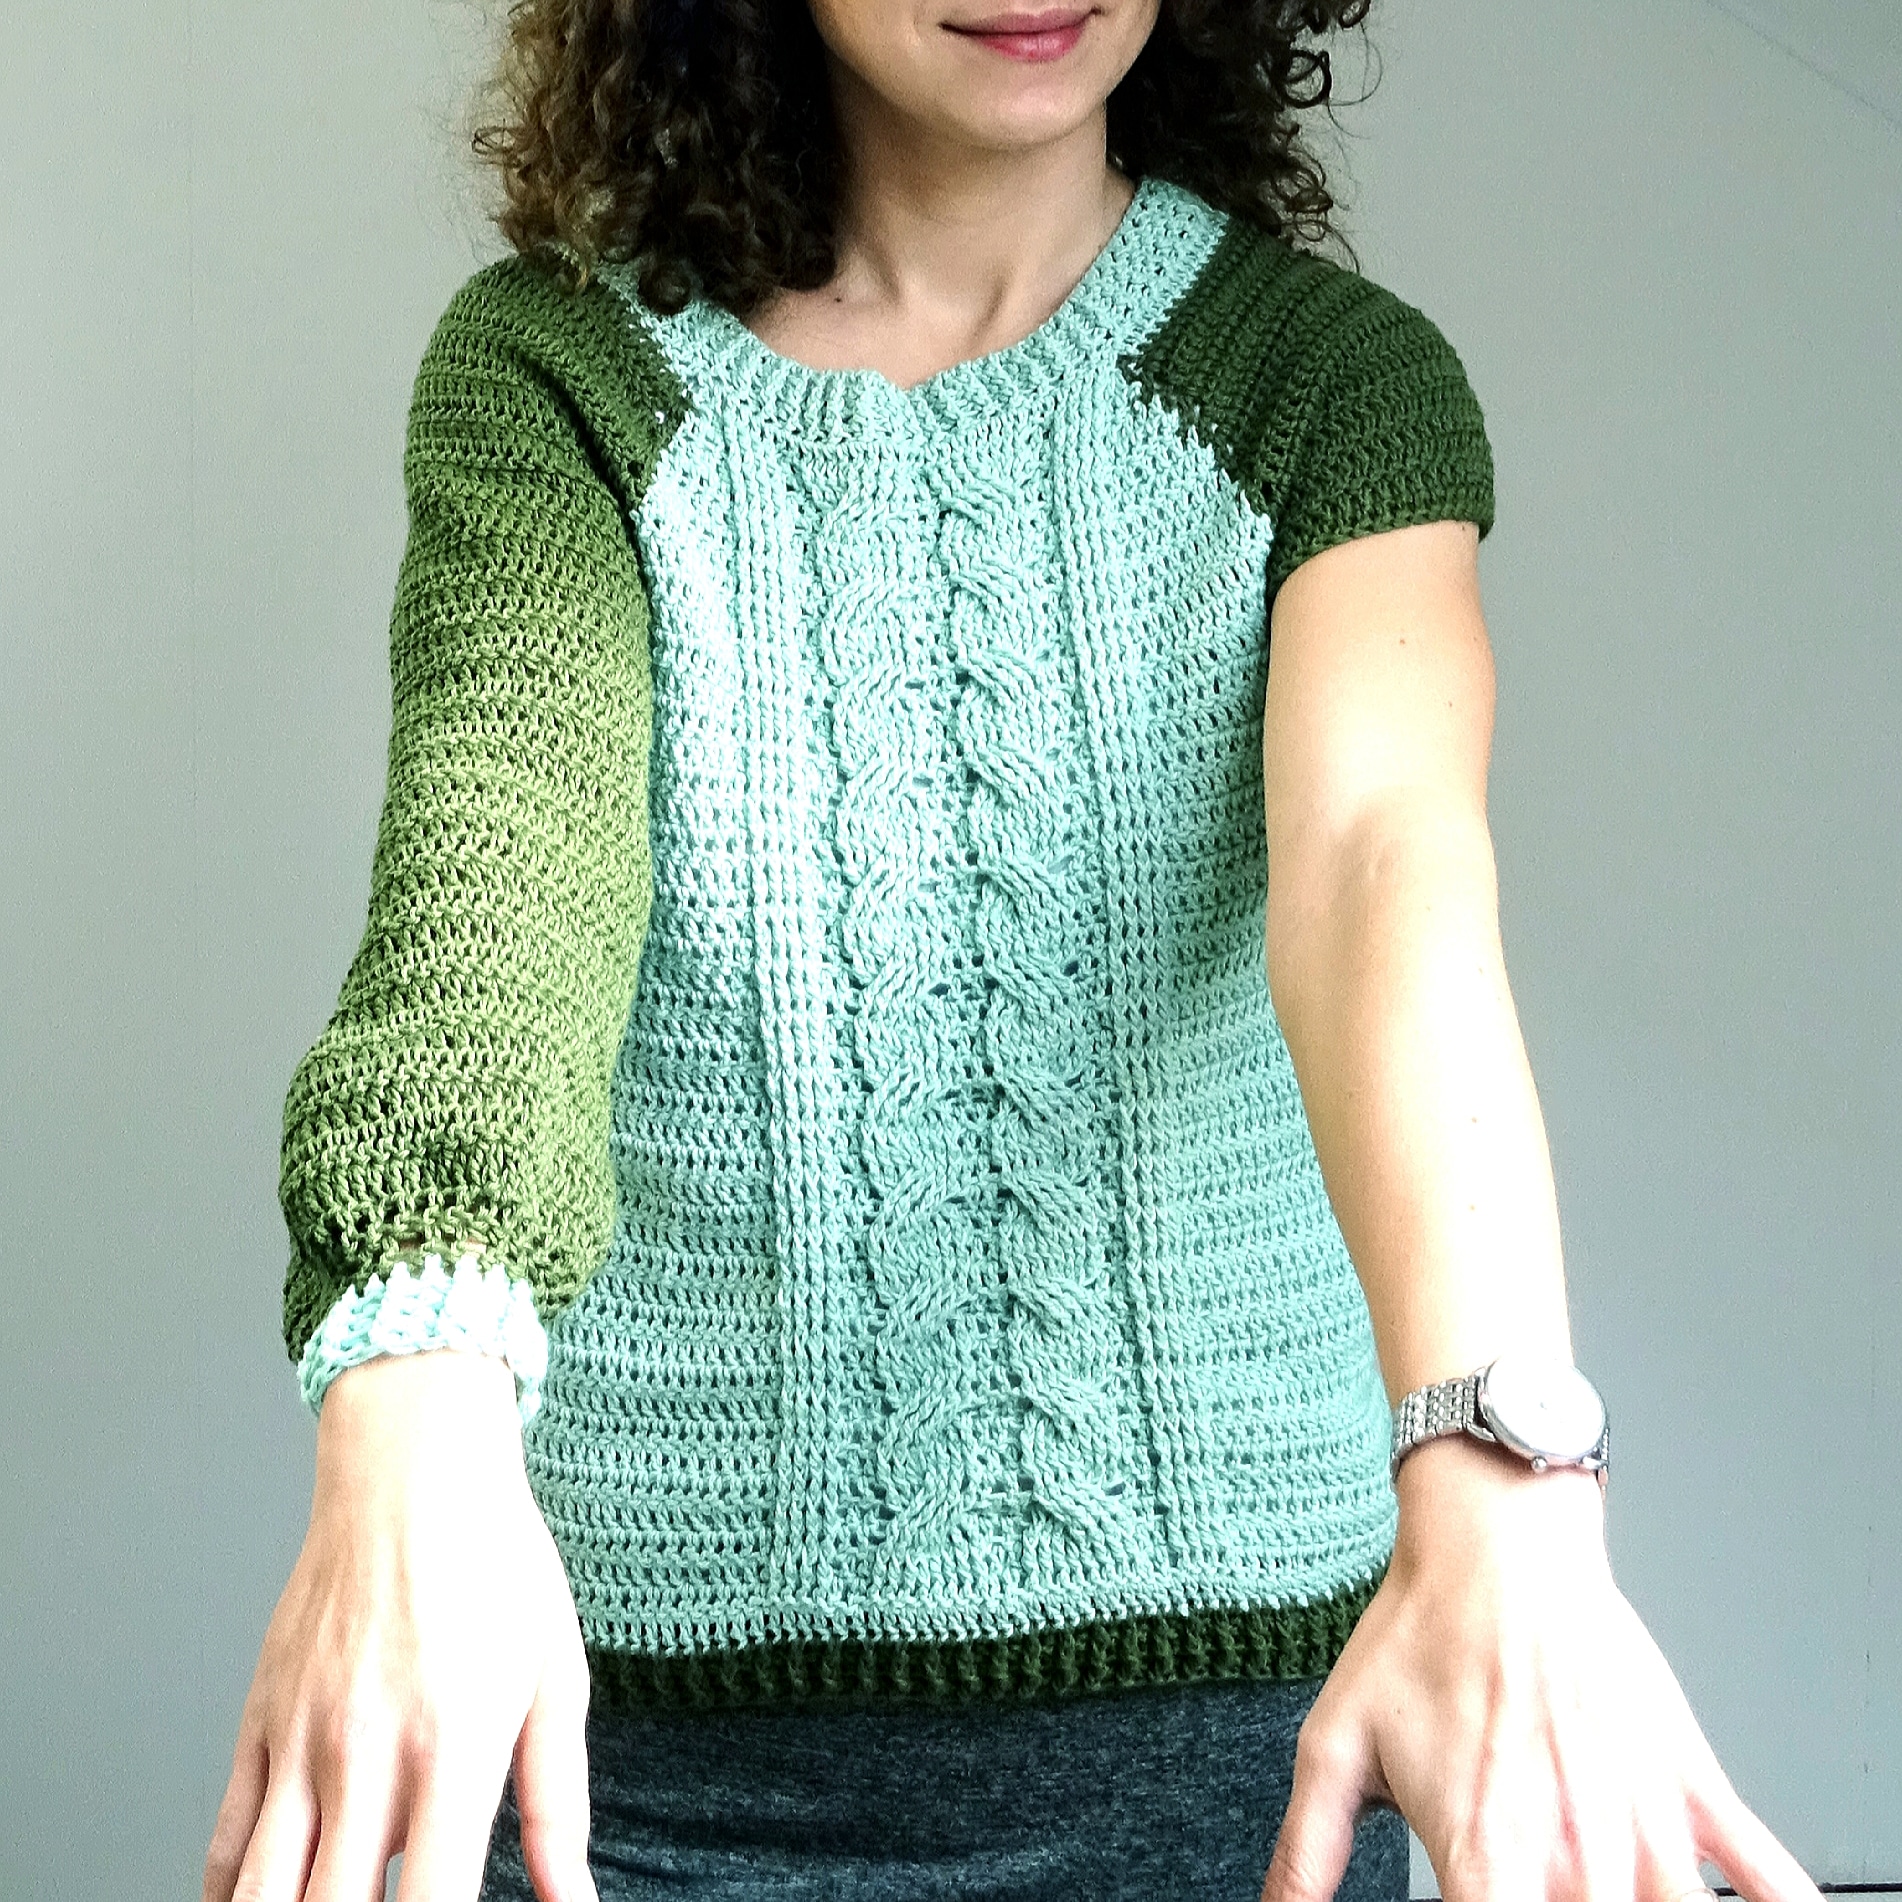
I’m so excited to share with you my new crochet pattern: Spring Time Cable Sweater. I started this sweater some time ago and I’m so happy that finally I had time for it. I think the moment is perfect since we all wait for Spring to come, and this Spring Time Cable Sweater is the perfect transition between winter clothes and summer ones.
Pentru Postarea in limba romana click aici

As you can see, cables never dies and they are looking so great even made with this thinner yarn.
About Design
The Spring Time Cable Sweater is a top Down sweater made with the Raglan technique. Lately every time when I’m thinking to make a sweater this technique is the one first come to my mind. As I said ones in one on of my blog post, this Raglan technique is addictive. The truth is that is easier to work a sweater this way. No seams, no too much shaping, is perfect.
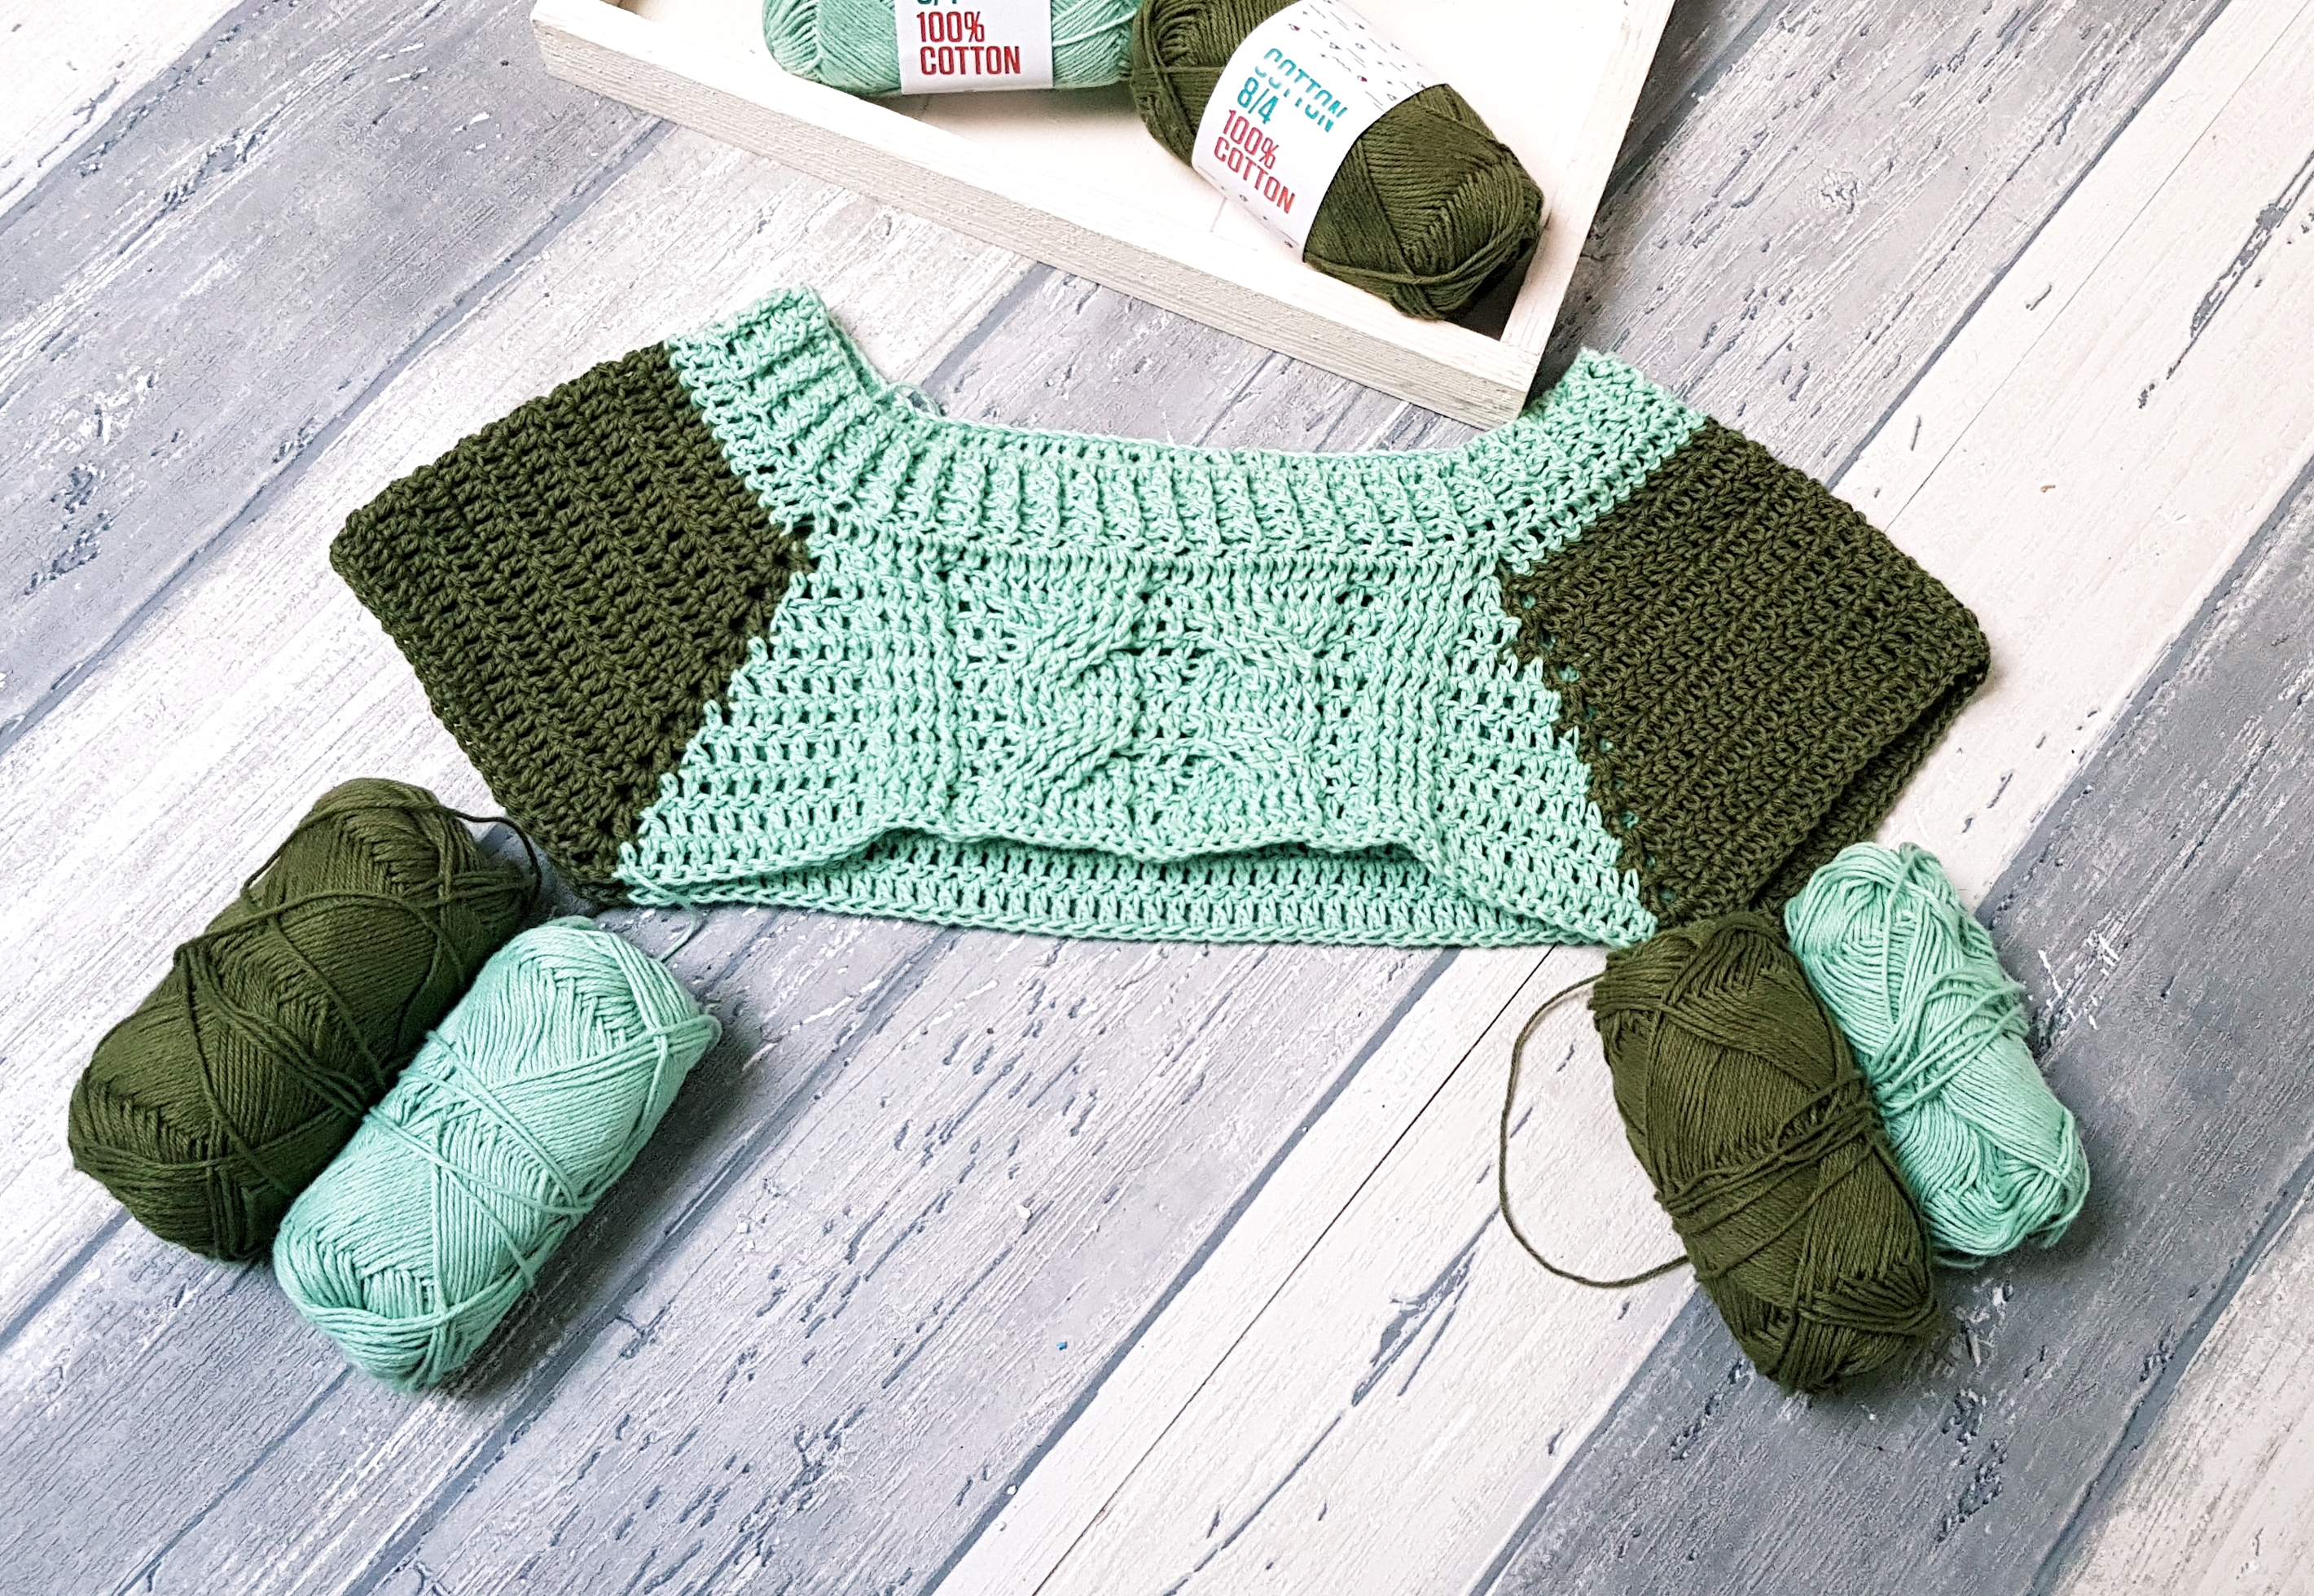
So, we will start from the neck working the yoke part first. On the yoke part we will work with 2 different colors: one for the body of the sweater and one for the sleeves. This pattern can be followed even if you want to work the Spring Time Cable Sweater in one single color.
After finishing the yoke we will separate the sleeves from the body of the sweater and we will continue working the 3 parts separately. On the front side we will make some cables as a main motif of the sweater.

Materials you will need
- Yarn
I used Stocks Cotton 8 /4 from Hobbii in the color Mint Green and Khaki Green. This yarn is a Fingering, 4 ply, Super Fine (size 1) and each skein has 50 G (1. 8 oz ) and 170 m (186 Yds)
- Crochet Hook
The recommended needle for this yarn is 3 mm, but I used a 3.5 mm (size E)
- Tapestry needle for wave in ends
- Scissors
- Stitch markers (optional)
This pattern is available for sizes from Small to 2X large and is written in US terms.
The final measurements of the sweater are listed in the diagram bellow. On the first line are the values in Centimeters and on the second one in Inches.
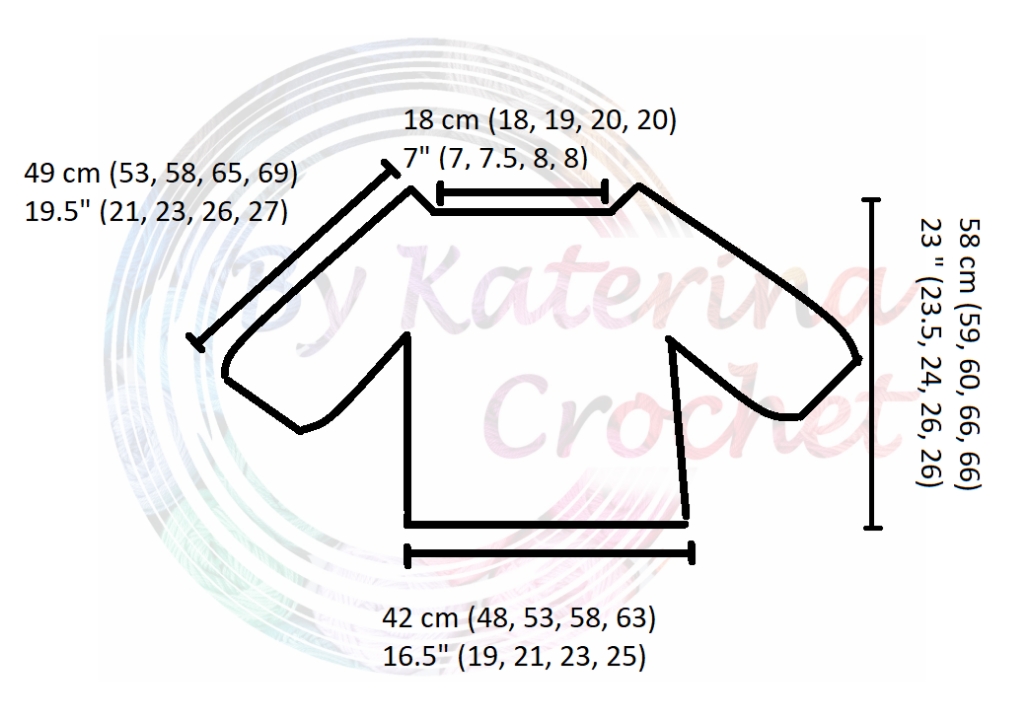
This Spring Time Cable Sweater has a closer fit. If you wish to have a bigger size, on the Bust area for example you will have to work a few more rounds on the yoke part or make a bigger size.
How much yarn do you need:
S – 350 G / 1200 m, 1310 Yds ( 4 skeins Mint Green, 3 Skeins Khaki Green)
M – 390 G / 1300 m, 1420 Yds (5 skeins Mint Green, 3 Skeins Khaki Green)
L – 410 G / 1380 m / 1510 Yds ( 5 skeins Mint Green, 4 Skeins Khaki Green)
XL – 440 G/ 1470 m / 1610 Yds ( 5 skeins Mint Green, 4 Skeins Khaki Green)
XXL – 460 G/ 1560 m / 1700 yds (6 Skeins Mint Green, 4 Skeins Khaki Green)
*These values are approximate. Make sure you have one skein more as a margin of error.
About the stitch
For the Spring Time Cable Sweater we are using for the most part of it , double crochet. On the front part where we have cables we will use:
Front Post double Crochet
Back Post Double Crochet
Front Post Triple Crochet.
Bellow you can see the stitch chart with the repeated rounds on the yoke part.
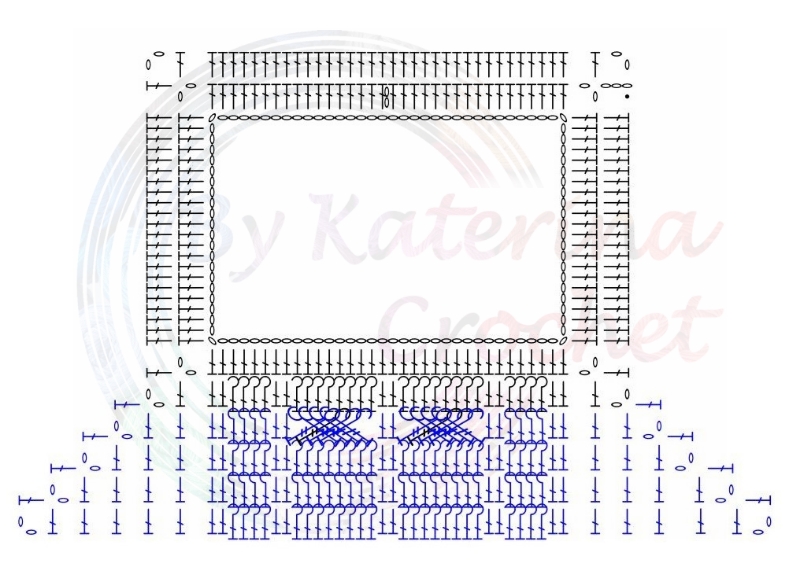
Abbreviations Used in this Pattern:
Ch -chain
Dc – double Crochet
FPDc – front post double Crochet
BPDc – back post
FPTrc – front post triple crochet
St (s) – Stitch (es)
Sl St – slip st
Inc – Increase (increase in corners, 1 dc – ch 2, 1 dc in the same st)
Pattern Notes
- we are working on the right side and wrong side. Turn your work after each round
- for the yoke part where we are working with 2 different colors in the same time, use one different skeins of yarn for each side (back, front and sleeves)
- starting with 2nd round after ribbed band we will start the round in the right corner of the back
- when working on the yoke, ch 3 at the beginning of the round count as a first dc
- if you want to use a different weight yarn check here how you can adjust this pattern to your gauge
Gauge
18 dc = 10 cm (4″)
10 rows = 10 cm (4″)

Let’s start to make this beautiful Spring Time Cable Sweater which will be perfect to wear now that the weather is starting to warm up. It’s so versatile and you can wear it with almost everything.
First we are starting with the foundation chain
S – 108 sts (32 sts for back and front, 20 sts for sleeves and 4 sts to increase in corners)
M – 108 sts (32 sts for back and front, 20 sts for sleeves and 4 sts to increase in corners)
L – 112 sts ( 34 sts for back and front, 20 sts for sleeves, 4 sts to increase in corners)
XL – 120 sts (36 sts for back and front, 22 sts for sleeves, 4 sts to increase in corners)
XXL – 120 sts (36 sts for back and front, 22 sts for sleeves, 4 sts to increase in corners)
After making the foundation chain, join the ends to make a circle.
Ribbed Band
Start with the main color or the one you want to use it for the body of the Spring Time Cable Sweater in my case Mint Green
*if you want you can make the ribbed band at the end
Round 1
You can work the ribbed band without turning after each round
Ch 2, 1 dc in the same st (ch 2 doesn’t count as a st), 1 dc in each st around.
Round 2
Ch 3, 1 [FPdc in the next st, 1 BPdc in the next] repeat to the end of the round
3-5
Repeat round 2
*if you want the ribbed band to be higher just work a few more rounds
Yoke
Round 1
*the numbers for size M, L, XL, XXL are written between brackets
We are working this round only in color Mint Green
Ch 2, 1 dc in the same st, 1 dc in the next 15 ( 15, 16, 17, 17) sts, inc in next (1 dc, ch 2, 1 dc in the same st), 1 dc in next 20 (20, 20, 22, 22) sts, 1 inc in next, 1 dc in next 32 (32, 34, 36, 36 )sts, 1 inc in next, 1 dc in next 20 (20, 20, 22, 22) sts, 1 inc in next, 1 dc in next 16 (16, 17, 18, 18 ) sts. Join with a sl st with 1st dc.
Cut the Yarn
Round 2
We will start this round in the right corner of the back using the main color, Mint Green
back – Join the yarn here in the corner and ch 5 ( ch 3 as a first dc, and ch 2 for the increase) 1 dc in the same ch 2 space, 1 dc in the next sts to the next corner, inc in corner.
1st Sleeve: Change with the color for the sleeves ( finish the last dc with the new color). 1 dc in each st to the next corner, change color before corner, 1 inc in corner.
Front: 1 dc in next 2 (2, 3, 4, 4 sts), 1 BPDC in the next 4 sts, 1 dc in the next 2, 1 BPDc in the next 8 sts, 1 dc in the next 2, 1 BPDc in the next 8 sts, 1 dc in the next 2, 1 BPDc in the next 4 sts, 1 dc in next sts to the corner, 2 (2, 3, 4, 4), 1 inc in corner and change the color before finish the last dc of the increase.
2nd sleeve: 1 dc to the end of the round. Join with a sl st with the 3rd st of starting chain. Ch 3 and turn.
Round 2
Sleeve: 1 dc to the next corner.
Front: finish the last st of the sleeve with the main color, 1 inc in corner, 1 dc in each st to the first set of 4 FPdc, 1 FPDc in the next 4 sts, 1 dc in next 2, skip the next 4 sts (we are making the first cable), 1 FPTrc in the next 4 sts. Turn to the skipped sts and make 4 FPTrc in the skipped sts. Make the sts by inserting the hook under the previous 4 FPTrc you just made.
Continue with 1 dc in the next 2 sts. Now the second cable:
Skip the next 4 sts, 1 FPTrc in the next 4 sts. Turn to the skipped sts and make 1 FPTrc over the previous 4 FPTrc you just made. 1 dc in the next 2 sts, 1 FPDc in the next 4, 1 dc in the next sts to the corner, 1 inc in corner.
Sleeve: change the color and make 1 dc in each st to the corner
Back: change the color before corner, 1 increase in corner, 1 dc in each st to the end of the round. Join with sl st with the 3rd st of the starting chain. turn
Round 3
Back: Start with a sl st to the ch 2 space, ch 5, 1 dc in the same space, 1 dc in each st to the next corner, 1 inc in corner.
Sleeve: change the color, 1 dc in each st to the next corner
Front: change the color, 1 inc in the corner, 1 dc in the next sts to the first set of 4 BPDc, 1 BPdc in the next 4 sts, 1 dc in next 2, 1 BPDc in the next 8 sts, 1 dc in next 2, 1 BPDc in the next 8, 1 dc in the next 2, 1 BPDC in the next 4 sts, 1 dc in each st to the corner, 1 inc in corner.
*when working the stitches over the cables pay attention at the position of the sts because they are crossed.
Sleeve: change color, 1 dc in each st to the end of the round. Join with a sl st with the 3rd st of the starting chain. Ch 3 and turn
*pay attention that the last st of the sleeve has to be on the top of the first st of the increase you made on the previous round.
Round 4
Sleeve: 1 dc in each st to the next corner
Front: change the color, 1 inc in corner, 1 dc in each st to the first set of 4 FPDc, 1 FPDc in the next 4 sts, 1 dc in the next 2, 1 FPDC in the next 8 sts, 1 dc in the next 2 sts, 1 FPDc in the next 8 sts, 1 dc in the next 2 sts, 1 FPDc in the next 4 sts, 1 dc in each st to the corner, 1 inch in corner.
Sleeve: change the color, 1 dc in each st to the corner
Back: change the color, 1 inc in corner, 1 dc in each st to the next corner, 1 inc in corner Sl st with the 3rd st of the starting chain and turn.
Round 5
Back: SL st to the first corner, ch 5, 1 dc in the same ch 2 space, 1 dc in each st to the next corner, 1 inc in corner.
Sleeve: change color, 1 dc in each st to the next corner
Front: change color, 1 inc in corner, 1 dc in each st to the first 4 set BPDc, 1 BPDc in the next 4 sts, 1 dc in next 2 sts, 1 BPDc in the next 8 sts, 1 dc in the next 2, 1 BPDc in next 8 sts, 1 dc in next 2, 1 BPDc in next 4 sts, 1 dc in each st to the corner, 1 inc in corner.
Sleeve: change color, 1 dc in each st to the end of the round. Sl st with the 3rd st of the starting chain. Ch 3 and turn.
Next, you will have to repeat rounds 2 – 5 to the end of the yoke part:
S – 18 rounds
M – 22 rounds
L – 26 rounds
XL – 34 rounds
XXL – 38 rounds
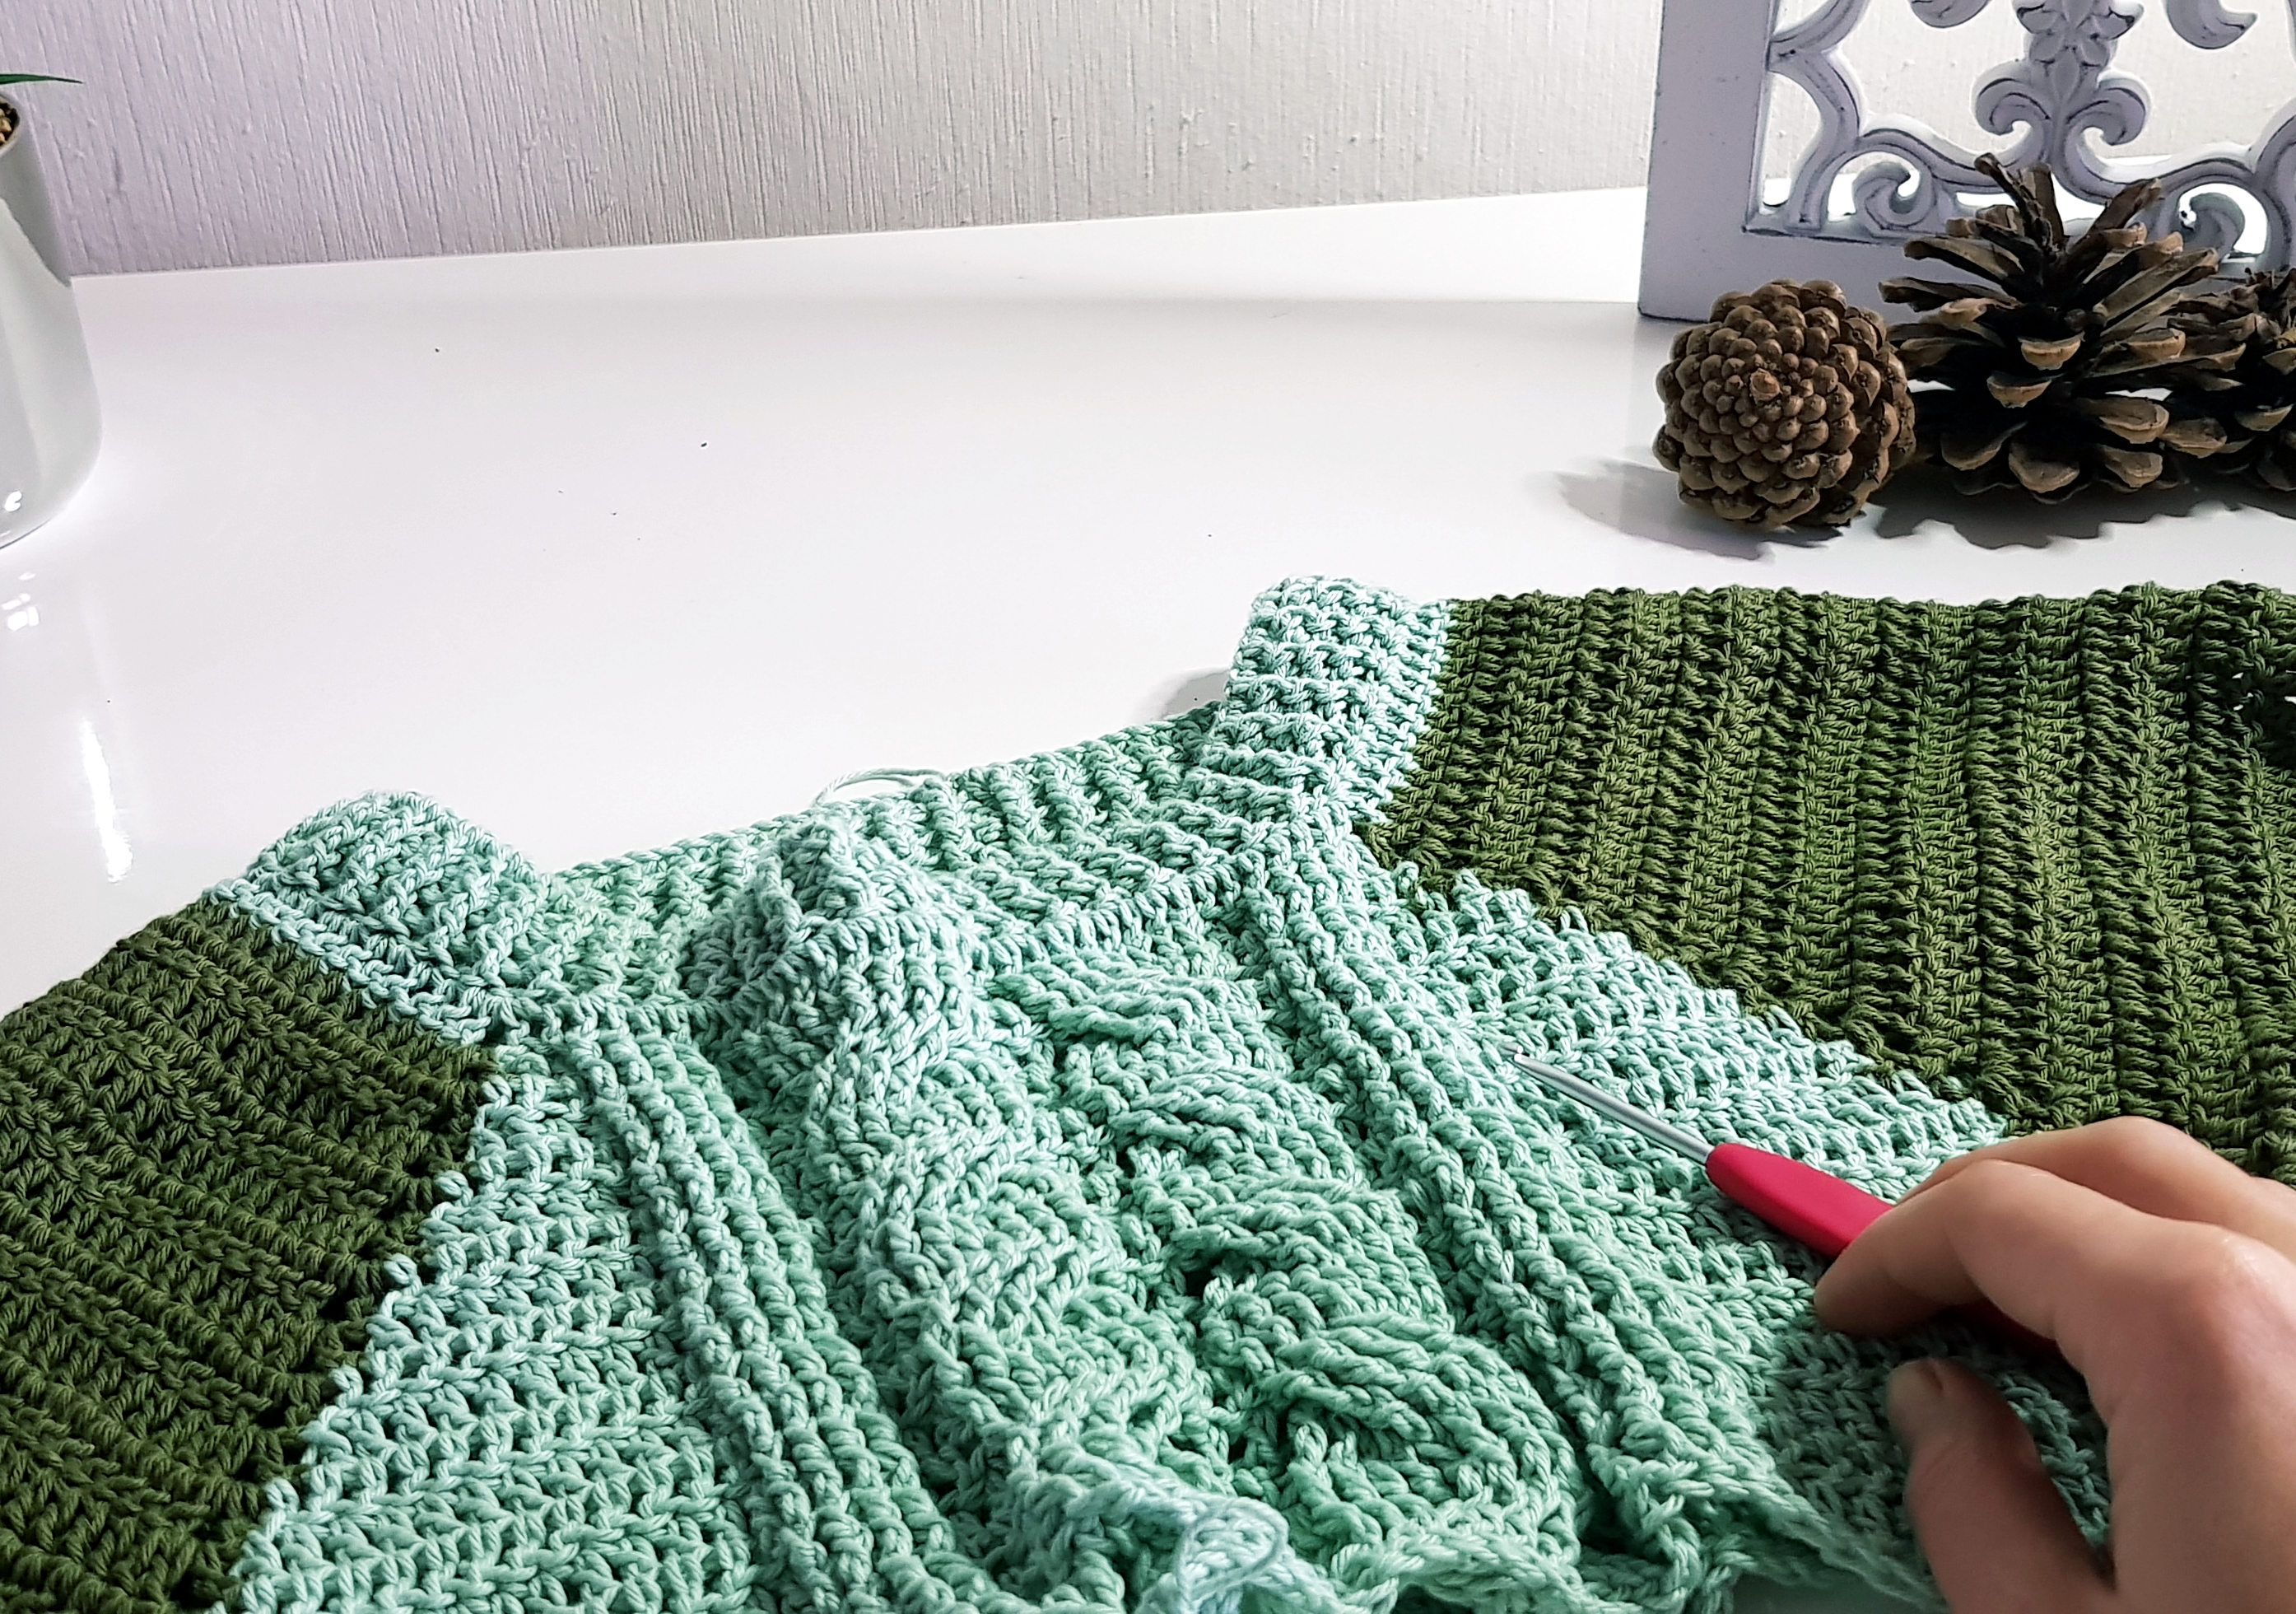
*This sweater has a closer fit. If you want to be larger or you think is becoming to big just make on the yoke as many rounds as you need to have the desired measurement of the chest circumference.
Body
Starting with the separating round, we will only work with the main color. Cut all the yarns and we will start this round from the corner you finished the previous round.
Round 1
Make sure you are working on the wrong side
Ch 2 in the ch 2 space, 1 partial dc in the same space, skip the sts for the sleeve, 1 partial dc in the next corner.
Continue with the sts that you have (if your next section is the front continue with the cables, if the next section is the back continue with 1 dc to the next corner).
In next corner, 1 partial dc, skip the sts for the sleeve, 1 partial dc in in the next corner. Continue with the sts for back or front. Join with a sl st with the cluster dc that you made at the beginning of the round. Ch 2 and turn
*Ch 2 at the beginning of the round doesn’t count as a st.
Continue working following the cables pattern on the front side until you get to the desired length or until you have in total:
S – 33 rounds
M – 33 rounds
L – 34 rounds
XL – 33 rounds
XXL – 28 rounds
Finish the body by adding the ribbed band. You can make the ribbed band in the color that you are using for the sleeves.
Sleeves
We will start the sleeves at the arm pit. Join the yarn in one of the 2 ch space.
We will work the sleeves by turning after each round.
Ch 2 at the beginning of the round doesn’t count as a stitch.
Round 1
Ch 2, 1 partial dc in the same ch 2 space, 1 partial dc in the next ch 2 space, yarn over and pull the yarn through all loops on your hook. Continue with 1 dc in each st to the end of the round. Sl st with the cluster dc that you made at the beginning of the round. Ch 2 and turn.
Repeat round 1, working 1 dc in each st until you get to the desired length or until you have in total:
S – 26 rounds
M – 26 rounds
L – 27 rounds
XL – 27 rounds
XXL – 26 rounds
To make the sleeves smaller and follow the next 2 rounds
- ch 2, 1 dc in the same st, skip 1, 1 dc in next or 2 dc cluster to the end of the round
- Ch 2, 1 dc in the same st, 1 dc in next, skip 1, 1 dc in next 2 or 3 sts depending how small you need the sleeves to be.
After these round add the ribbed band in the other color that you used for the rest of the sweater.
If you are done with the sleeves, all you have to do next is to wave in the few end that you have and done, The Spring Time Cable Sweater is done.
Bellow you will find the video tutorial for the sweater that I hope will help you:
I hope you will have a good time making this Spring Time Cable Sweater. Can’t wait to see your photos.

https://nl.pinterest.com/katerina6795/free-crochet-patterns/


Comments are closed.