
Levanda Shirt
It’s time to add one more Spring – Summer crocheted garment to our wardrobe: the Levanda Shirt. I already did mine and I’m about to share with you this wonderful pattern.
Pentru Postarea in limba romana click aici
Voor het patroon in het nederlands,klik hier

I just love shirts and it’s been a while since I wanted to make a crocheted one. They are so simple to wear, even if you want a more office outfit or a casual one. And of course has to be off shoulders. Don’t know why, but this off the shoulders shape is on my favorites this season, so maybe you will see most of my patterns this way.
You can purchase the add free, easy printable, instant download pdf version of this pattern here:
 Can’t tell you how happy I am with this Levanda Shirt. Was one of the project that didn’t get me into trouble at all and everything worked just perfect. So, let’s see what it’s all about.
About Design
Again, this Levanda Shirt is worked top – down using the Raglan Technique. You already know that I’m a huge fan of top – down sweaters, blouses, tops and so on, so this couldn’t be other way.
We will first work a double brim at the beginning and to make sure that the shirt won’t fall off the shoulders, we will insert an elastic band through it. After making the brim we will start working the yoke, then we will separate the sleeves and we will work the 3 main parts individually.
At the bottom I designed this Levanda Shirt to have a shirt shape. So the bottom is not straight and on the last few rows of the body we will make some decreases and work the front panels and the back panel separately.
The sleeves are a bit larger from the yoke and we will decrease for a few rounds at the beginning, because this time I didn’t want them to be too large. Off course, again the sleeve are 3/4, but if you want you can make them longer just by adding a few more rounds. Also if you want that your Levanda Shirt to be with shirt sleeves you can let the length resulted from the yoke part or simply make less rounds then in the pattern.

Materials you will need
- Yarn
Fingering, Size 1, 4 ply, Super Fine Yarn
I used Cotton Kings Cone 500 from Hobbii. Is the same beautiful cotton yarn as Cotton Kings 8/4 only that it comes in a 500 grams cone, which is awesome because in this way you will have less knots in your project.
- Crochet Hook
3.5 mm ( size E) crochet hook
- Some stitch markers
- an elastic band ( has to measure with 1 – 2 cm less then you shoulder circumference )
- Tapestry niddle
- Scissors
Final measurements
This pattern is available in 5 sizes, from Small to 2X Large and is written in US terms. Final Measurements are listed in the diagram below:

How much Yarn do you need:
- S – 320 grams / 1088 m (1 cone or 7 skeins of 50 grams and 170 m)
- M – 350 grams / 1190 m ( 1 cone or 7 skeins)
- L – 390 grams /1326 m / (1 cone or 8 skeins)
- XL – 410 grams / 1400 m (1 cone or 9 skeins)
- XXL – 430 grams /1460 m (1 cone or 9 skeins)
About the stitch pattern
We will use 2 simple sts for this Levanda Shirt: single crochet for the brim and V Stitch for the rest of the shirt.
V stitch
1 dc, ch 1, 1 dc in the same stitch or ch 1 space of the previous round V st. If you are working the V stitch into a chain, skip 2 sts between the V’s.
Abbreviations used in this pattern
- ch – chain
- sc -single crochet
- dc – double crochet
- V st – V stitch
- sl st – slip stitch
- st(s) – stitch (es)
- Inc C – increase corner ( 1 V st, ch 2, 1 V st in the same st/ch 1 space)
Gauge
- 20 sc = 10 cm (4″)
- 7 V sts = 10 cm (4″)
- 10 rows in V st = 10 cm (4″)

You can purchase the add free, easy printable, instant download pdf version of this pattern here:
And I think we are done with all details and we can start.
First, foundation chain:
- S – 185 sts
- M – 203 sts
- L – 221 sts
- XL – 239 st
Brim
Row 1: Ch 1, 1 sc in the first st, 1 sc in each st to the end of the row, ch 1 and turn
Row 2: 1 sc in each st to the end of the row
Rows 3 to 8: Repeat row 2
Row 9
Fold the piece in half, and you will work this row imaking one single crochet in each st, but inserting the hook through both sides.

Yoke
Use 4 stitch markers to mark the 4 corners and the sides of the shirt: back, front and sleeves.
- S – 29 sts for the front panels, 32 sts for sleeves and 59 sts for back panel
- M – 32 sts for the front panels, 35 sts for sleeves and 65 sts for back panel
- L – 35 sts for the front panels, 38 sts for sleeves and 71 sts for back panel
- XL – 38 sts for the front panels, 41 sts for sleeves and 77 sts for back panel
- XXL – 41 sts for the front panels, 44 sts for sleeves and 83 sts for back panel

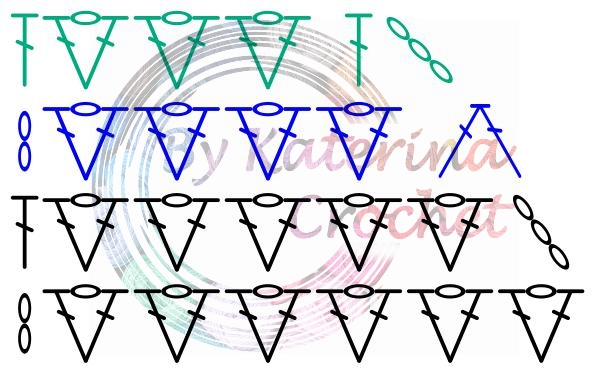
Starting with the yoke we we will make the V st. The pattern for the yoke is a 2 rows repeat and you can follow the stitch chart below:

Row 1
*the numbers for the sizes Medium, Large, 1X large and 2 X Large are between brackets.
Ch 2, skip 1 st, [1 V st in next, skip 2 sts]. Repeat the section between [ ] until you have 9 (10, 11, 12, 13) V sts, skip the next 2 sts, 1 inc C in next (1 v st, ch 2, 1 V st in the same st). Skip next 2 [1 V st in next, skip 2 sts]. Repeat the section between [ ] until you have 10 (11, 12, 13, 14) V sts. Skip next 2, 1 inc C in next, skip next 2 sts, [1 V st, skip2 sts] until you have 19 (21, 23, 25, 27) V sts, skip 2, 1 inc C in next, skip 2 sts, [1 V st in next, skip 2 sts]. Repeat the section between [ ] until you have 10 (11, 12, 13, 14) V sts. Skip the next 2, [ 1 V st in next, skip 2] until you have 9 (10, 11, 12, 13), skip 1 st, 1 dc in the last. Ch 2 and turn.
Ch 2 at the beginning of the round count as a first dc.
Row 2
Starting with row 2, we will make the V sts in the ch 1 space of the previous row V st. So, when the pattern says “next st” that means in the next ch 1 space of the previous row V st.
1 V st in the next st, repeat until corner, in the ch 2 space from the corner make 1 V st. Repeat to the end of the row, ending the row with 1 dc in the 2nd st of the starting chain. Ch 2 and turn.
Row 3
1 V st in each st until the V st made on into the ch 2 space on the previous row. In this stitch make 1 inc C. Repeat to the end of the row, ending the row with 1 dc in the 2nd st of the starting ch.

Repeat rows 2 and 3 until you will finish the yoke and have in total:
- S – 11 rows
- M – 12 rows
- L – 13 Rows
- XL – 15 Rows
- XXL – 16 rows
Body
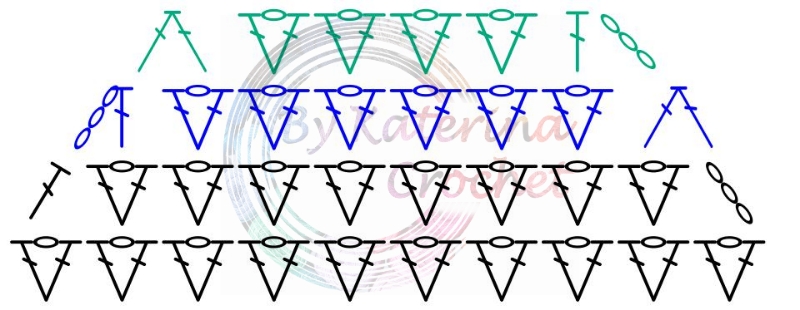
First row of the body will be the separating row. We will separate the sleeves from the body of the Levanda Shirt.
Row 1
Start the row as usual, Working 1 V st in each st until getting to the corner, in the corner make 1 V st, ch 14, skip the sts for the sleeves, make 1 V st into the next corner. Continue making 1 V st in each st until you get to the opposite sleeve and proceed the same. Finish the row working 1 V st in each st and 1 dc in the 2nd st of the starting ch. Ch 2 and turn.

Row 2
1 V st in each st until the armpit ch, skip 2 ch sts, [1 V st in next, skip 2] 4 times. Continue with 1 V st in each st until you get to the next armpit ch and proceed the same as in the opposite side. Continue with 1 V st in each st to the end of the row. 1 dc in the 2nd st of the starting ch, ch 2 and turn.
Row 3
1 V st in each st to the end of the row. Finish the row as usual with 1 dc in the second st of the starting ch. Ch 2 and turn.

Rows 4 – 33: Repeat row 3.
If you want a shorter or longer shirt, here you can adjust the length, by making less or more rows.
Bottom body
After making the 33 rows we will shape a bit the bottom of the shirt and making some decreases. If you want you can skip this part and let the bottom of the shirt straight. If you need more length, repeat row 3 few more times.
Use 2 st markers to mark and separate the front panel from the back panel, because we will work the 3 parts individually.

The both 2 front panels are worked in the same way. Only that you will start the right front panel from the straight edge, and the left front panel, from the side, where you put the stitch marker.
When you are starting from the side, you will start with a decrease. Join the yarn into the the V st marked, ch 3, and 1 V st in next. Continue with 1 V st in each st, until the end of the row. 1 dc in the 2nd st of the starting ch.
When you are starting from the straight edge, start the row as usual, work 1 V st in each st and in the last one, the marked one make just 1 dc.
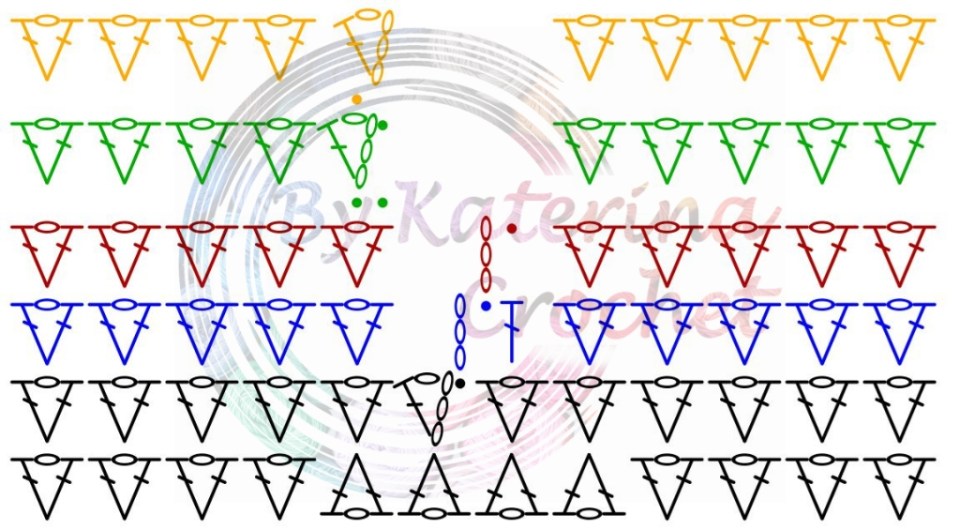
Below you can find the stitch chart for the bottom part of the front panels
Right front panel
Row 1
Ch 2, 1 V st in each st until you get to the marked stitch, 1 dc in the last V st or the marked one.
Row 2
Ch 3, 1 dc in the next V st, 1 V st in each st to the end of the row. 1 dc in the 2nd st of the starting chain.
Row 3
Ch 2, 1 V st in each st until you get to the last one, 1 partial dc in the last V st, 1 partial dc in the 3rd st of the starting chain. yarn over and pull the yarn through all the loops on your hook.
Repeat rows 2 and 3 until you have 8 rows.
Left Front Panel
Row 1
Start the row in the marked stitch, ch 3, 1 V st in each stitch to the end of the row. 1 dc in the 2nd st of the starting chain
Row 2
Ch 2, 1 V st in each st until you get to the last V st, 1 partial dc into the last V st, 1 partial dc into the 3rd st of the starting chain. Yarn over and pull the yarn through all the loops on your hook.
Row 3
Ch 3, 1 dc in the next V st, 1 V st in each stitch to the end of the row, 1 dc in the 2nd st of the starting chain.
Repeat rows 2 and 3 until you have 8 rows.
Back panel
We will work the back panel following the stitch chart below:
Row 1
Ch 3, 1 V st in each st until you get to the last one, 1 dc in the last V st.
Row 2
Ch 3, 1 dc in the next V st, 1 V st in each st until you get to the last one. In the last V st make 1 partial dc, 1 more partial dc in the 3rd st of the starting chain. Yarn over and pull the yarn through all loops on your hook.
Repeat row 2 until you have 10 rows in total. The back panel will be longer then the front panels.

We will have to add to the body a border in single crochet but after we will make the border on the edges of the front panels. We will move forward to the sleeves and we will come back for the border.
Sleeves
We will work the sleeves in rounds, only on the right side.
We will join the yarn at the armpit
Round 1
Ch 4, 1 dc in the same st, 1 V st in each st to the end of the round.

Starting with round 2 we will start to decrease. We will work the rounds with decreases following the stitch chart below:
Round 2
Ch 3, skip the 1st V st, 1 V st in next. 1 V st in each st until you get to the last V st. 1 dc in the last V st and join with a sl st with the 3rd st of the starting ch.
Round 3
Ch 3, 1 V st in each st around. Join with a sl st with 3rd st of the starting chain.
Round 4
Sl st to the ch 1 space of the next V st. Ch 4, 1 dc in the same space. 1 V st in each stitch to the end of the round. Sl st with the 3rd st of the starting ch.
Round 5
Repeat round 4. (you will have now to slip only one st)
Next, repeat rounds 2 to 5 3 more times until you have in total 13 rounds.
Continue then 10 more rounds without decreasing (repeating basically the last made round), If you want a longer sleeve you can adjust the length by making more then 10 rounds.
After finishing decreasing, if you consider that the sleeve is still large you can repeat the 4 rounds one more time or as many time as you need. Also you can repeat the 4 rounds less times if you want a larger sleeve.
After finishing the length of the sleeve we will add a few more rounds in single crochet.
I made 5 rounds.
Round 1: 1 sc in each st around
Round 2: 1 sc in the first st, [1 dec in next 2 (2 single crochet worked together), 1 sc in next 3 sts.]. Repeat the section to the end of the round.
Round 3: Repeat round 2
Rounds 4 and 5: Repeat round 1.
And one sleeve is done. Repeat the pattern for the other sleeve.

Next, we will have to make the margins of the front panels, but first we will insert an elastic band through the top border. Use a safety pin to make it easy.

After you inserted the elastic band, sew the ends of the elastic band to make sure it will stay in place.
We will work for the front panels margins 5 rows in sc. On the left side we will let some button holes. I made the button holes by ch 2, skip 2, at every 8 sts on the row 3.
After making the front panels margins we will work 5 rows in single crochet on the bottom of the body too.
Starting with the second round, the 3 sts that are in vale will be worked together.

And done. The Levanda shirt is ready to be worn and I truly will love to see all your make. Please try to make it, besides of how long this pattern might look, it’s not that difficult, only that I tried as usual to give you as many details as possible.
You can purchase the add free, easy printable, instant download pdf version of this pattern here:


