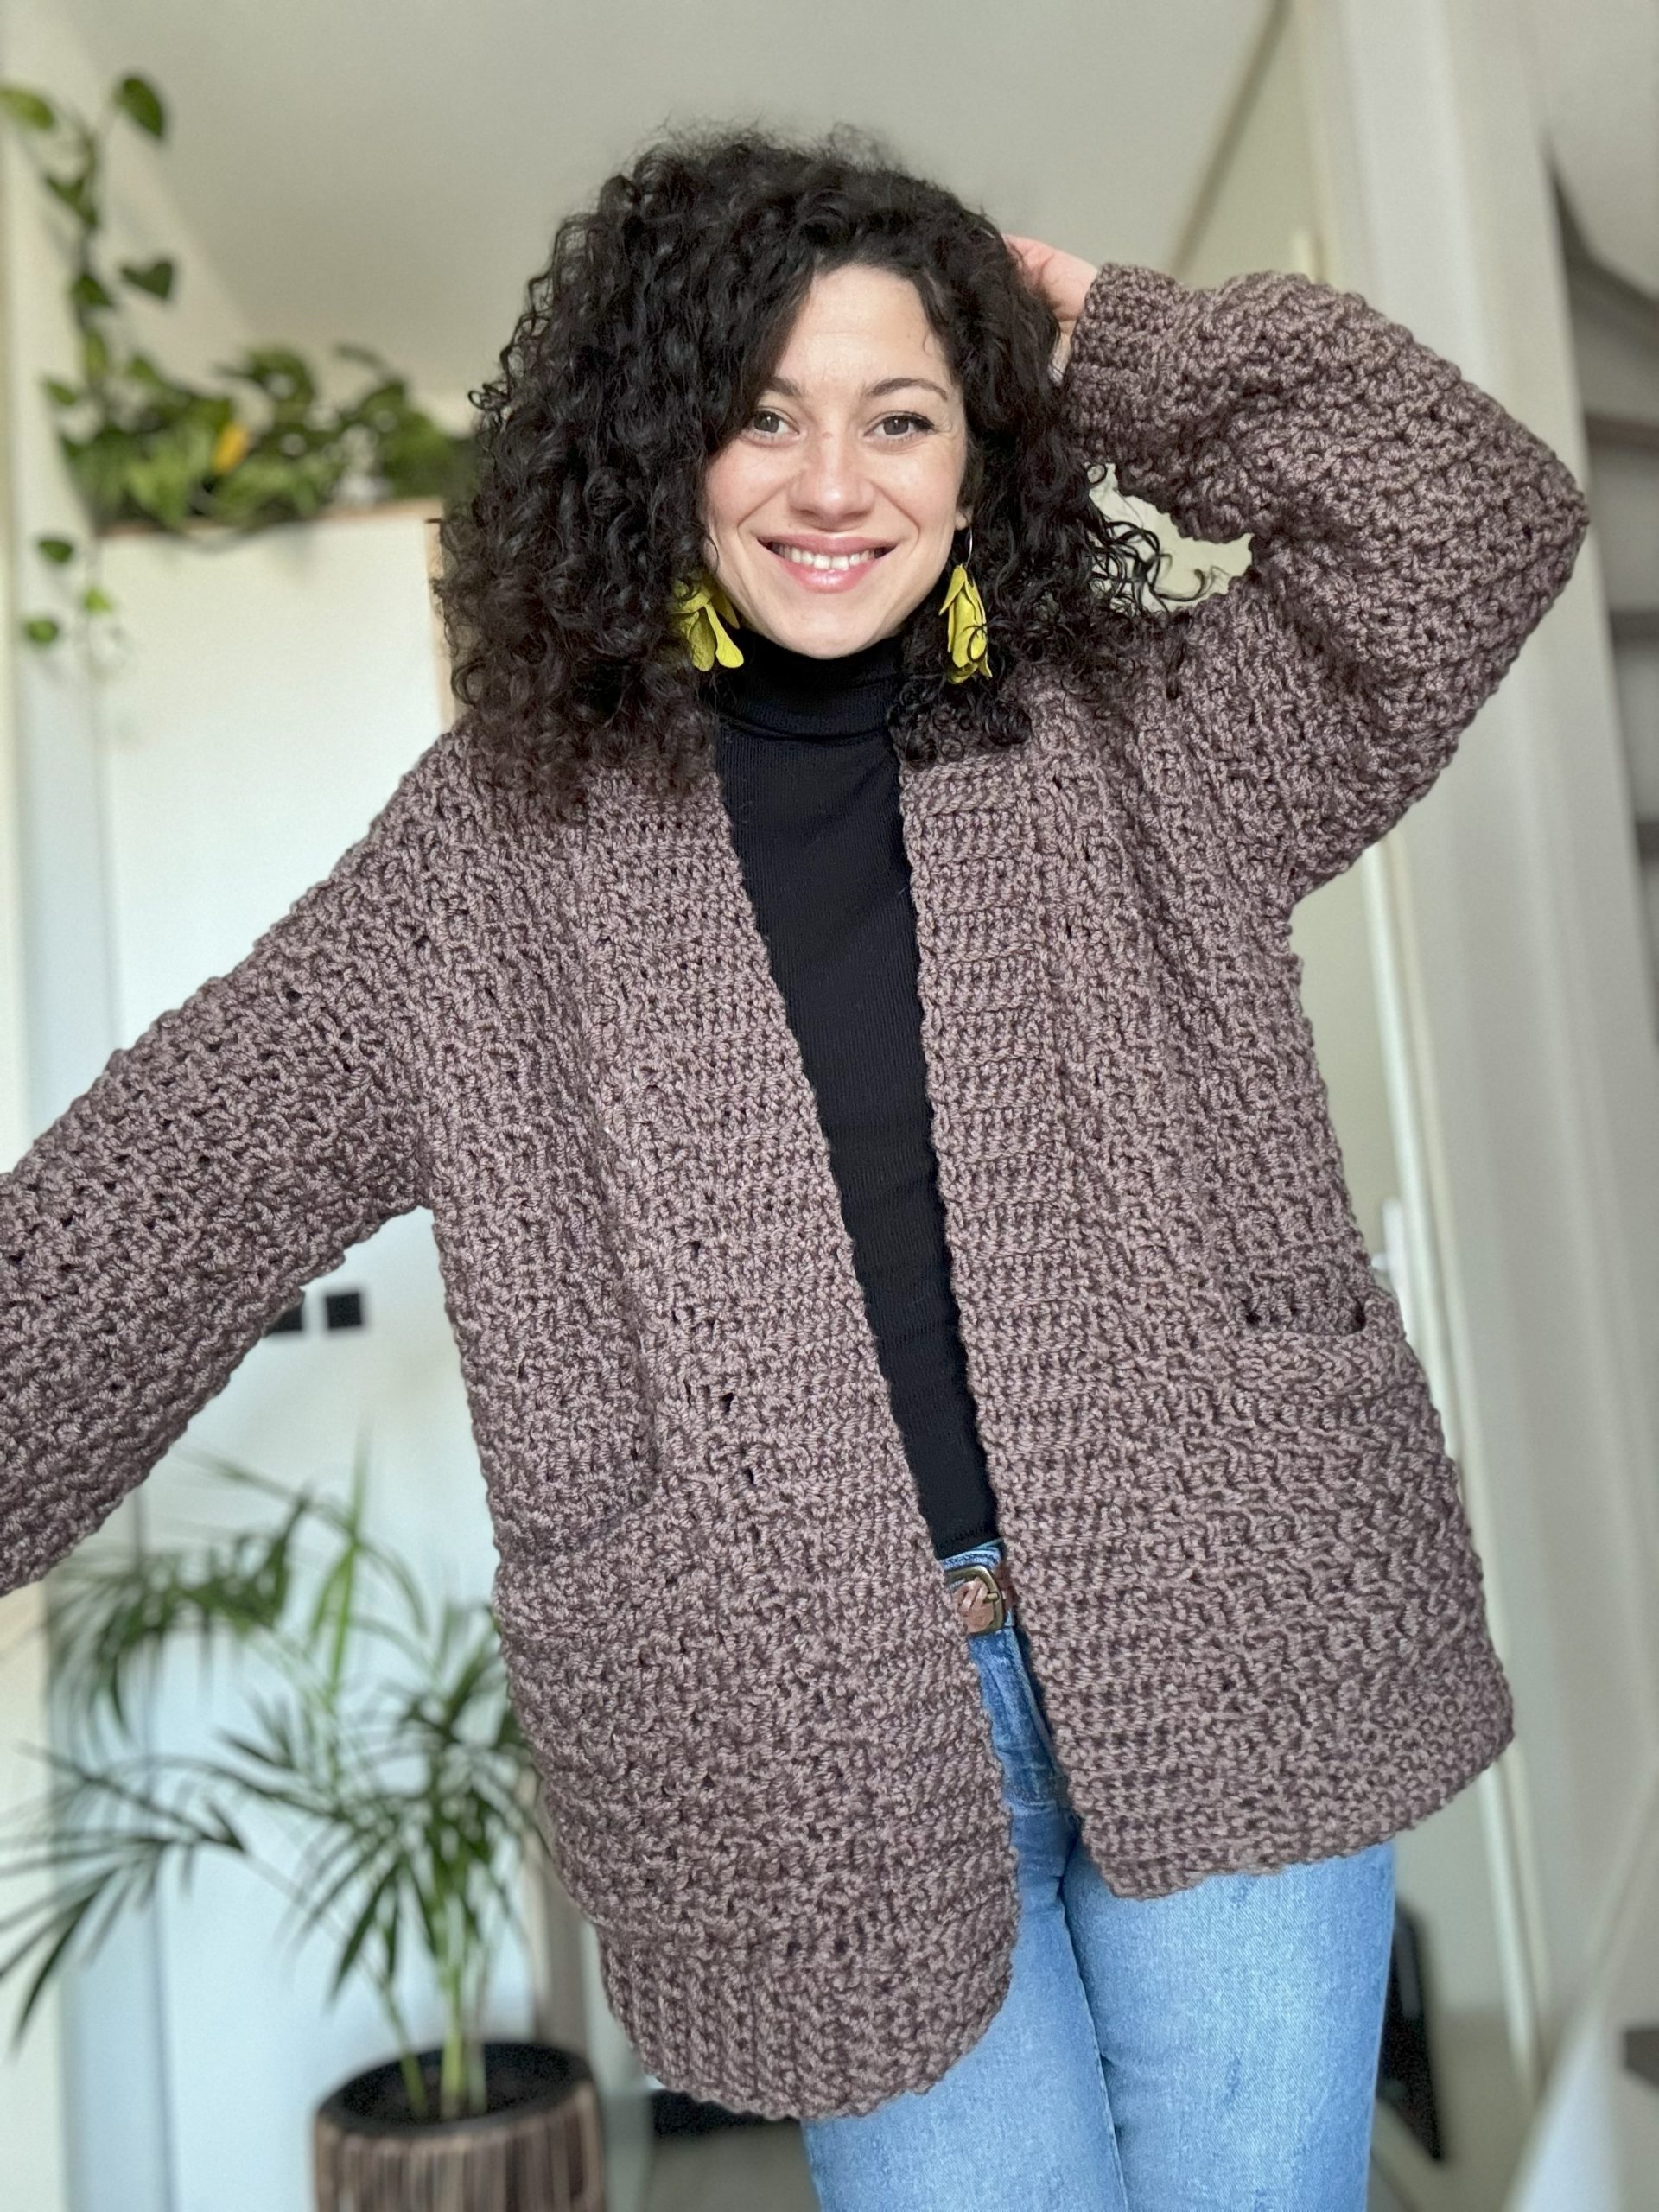
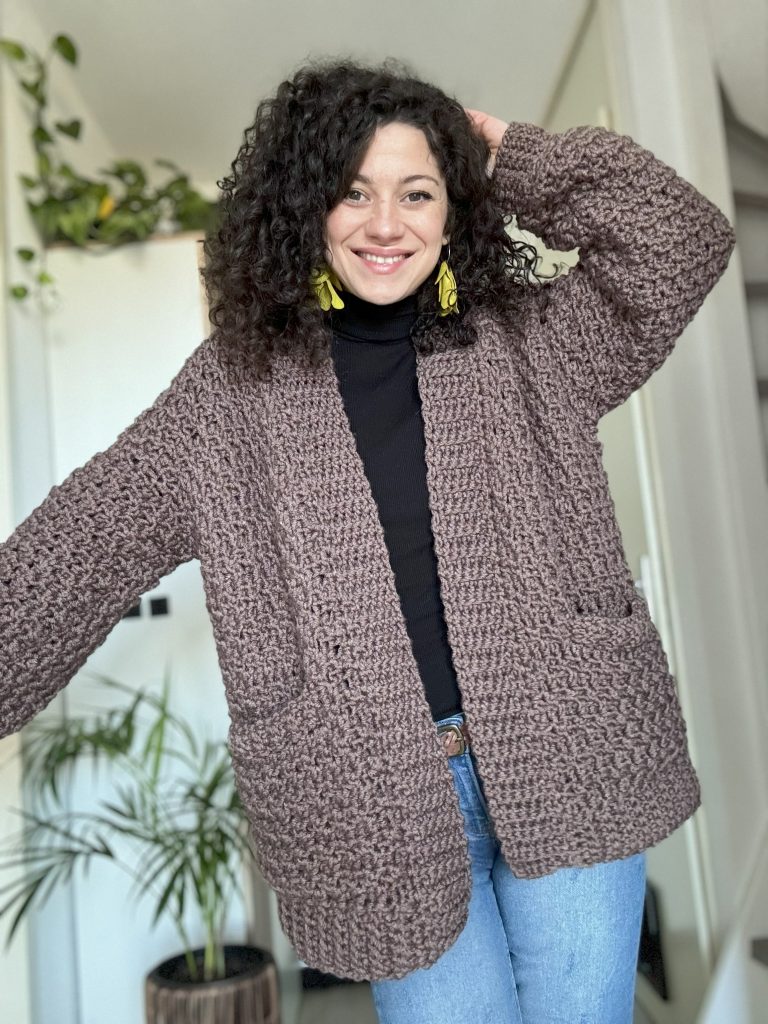
I am thrilled to introduce the latest pattern for the Dare To Be Cozy Cardigan!
This cardigan design emerged spontaneously, unplanned but destined to become something special. When the wonderful team at Durable Yarn approached me to test their new Durable Dare yarn, I was genuinely grateful. I casually mentioned that I envisioned crafting an oversized cardigan with their yarn. Upon receiving the yarn, I committed to the idea and began experimenting with various half-double crochet variations—one of my favorite basic stitches.
After several iterations, I arrived at a final stitch pattern variation that captivated me. This variation not only aligns with my vision for the oversized cardigan but also creates a fascinating texture effortlessly. Join me on this creative journey as we explore the unique charm of the Dare To Be Cozy Cardigan, a design born out of spontaneity and enhanced by the delightful qualities of Durable Dare yarn.
Pentru postarea in Limba Romana, click aici
You can purchase the easily printable PDF pattern here at the links below.
NEW!!! you can now purchase the PDF Written Pattern and the KIT here: Yarnsea.com
MATERIALS
• Yarn: Size 5 , Bulky weight yarn
• Crochet Hook:
o 8 mm crochet hook
• yarn needle for weaving in ends
• Scissors
NOTES ABOUT DESIGN
Introducing our latest crochet pattern: The Dare To Be Cozy Cardigan!
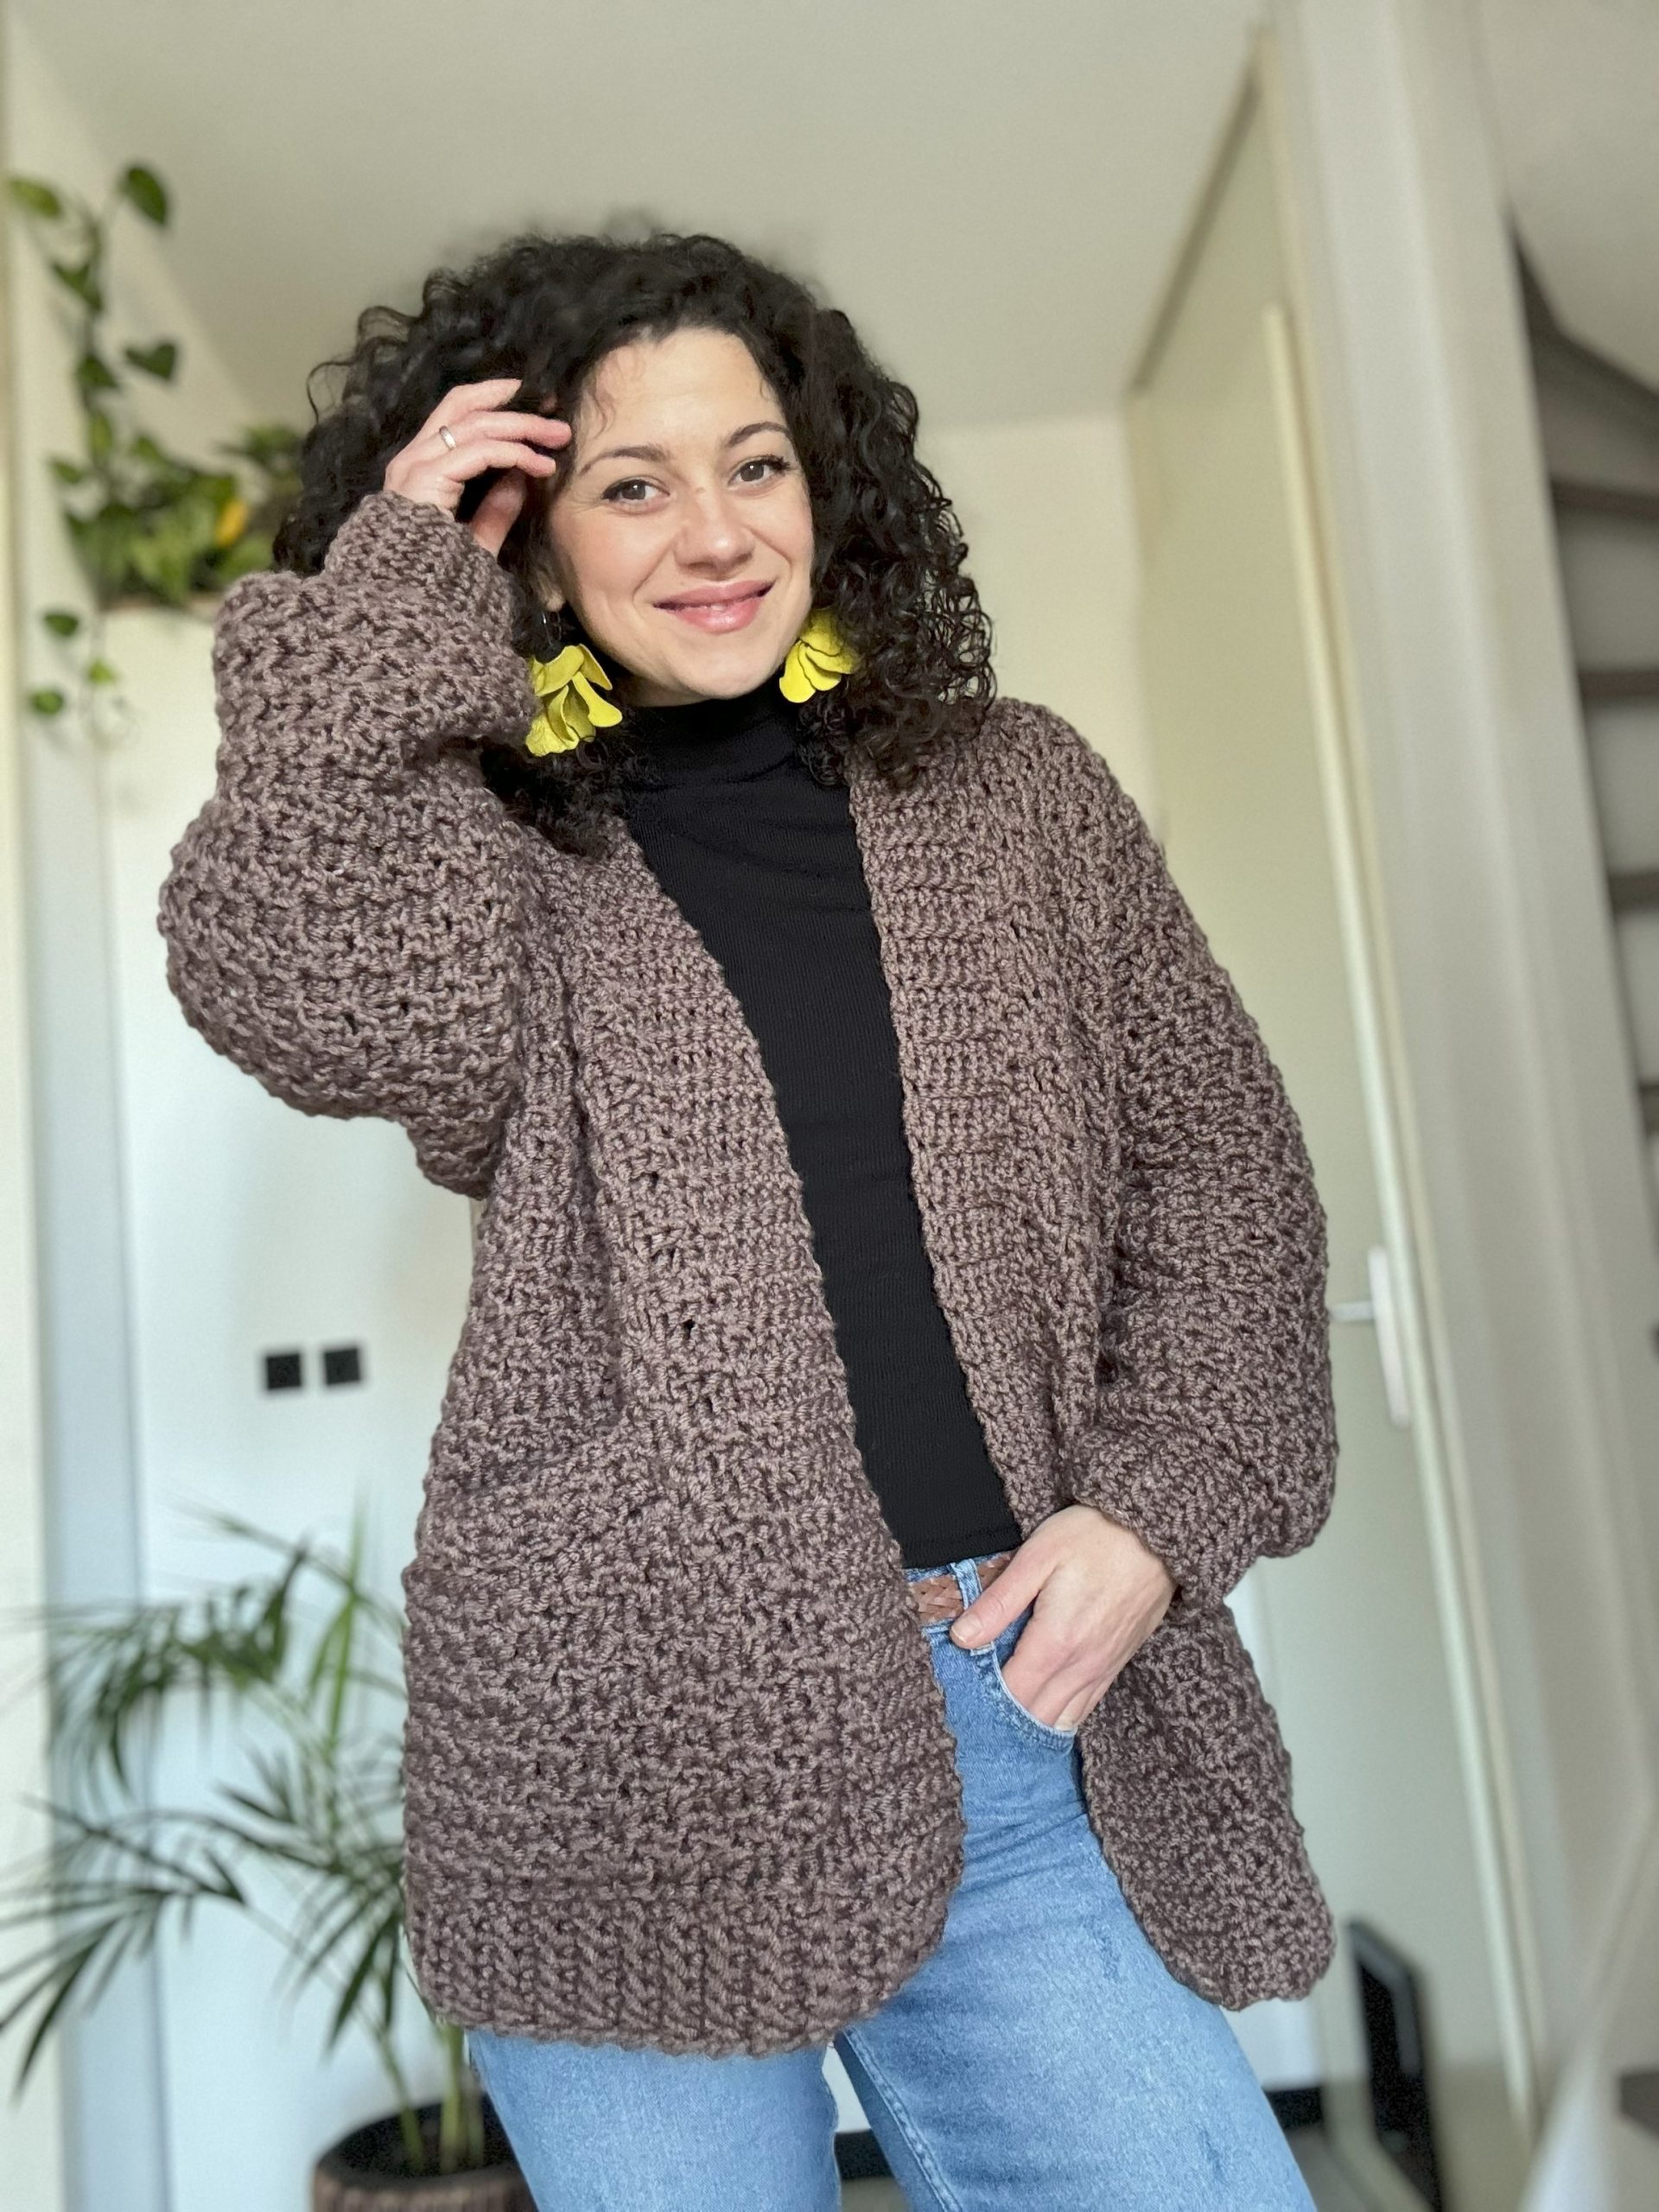
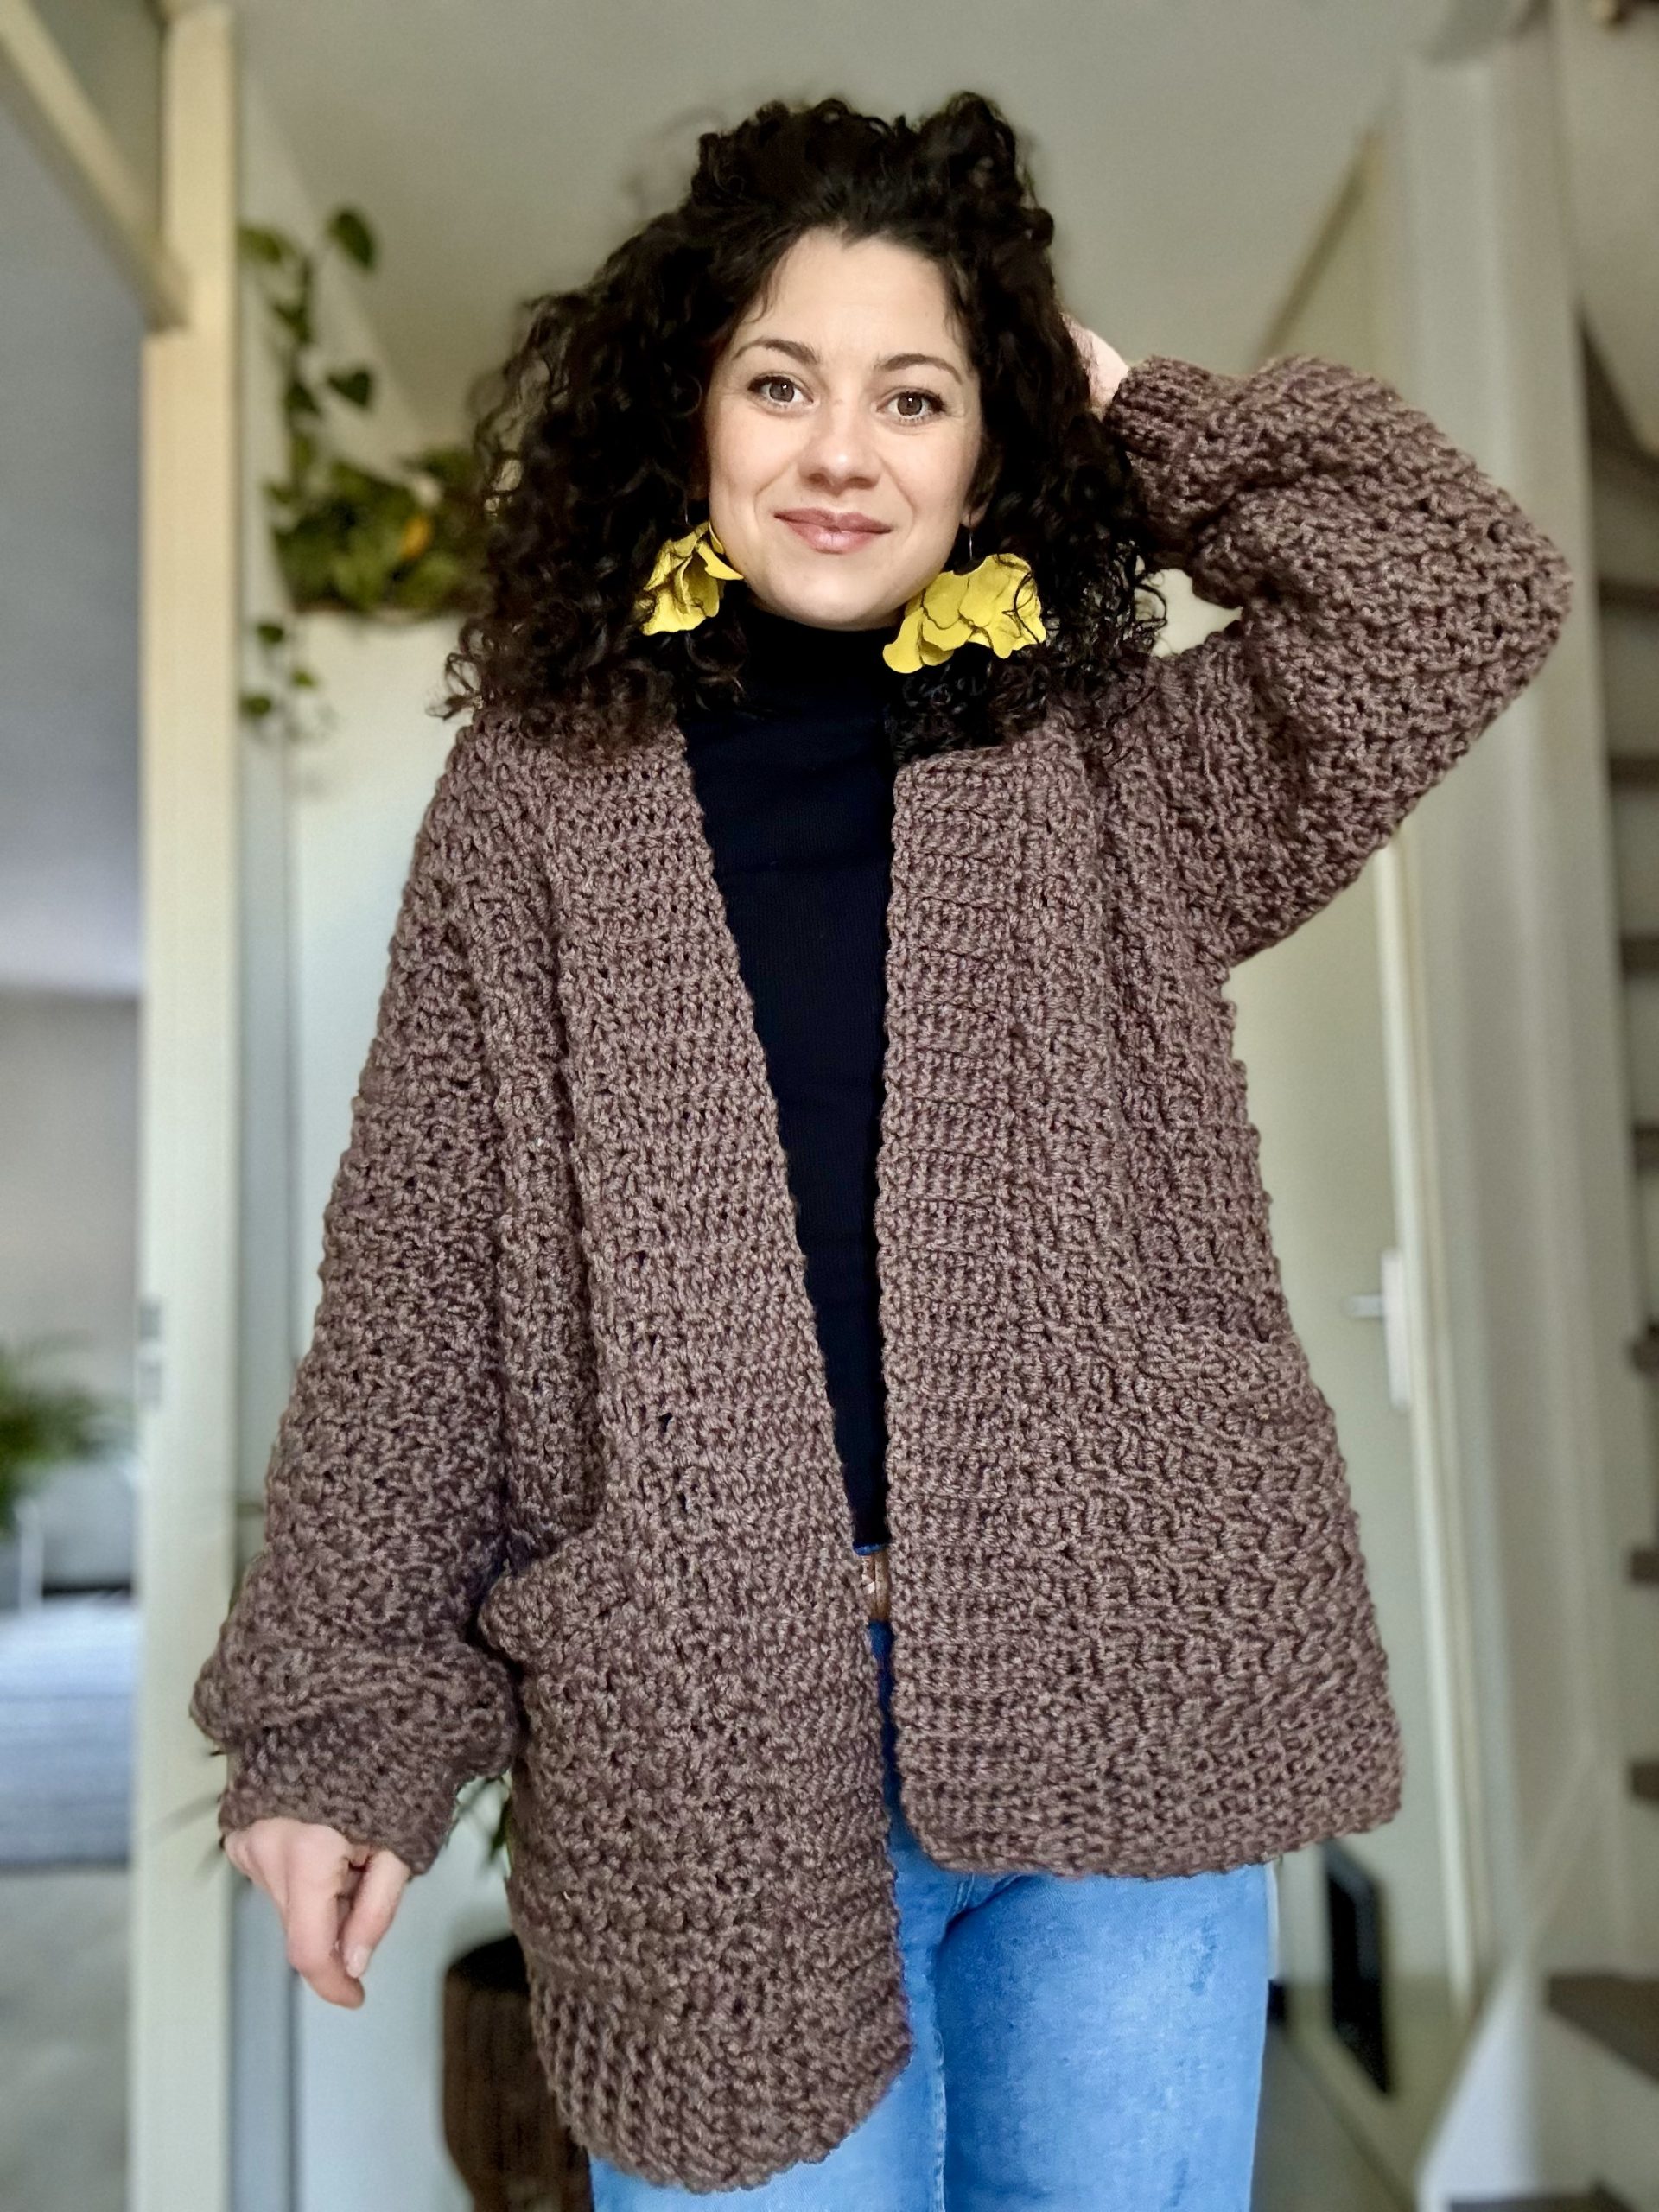
Crafted with care and comfort in mind, this cardigan is a stylish addition to your wardrobe. Using a size 5 yarn in a textured stitch pattern, the Cozy Cardigan boasts a warm and inviting feel, perfect for those chilly days.
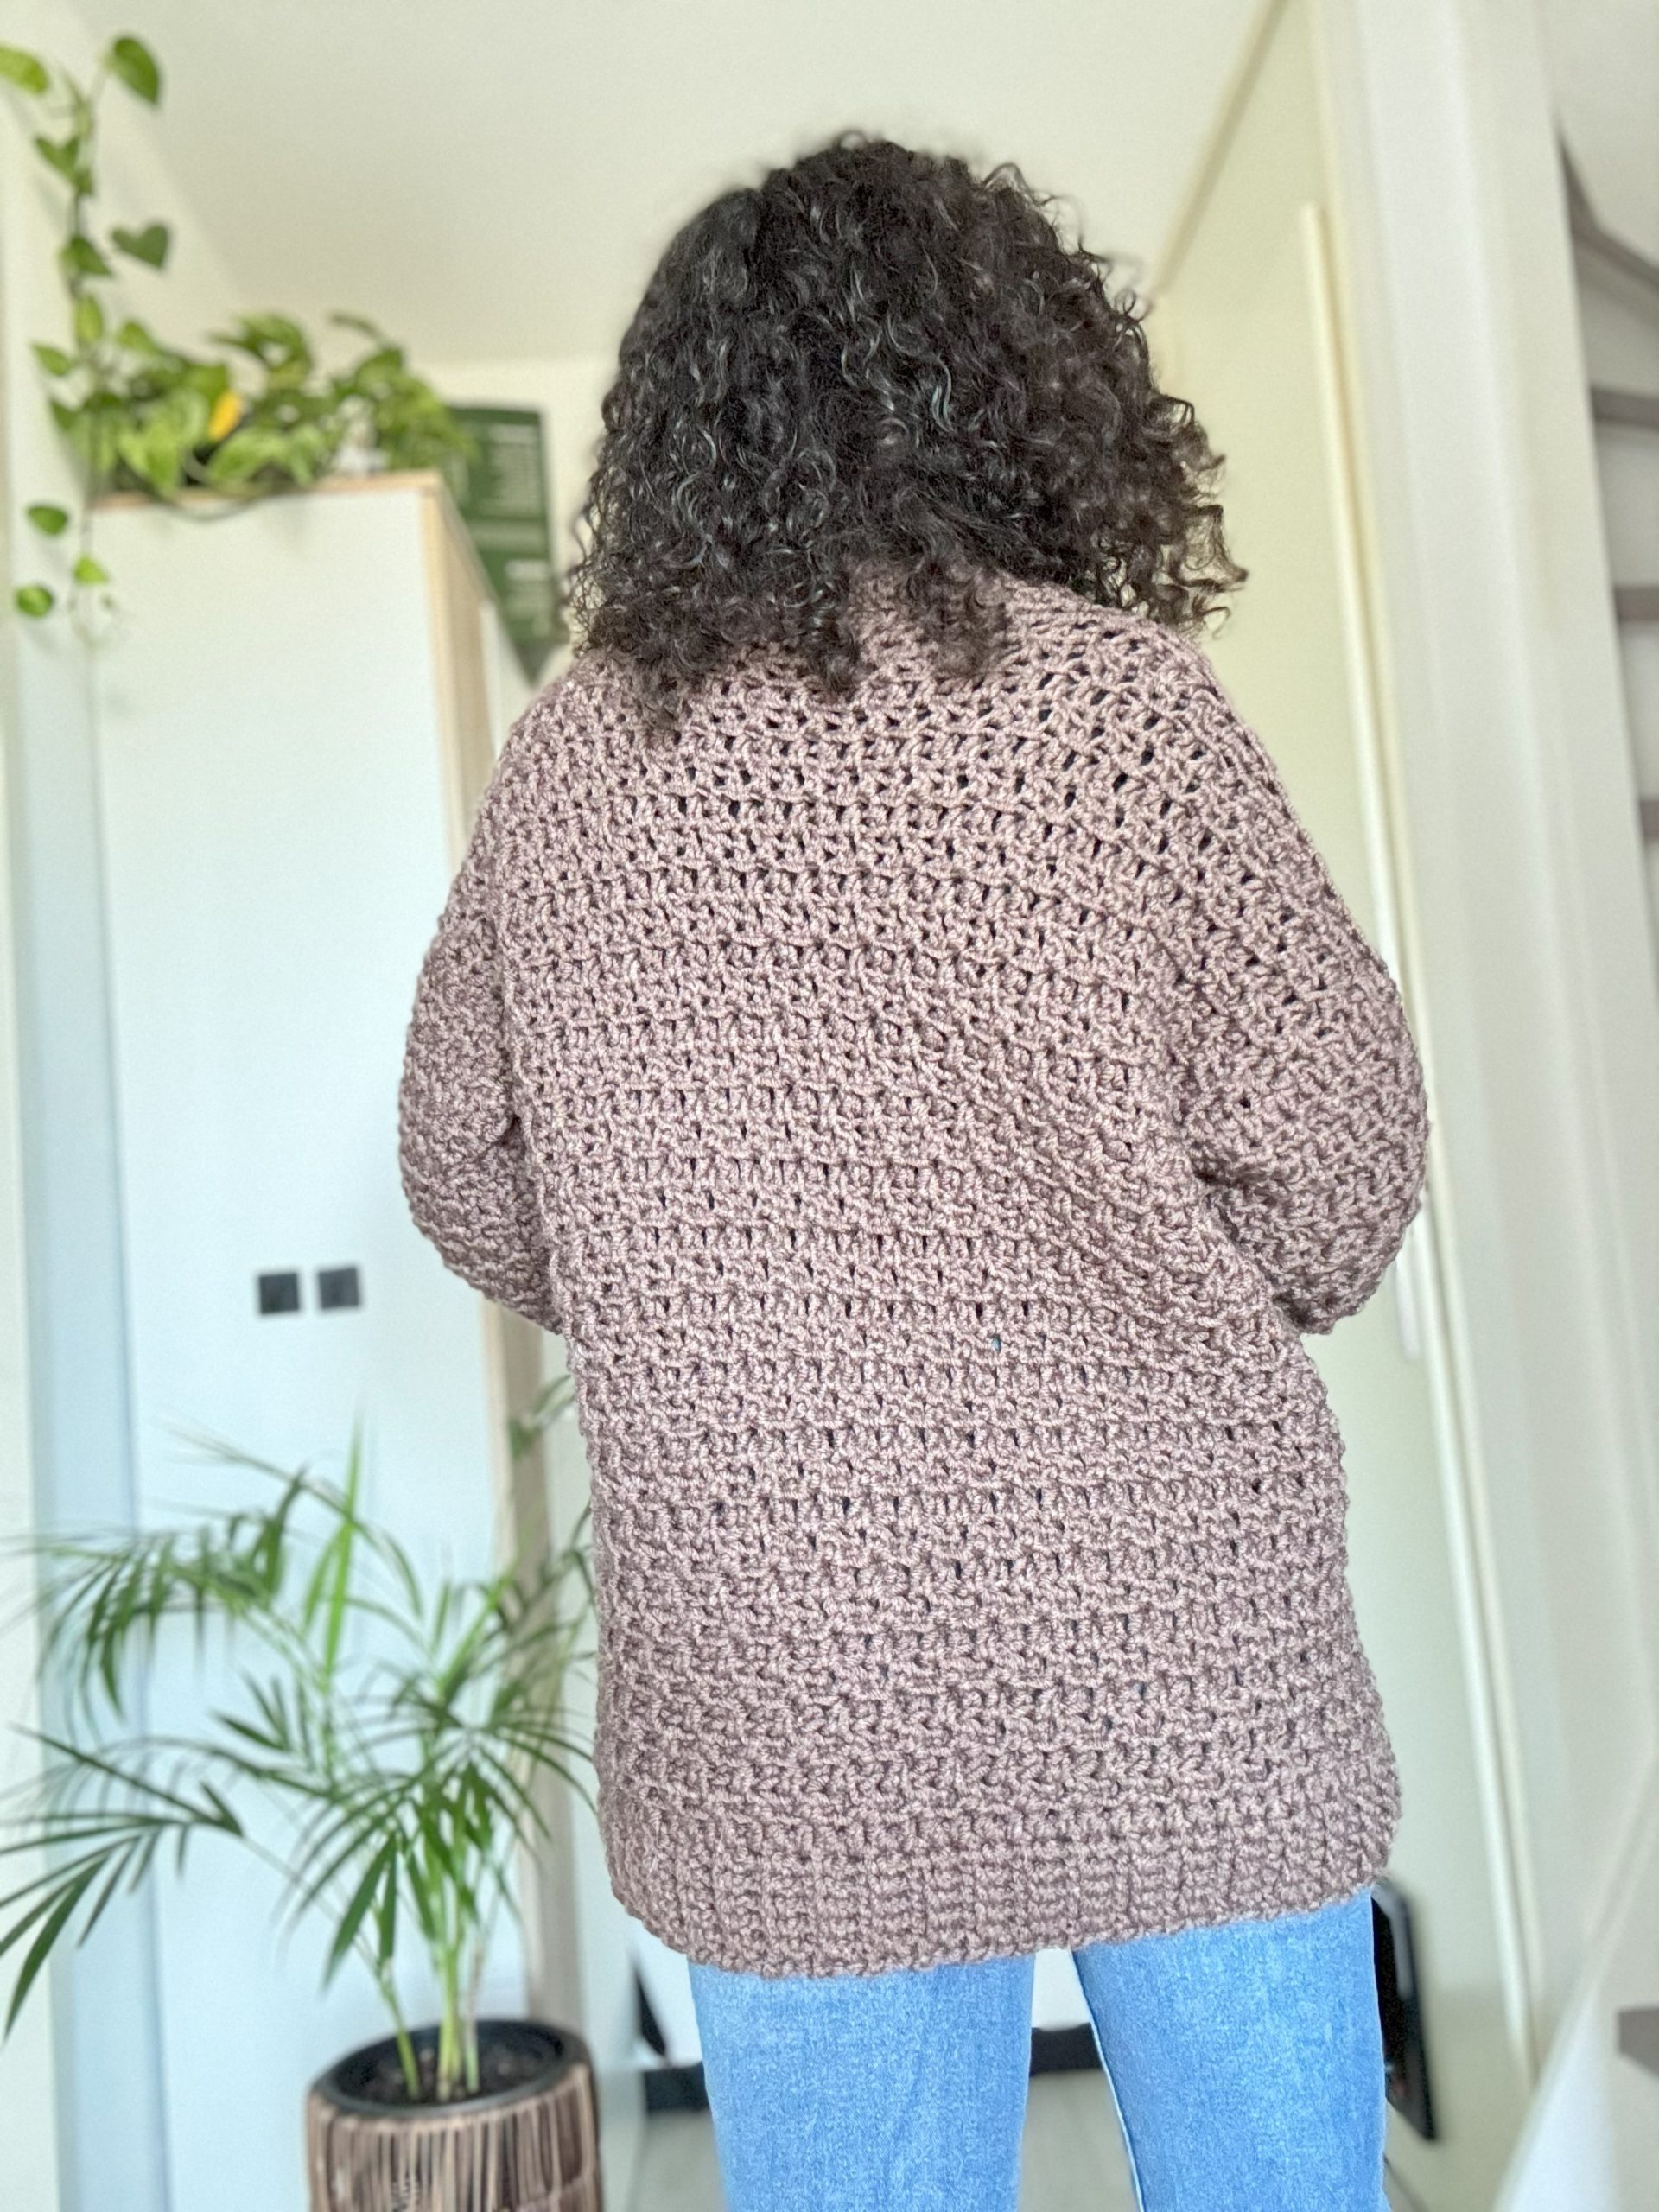
Designed with a drop-shoulder construction and an oversized fit, this cardigan exudes a relaxed and laid-back vibe. The back panel features carefully shaped shoulders, creating a higher neckline and a lower edge next to the sleeves for an enhanced and flattering fit.
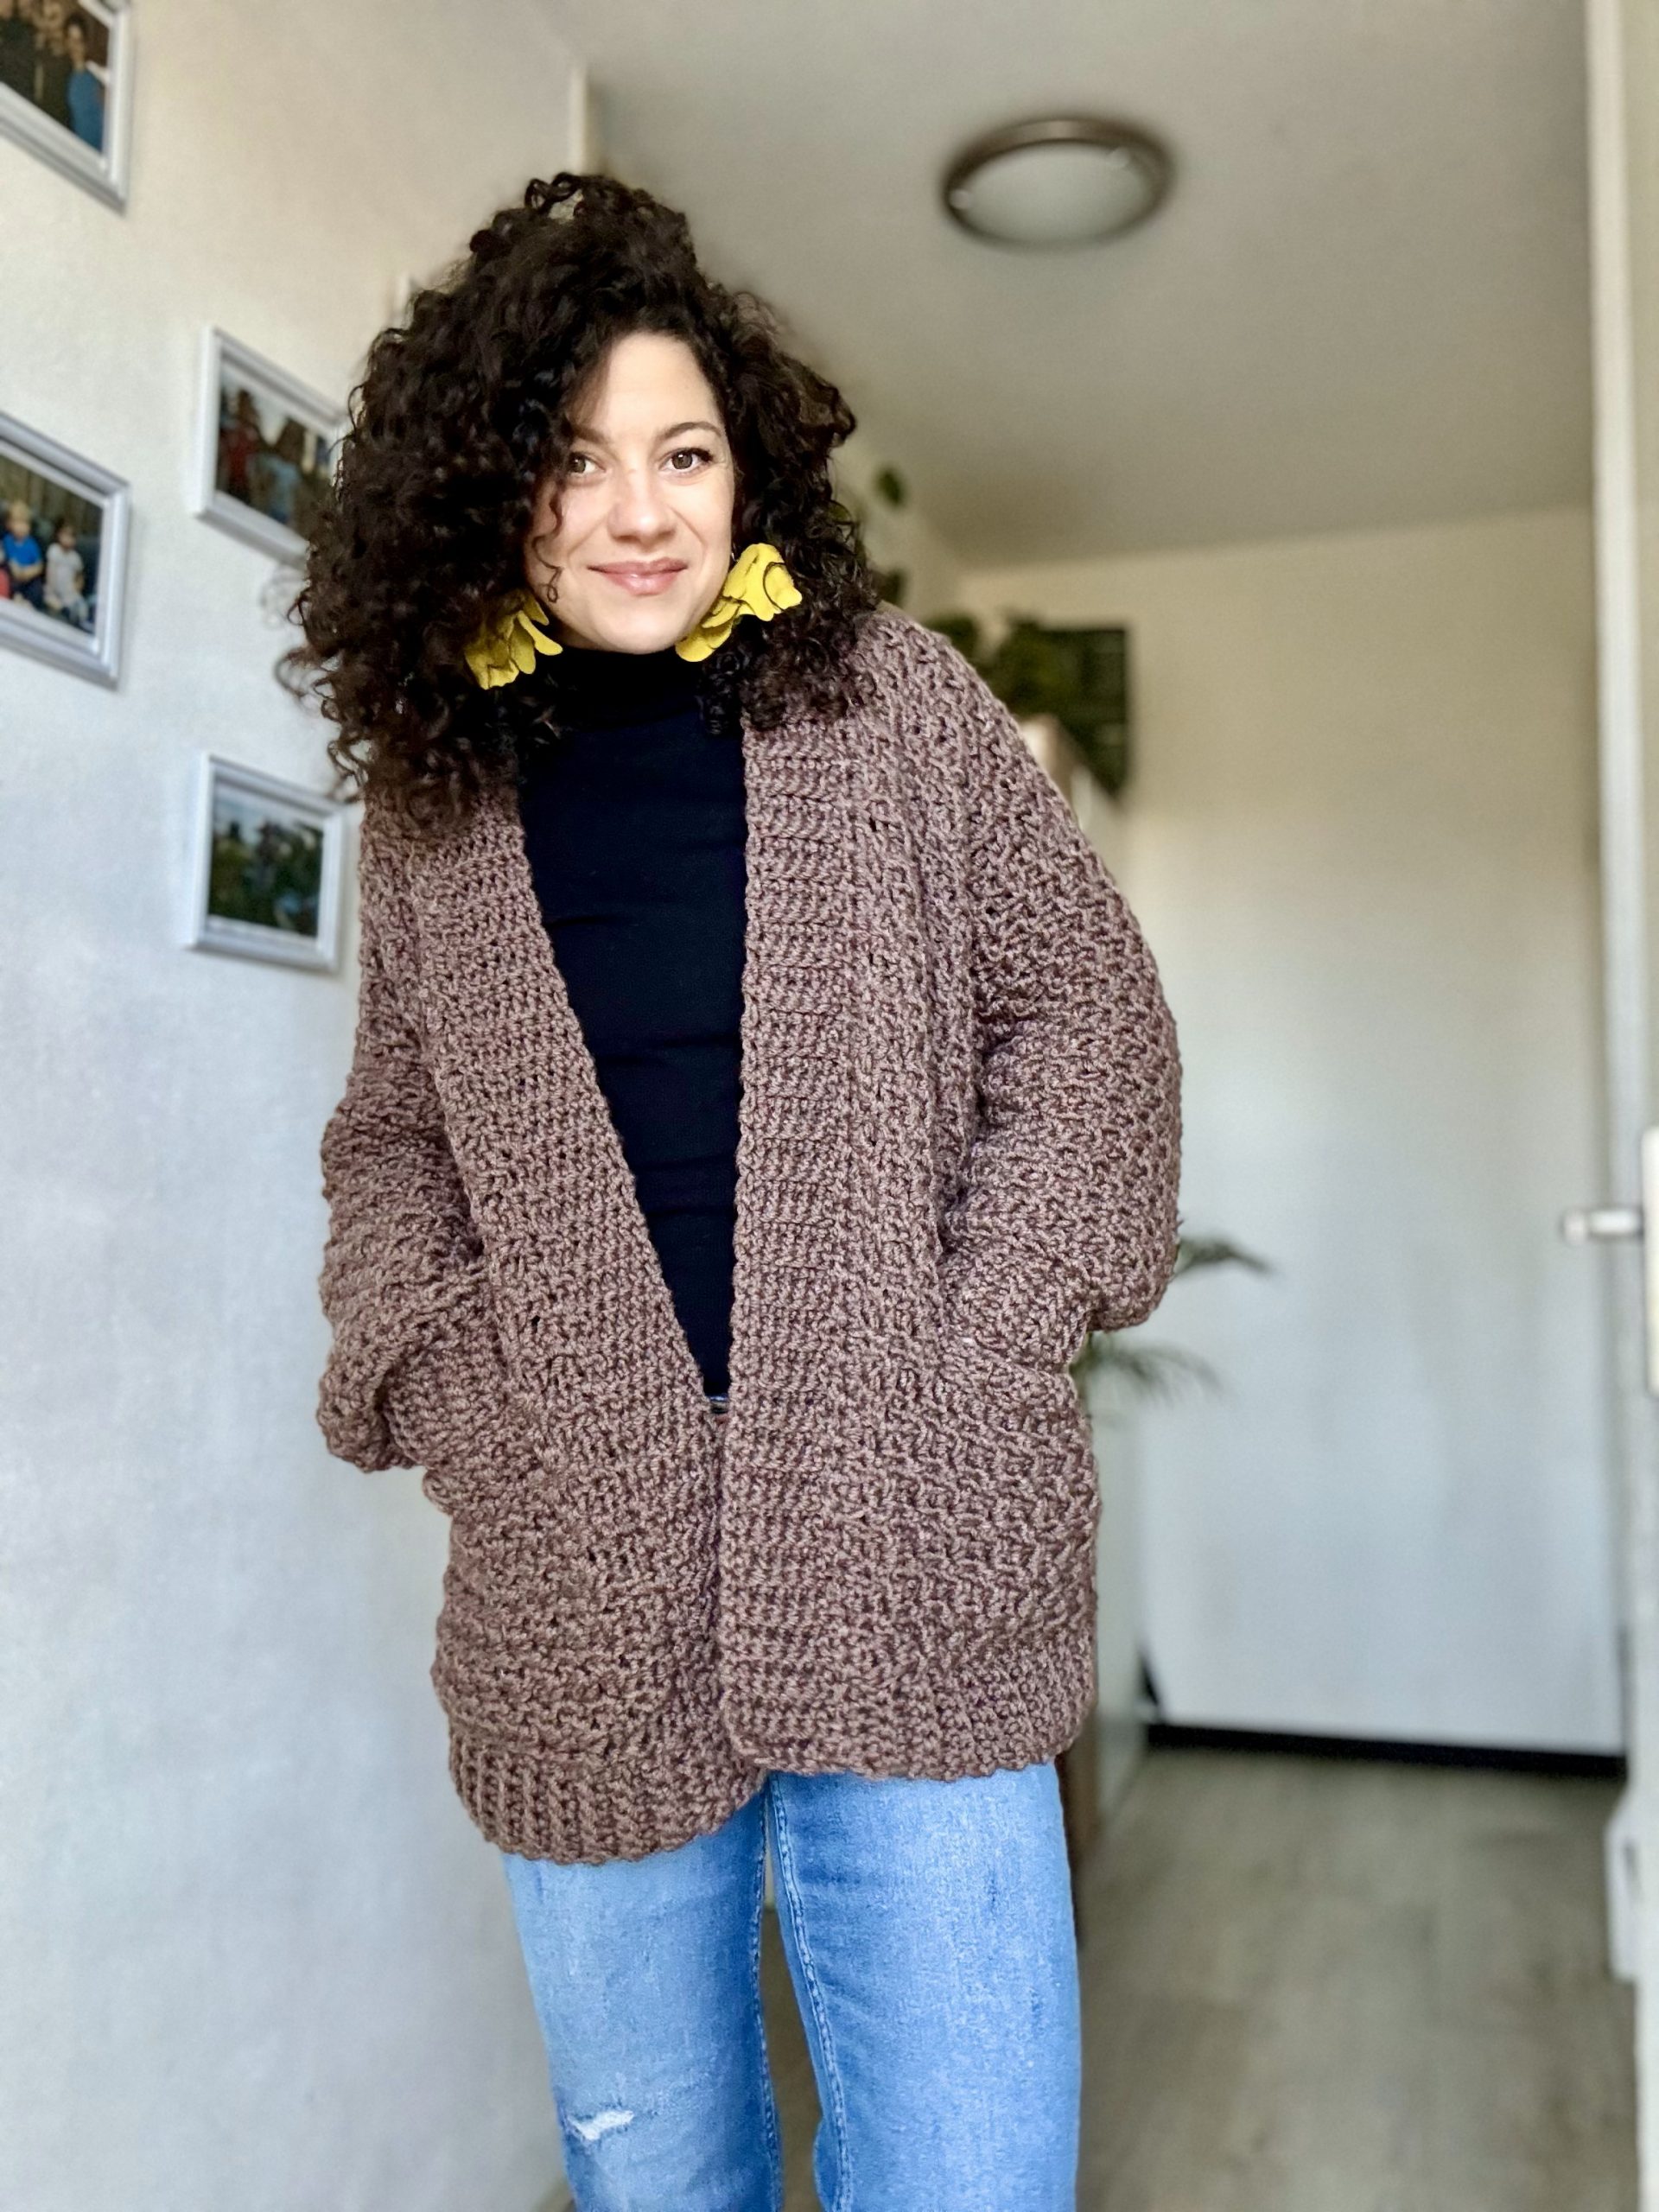
What sets this cardigan apart is its unique construction. The front panels seamlessly continue from the back, forming a slightly V-shaped neckline that adds a touch of sophistication. One standout detail is the cleverly concealed pockets. These hidden gems are skillfully integrated into the design by creating pocket holes while working on the front panels and then crafting the inside pocket for added functionality.
With its cozy texture, stylish drop-shoulder silhouette, and thoughtful pocket detailing, the Cozy Cardigan is a must-have piece for those who appreciate both fashion and comfort. Elevate your handmade wardrobe with this versatile and chic crochet pattern.
MEASUREMENTS AND SIZES
The Dare To Be Cozy Cardigan Pattern is available in 9 sizes, from XS up to 5X Large. The model is 168 cm tall, with a 88 cm bust circumference, and wears a size Small.
The numbers are written below as follows: XS (S, M, L, XL) ( 2XL, 3XL, 4XL, 5XL);

Final Measurements of the Dare To Be Cozy Cardigan
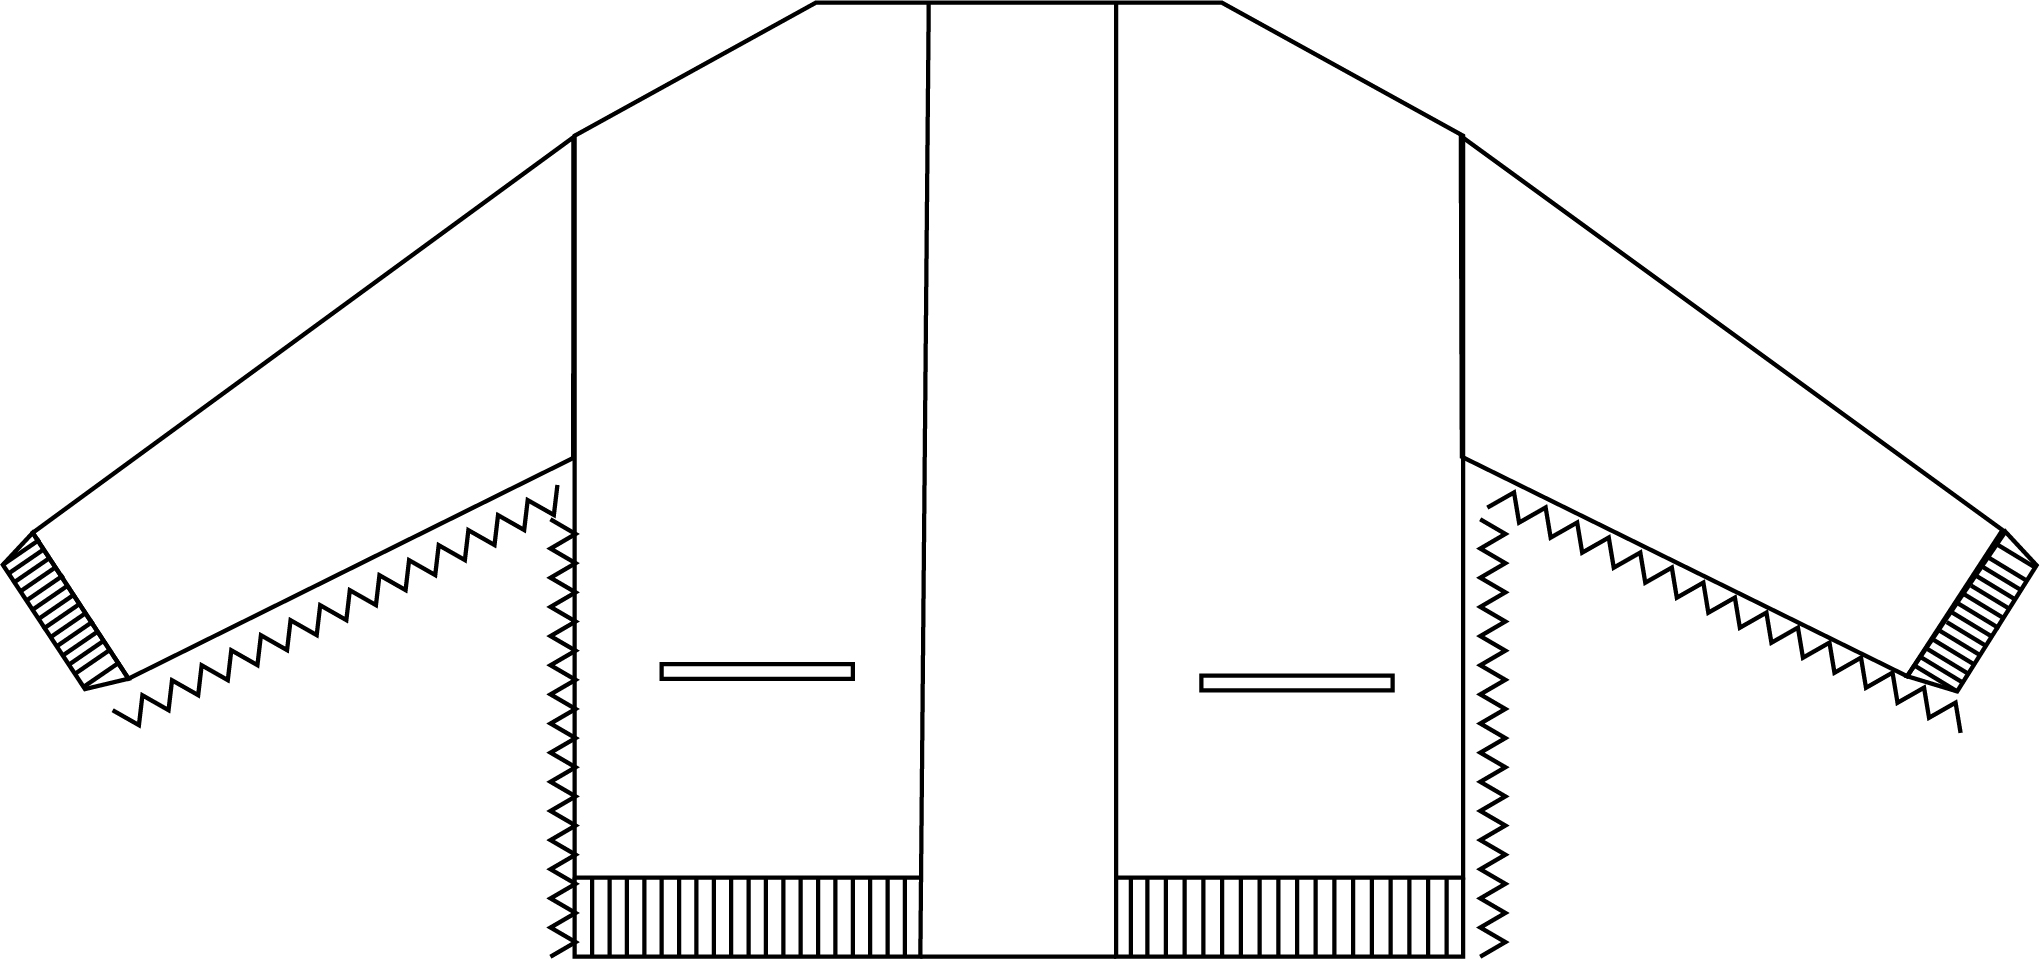
Neck Width a: 14 cm (16, 16, 19, 19) (19, 21, 21, 21)
Width b: 56 cm (59, 61.5, 65, 68.5) (73.5, 78.5, 83.5, 88.5)
Armhole depth. c: 19 cm (21, 21, 23, 25) (25, 27, 29, 30)
Sleeve length d: 46 cm (46, 48, 48, 49) (49, 51, 51, 51)
Length e: 63 (63, 65, 65, 68) (69, 69, 69, 71)
YARN
For the Dare To Be Cozy Cardigan, I used: Durable Dare By Durable yarn, in color Mustang (413). Yarn composition:80% Antipiling Acryl, 20% Polyamide; Each ball has 100 grams and is approximately 99 meters.
For each size, you will approximately need:
1010 (1080, 1150, 1220, 1350) (1430, 1550, 1660, 1780) meters
11 (11, 12,13, 14) (15, 16, 17, 18) balls of Durable Dare
You can purchase the easily printable PDF pattern here at the links below.
NEW!!! you can now purchase the PDF Written Pattern and the KIT here: Yarnsea.com
ABBREVIATIONS
Ch – chain
Sc – single crochet
scblo – single crochet in back loop only
hdc – half double crochet
hdcblo – half double crochet in the back loop only
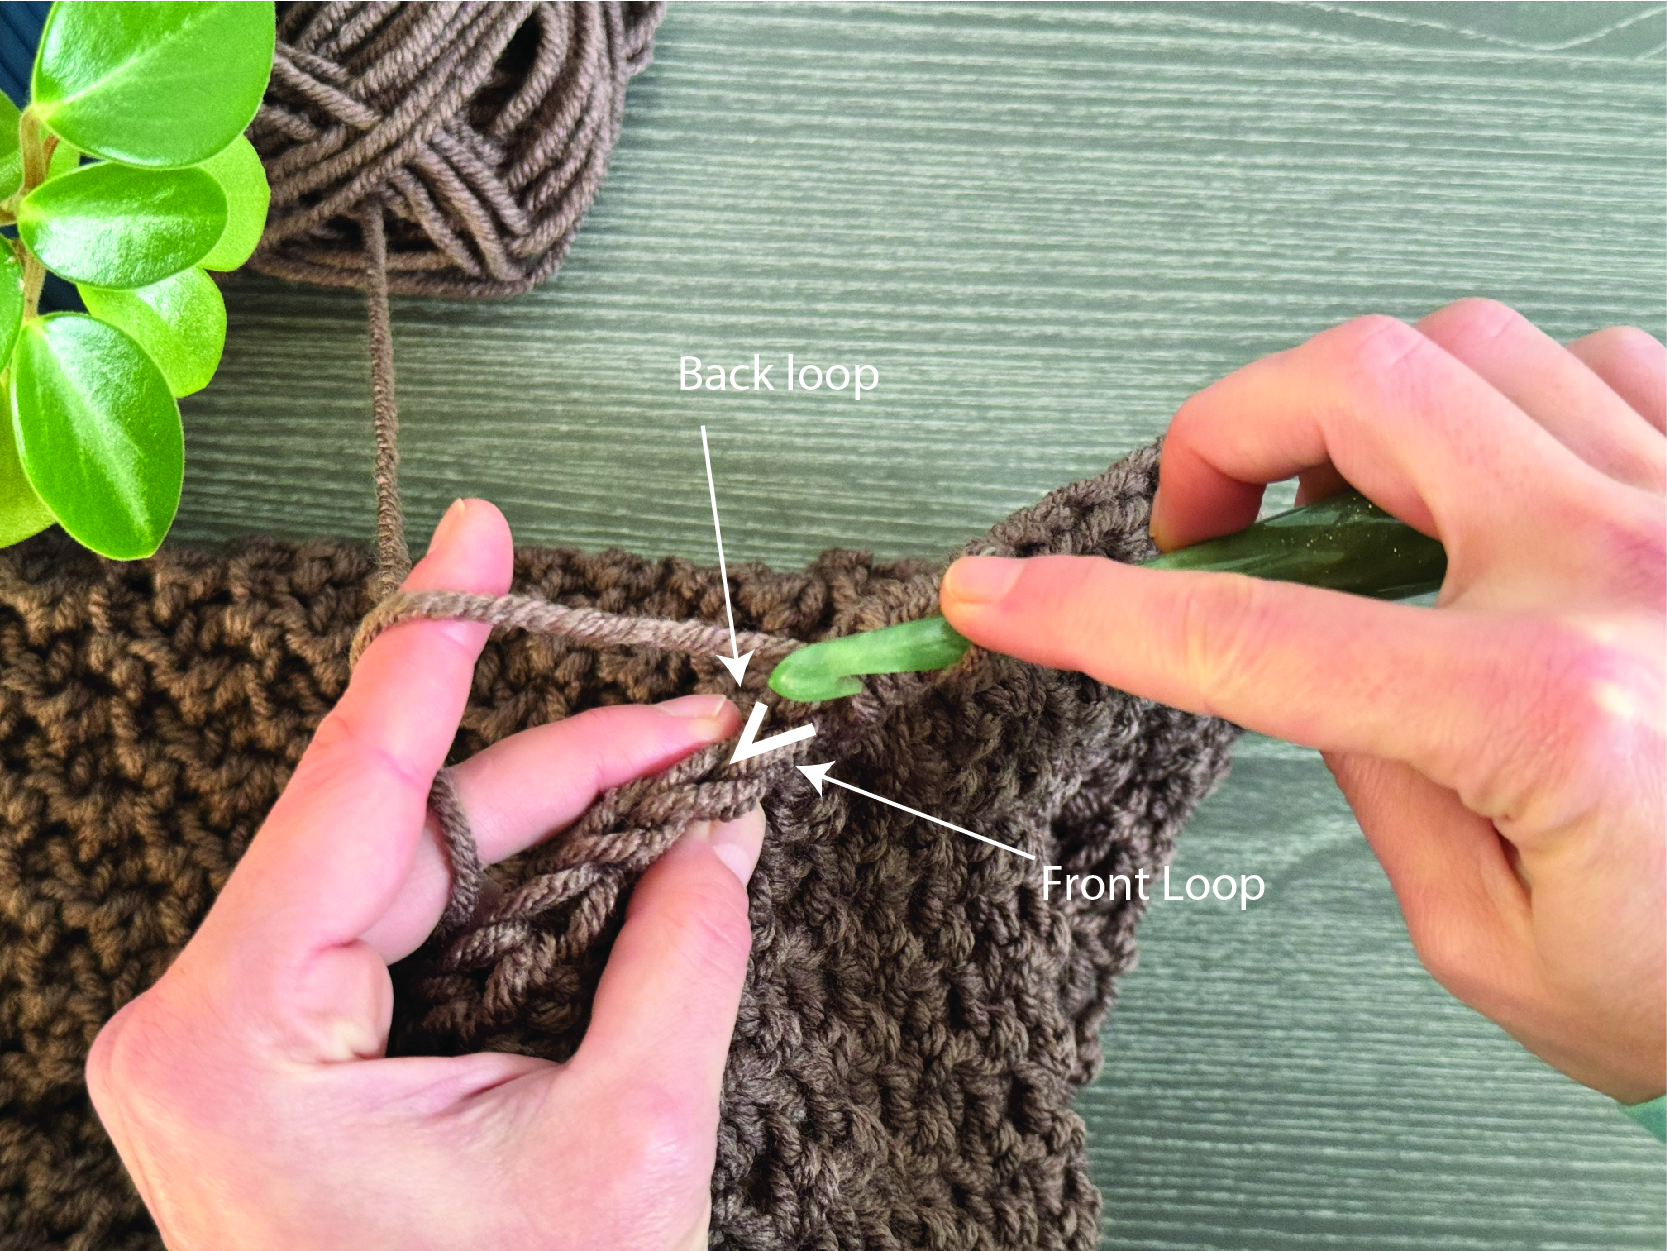
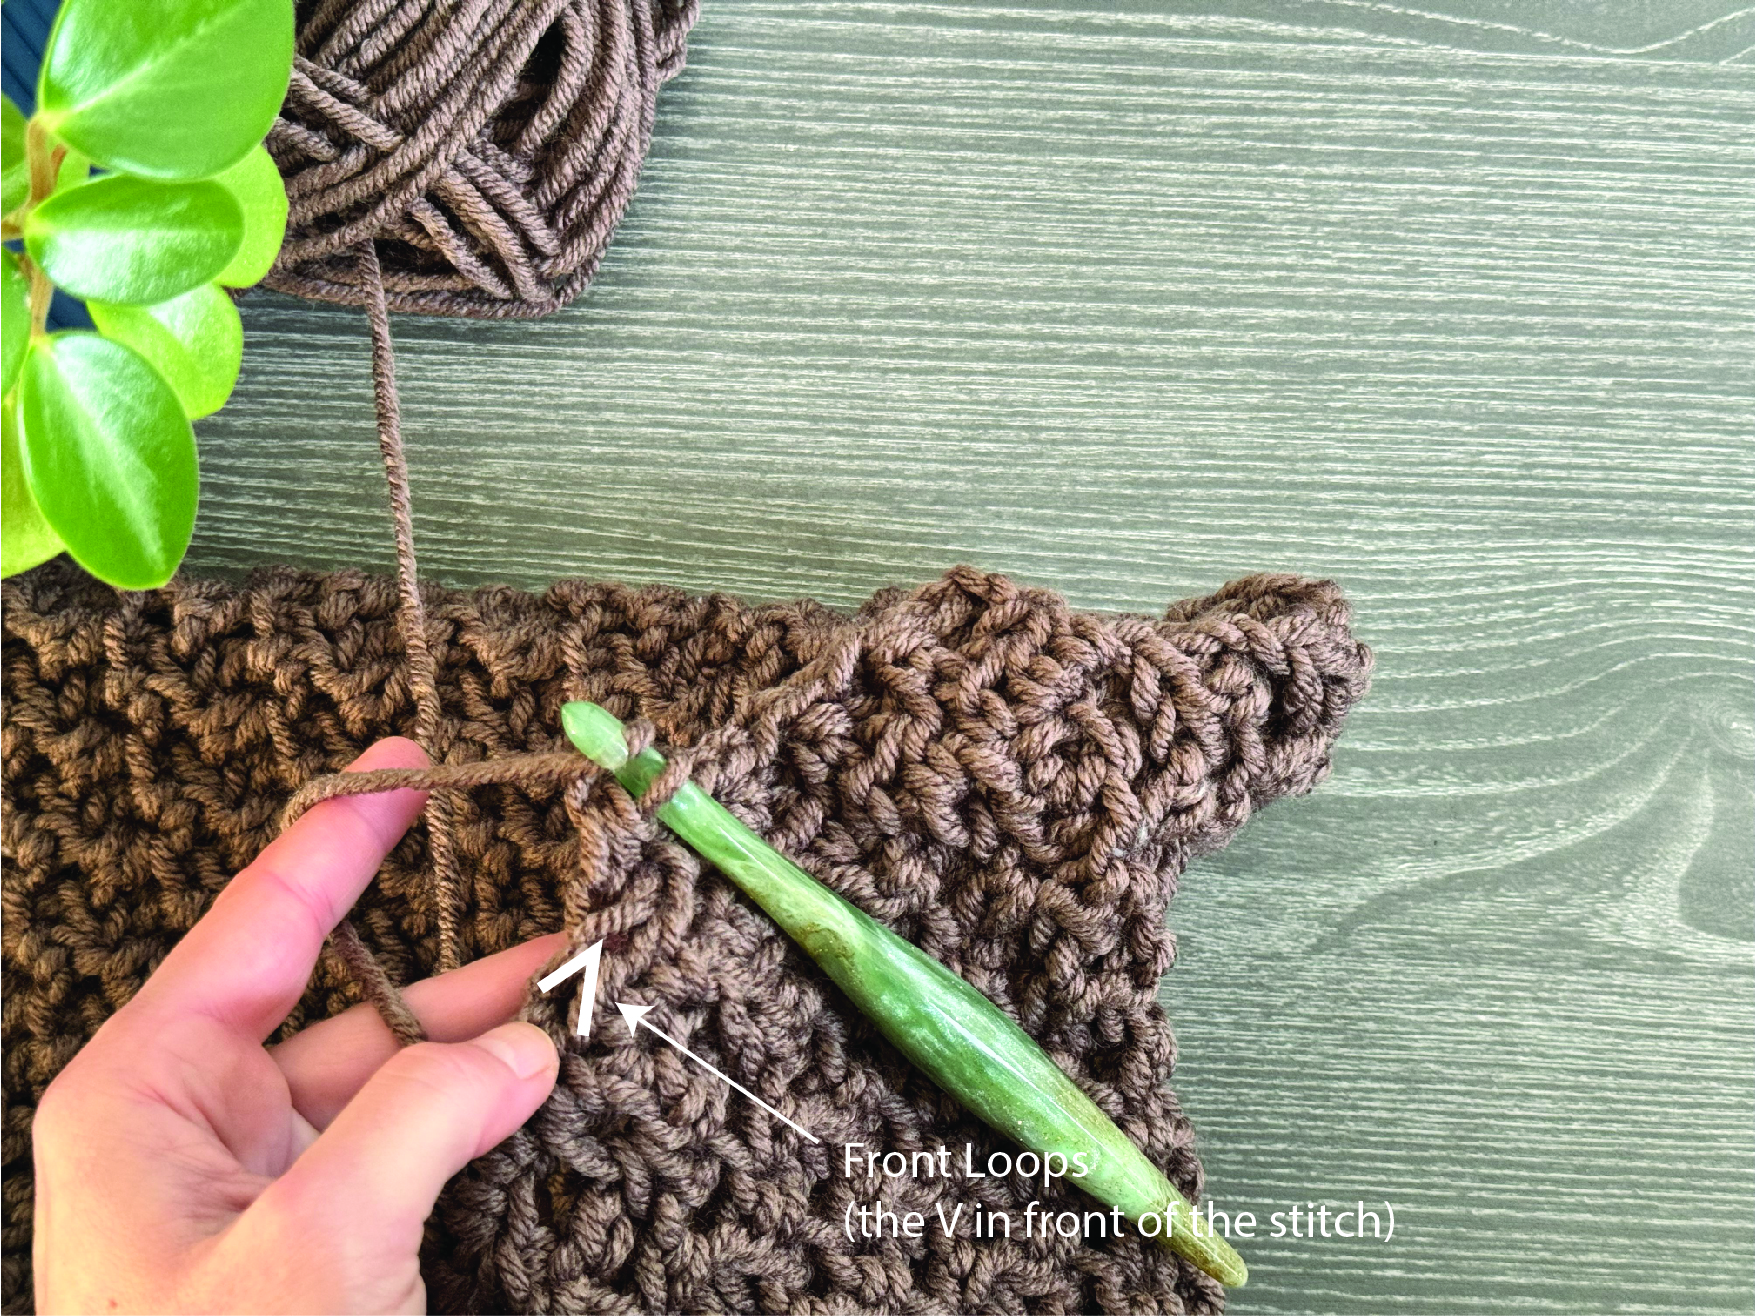
hdcflo – half double crochet in the front loops only (the side V in front of the stitch)
ss – slip stitch
St(s) – stitch(es)
R – row
** – repeated section.
TENSION
Using 8mm crochet hook in the hdc front loop, hdc back loop pattern
8sts = 10 cm
6.5 rows = 10 cm
STITCH PATTERN AND TECHNIQUES
The primary stitch pattern used in the Dare To Be Cozy Cardigan is a variation of the half-double crochet stitch, requiring an odd number of stitches. The texture is achieved by alternating between one stitch of half-double crochet into the back loop only and the next stitch of half-double crochet into both front loops. This method creates a subtle yet visually interesting texture.
The second stitch pattern integrated into the Dare To Be Cozy Cardigan is the single crochet in the back loop only. This specific stitch pattern will be utilized for the bottom, cuffs, and collar ribbing, introducing a subtle texture to enhance these areas. The inside of the pockets will showcase the single crochet stitch, contributing to a uniform and dense fabric that enhances the functionality of the pockets.
INSTRUCTIONS
BACK PANEL RIBBING
Start| Ch 7
R1: Starting in the second st, 1sc in each st, 1ch and turn;
R2: 1sc, 1scblo in each st except the last one, 1sc in last st.
Rep. R2 until you have: 45 (47, 51, 53, 57) (61, 63, 67, 71) rows;
BACK PANEL
Upon finishing the ribbing, transition to working along the side rows. Crochet one half-double crochet (hdc) in each side row, considering the initial 2 chain stitches as the first hdc.
R1: 2ch, 1hdc in each st (side row) to the end of the row; 2ch and turn
R2: *1hdcblo in next st, 1hdcflo in next st; *rep. until the last st, 1hdc in the last (second ch)
Rep. R2 until you have in total: 34 (34, 34, 34, 36) (36, 36, 36, 36) rows
*Note: You can adjust the number of rows according to the desired length
SHAPING THE SHOULDERS
*Note: If you prefer a more beginner-friendly approach, you have the option to skip this section of short rows.
Shaping the shoulders, is for creating a higher neckline and a lower edge next to the sleeves for a better fit.
Before beginning the short rows, consider marking the stitches for the neckline. While the short rows will involve the neckline stitches, marking them allows for flexibility in adjusting the number of rows or the number of stitches to decrease in each short row.
Having the remaining stitches for the shoulders is essential for calculating the number of short rows and the corresponding decreases. For instance, in the case of size Small, 17 stitches are allotted for each shoulder. As 17 is not easily divisible, we will use 16 as a reference, which divides evenly by 2, 4, and 8. These numbers represents potential options for the number of stitches to decrease on each short row:
2 stitches will result in 7 short rows (8-1, as the 2 remaining stitches stay unchanged).
4 stitches will lead to 3 short rows.
8 stitches will lead to 1 short row.
I opted for a decrease of 4 stitches, resulting in 3 short rows. Given the initial count of 17 stitches, I made a decrease of 5 stitches on the first row.
XS – 17sts for the shoulders. 11sts for the neckline
S – 17sts for the shoulders, 13sts for the neckline
M – 19sts for the shoulders, 13sts for the neckline
L – 19sts for the shoulders, 15sts for the neckline
XL – 21sts for the shoulders, 15sts for the neckline
2XL – 23sts for the shoulders, 15sts for the neckline
3XL – 23sts for the shoulders, 17sts for the neckline
4XL – 25sts for the shoulders, 17sts for the neckline
5XL – 27sts for the shoulder, 17sts for the neckline
Use stitch markers to mark these sts and remove and place the stitch marker back everytime you need to work in that st.
1st Short Row: start from where your yarn is;
ss 6 (6, 4, 4, 6,) ( 4, 4, 6, 4) sts (this means you wil start your row into the 6 (6, 4, 4, 6,) ( 4, 4, 6, 4) and you will skip 5 (5, 3, 3, 5,) ( 3, 3, 5, 3) sts at the beginning of the row; 2ch, *1hdcblo in next st, 1hdcflo in next st; *rep. until you have 5 (5, 3, 3, 5,) ( 3, 3, 5, 3) left; 2ch and turn
Total sts left: 35 (37, 45, 47, 47) (55, 57, 57, 65)
2nd Short Row (for all sizes): ss 5 sts, 2ch, 1hdcblo in next st, 1hdcflo in next st; *rep. until you have 4sts left, 2ch and turn
Total sts left: 27 (29, 37, 39,39) (47, 49, 49, 57)
Rep. 2nd Short Row until you have 19 (21, 21, 23,23) (23, 25, 25, 25) sts left.
This means you will work: 3 (3, 4, 4, 4) (5, 5, 5, 6) short rows.
If you marked at the beginning the neckline sts, you need to have 4 sts more on each side.
Cut the yarn
RIGHT FRONT PANEL
We’ll straighten the edge of the shoulder by working single crochet stitches over the short rows. It’s important to note that this single crochet row should be on the right side of your work.
Reattach the yarn to the first stitch on the outer edge of the shoulder. To pass the bridge between the short rows, work 2 single crochets together – 1 into the last stitch before the bridge and 1 into the side of the first stitch of the next short row.
For a more comprehensive visual guide, refer to the video tutorial available here.
1ch, 1sc into the next 4 (4, 2, 2, 4,) ( 2, 2, 4, 2) sts, sc2tog (as explained above), *1sc into the next 3sts, sc2tog; *rep this section until you 4sts left before the first marked stitch of the neckline, 1sc into the last 4 sts. 2ch and turn
Total sc: 17 (17, 19, 19, 21) (23, 23, 25, 27) sts
Let’s begin working on the front panel. To provide clearer instructions, we will start counting from R1
R1: 1fphdc in each st to the end of the row; 2ch and turn
R2: *1hdcblo in next st, 1hdcflo in next st; *rep. until the last st, 1hdc in the last (second ch), 2ch and turn
R3: Rep. R2
R4: *1hdcblo in next st, 1hdcflo in next st; *rep. until the last st, 2hdc into the last st (making an increase)
R5: Rep. R2
Rep. R4 and R5 5 (5, 5, 7, 7,) (7, 7, 7, 7) times.
You will have in total 6 (6, 6, 8, 8,) (8, 8, 8, 8) increase rows and 6 (6, 6, 8, 8,) (8, 8, 8, 8) more stitches than initial
After completing the increased rows, the total number of rows worked for the front panel is 15 (15, 15, 19, 19) (19, 19, 19, 19). To ensure the continuity of the stitch pattern, it’s important to maintain a stitch count that is a multiple of 2+1.
You will now have 23 (23, 25, 27, 29) (31, 31, 33, 35) sts for the front panel.
Next, continue to work into the established pattern until the pocket hole. More exactly, until you have for the front panel 25 (25, 27, 27, 29) (29,29,29,31) rows.
Next Row: POCKET HOLE
The Pocket hole needs to be proportional to the front panel width.
Work in the establish pattern first, 4 (4, 5, 5, 5) (6, 6, 6, 7) sts, ch 14 (14, 15, 16, 18) (19, 19, 20, 21) sts, skip 14 (14, 15, 16, 18) (19, 19, 20, 21) sts, continue with the established pattern for the last 5 (5, 5, 6, 6) (6, 6, 7, 7) sts, 2ch and turn
Next Row: work into the established pattern for the first 5 (5, 5, 6, 6) (6, 6, 7, 7) sts, then 1hdc in each ch st, and finish the row with the established pattern for the last 4 (4, 5, 5, 5) (6, 6, 6, 7) sts
Next, continue to work into the established pattern until you complete the front panel, 10 (10, 9, 9, 9) (10, 10, 10, 9) more rows.
After completing the front panel length, you will have in total: 37 (37, 38, 38, 40) (41, 41, 41, 42) rows
To finish off the front panel, work the bottom ribbing
Ch7
R1: Start into the second st, 1sc in all 6sts, 1ss into the next 2sts of the front panel bottom edge, turn
R2: skip the 2ss, 1scblo in next 5st, 1sc in last st
R3: 1sc in first st, 1scblo in next 5sts, 1ss in next 2sts of the front panel edge.
Rep. R2 and R3 until you complete the front panel width.
Fasten off.
LEFT FRONT PANEL
Create the Left Front Panel as a mirror image of the Right Front Panel.
Start by straightening the shoulder edge with single crochet stitches over the short rows. Ensure this single crochet row is on the right side of your work.
Reattach the yarn to the first stitch of the shoulder immediately following the marked neckline stitch. To pass the bridge between the short rows, work 2 single crochets together – 1 into the side of the last stitch of the current short row and 1 into the first stitch of the next short row.
For a more comprehensive visual guide, refer to the video tutorial available here.
1ch, 1sc into the next 4 (4, 4, 4, 4,) ( 4,4, 4, 4) sts, sc2tog (as explained above), *1sc into the next 3sts, sc2tog; *rep this section until you have 4 (4, 2, 2, 4,) ( 2, 2, 4, 2) sts to the end of the row, 1sc into the last sts, 2ch and turn
Total sc: 17 (17, 19, 19, 21) (23, 23, 25, 27) sts
Let’s begin working on the front panel. To provide clearer instructions, we will start counting from R1
R1: 1fphdc in each st to the end of the row; 2ch and turn
R2: *1hdcblo in next st, 1hdcflo in next st; *rep. until the last st, 1hdc in the last (second ch), 2ch and turn
R3: Rep. R2
You can purchase the easily printable PDF pattern here at the links below.
NEW!!! you can now purchase the PDF Written Pattern and the KIT here: Yarnsea.com
R4: 1hdc into the first st (same as 2ch, making an increase), *1hdcblo in next st, 1hdcflo in next st; *rep. until the last st, 1hdc in the last (second ch), 2ch and turn
R5: Rep. R2
Rep. R4 and R5 5 (5, 5, 7, 7,) (7, 7, 7, 7) times.
You will have in total 6 (6, 6, 8, 8,) (8, 8, 8, 8) increase rows and 6 (6, 6, 8, 8,) (8, 8, 8, 8) more stitches than initial
After completing the increase rows, the total number of rows worked for the front panel is 15 (15, 15, 19, 19) (19, 19, 19, 19). To ensure the continuity of the stitch pattern, it’s important to maintain a stitch count that is a multiple of 2+1.
You will now have: 23 (23, 25, 27, 29) (31, 31, 33, 35) sts for the front panel.
Next, continue to work into the established pattern until the pocket hole. More exactly, until you have the front panel 25 (25, 27, 27, 29) (29,29,29,31) rows.
Next Row: POCKET HOLE
The Pocket hole needs to be proportional to the front panel width.
Work in the establish pattern first, 5 (5, 5, 6, 6) (6, 6, 7, 7) sts, ch 14 (14, 15, 16, 18) (19, 19, 20, 21) sts, skip 14 (14, 15, 16, 18) (19, 19, 20, 21) sts, continue with the established pattern for the last, 4 (4, 5, 5, 5) (6, 6, 6, 7) sts 2ch and turn
Next Row: work into the established pattern for the first 4 (4, 5, 5, 5) (6, 6, 6, 7) sts, then 1hdc in each ch st, and finish the row with the established pattern for the last 5 (5, 5, 6, 6) (6, 6, 7, 7) sts.
Next, continue to work into the established pattern until you complete the front panel, 10 (10, 9, 9, 9) (10, 10, 10, 9) more rows.
After completing the front panel length, you will have in total: 37 (37, 38, 38, 40) (41, 41, 41, 42) rows
To finish off the front panel, work the bottom ribbing
Ch7
R1: Start into the second st, 1sc in all 6sts, 1ss into the next 2sts of the front panel bottom edge, turn
R2: skip the 2ss, 1scblo in next 5st, 1sc in last st
R3: 1sc in first st, 1scblo in next 5sts, 1ss in next 2sts of the front panel edge.
Rep. R2 and R3 until you complete the front panle width.
Fasten off.
SLEEVES
Apply the same pattern to both sleeves.
Begin by marking the side rows to define the sleeve width on both the back and front panels:
11 (12, 12, 13, 14) (14, 15, 16, 17) rows on each side.
With the armhole now marked, let’s begin working the sleeves directly into the armhole side rows.
The number of stitches required for working into the armholes depends on your tension and the height of the edge stitches. As a guideline, for the initial row, I worked 3 half-double crochets in every 2 side rows. Feel free to modify the stitch count based on your tension, but maintain a multiple of 2+1 stitches.
R1: Reattach yarn into the marked stitch, 2ch, 1hdc in each st (as mentioned above) to the end of the row; 2ch and turn
Total sts: 33 (37, 37, 39, 43) (43, 45, 49, 51) sts
R2: *1hdcblo in next st, 1hdcflo in next st; *rep. until the last st, 1hdc in the last (second ch), 2ch and turn
Rep. R2 until you reach the desired sleeve length or until you have: 26 (26, 27, 27, 30) (30, 32, 32, 32) rows.
Last sleeve row: *1sc in the first st, sc2tog; rep to the end of the row.
To finish off the sleeve, work the bottom ribbing
Ch7
R1: Start into the second st, 1sc in all 6sts, 1ss into the next 2sts of the edge, turn
R2: skip the 2ss, 1scblo in next 5st, 1sc in last st
R3: 1sc in first st, 1scblo in next 5sts, 1ss in next 2sts of the edge.
Rep. R2 and R3 until you complete the sleeve width.
Fasten off.
ASSEMBLING
Before proceeding with the collar ribbing and pockets, I find it more convenient to assemble the cardigan first.
Fold the piece at the shoulders, bringing the front panels over the back panels.
Grab a yarn needle and measure the sewing yarn to be three times the length needed.
Next, sew the side edges together; you can commence from the cuff and finish at the bottom of the cardigan or do it in reverse.
For sewing, I prefer the ladder stitch technique but feel free to use any method you feel comfortable with. If you’d like a visual demonstration of this technique, you can refer to the video tutorial available here.
NECKLINE AND FRONT EDGES RIBBING
Work the foundation row of the ribbing in single crochet on the right side of the cardigan.
Rejoin yarn into the first st of the right front panel bottom corner
Ch1 and work 1sc in each st until the bottom corner of the left front panel;
Note:
When crocheting along the edges of the front panel, you’ll be working into the side rows. Here’s what to do:
In one side row, make 2 single crochets (2sc).
In the next side row, make just one single crochet (1 sc).
By following these steps, you’ll have a total of 3 single crochets (3sc) for every 2 side rows. Keep in mind that the result can vary depending on your tension and how tall the stitches are at the edge of the front panel. Feel free to adjust the pattern based on your own tension preferences.
After finishing the sc row;
Start: ch7 and turn
R1: starting with the second st, 1sc in each st to the end, 1ss into the next 2sts of the edge; turn
R2: skip the 2ss, 1scblo into each st, except the last one, 1sc into the last st; 1ch and turn;
R3: 1sc in the first st, 1scblo in each st to the end; 1ss into the next 2sts of the edge; turn;
Rep. R2 and R3 until you complete the entire length;
Work both pockets the same
Start by crocheting the inside layer of the pocket.
Reattach the yarn to the first stitch at the top edge of the pocket hole and chain 1.
R1: 1sc in each of the top edge’s stitches, 1ch and turn
R2: 1sc in each st, 1ch ch and turn
Rep. R2 until you complete the depth of the pocket.
The next step is to sew the inside layer of the pocket onto the back of the front panel. To finish the pocket, we need to work on ribbing on the bottom edge of the pocket hole.
Reattach the yarn to the first stitch at the bottom edge of the pocket hole and chain 4
R1: starting with the second st, 1sc in each st to the end, 1ss into the next 2sts of the edge; turn
R2: skip the 2ss, 1scblo into each st, except the last one, 1sc into the last st; 1ch and turn;
R3: 1sc in the first st, 1scblo in each st to the end; 1ss into the next 2sts of the edge; turn;
Rep. R2 and R3 until you complete the entire length;
To finish off, sew the edges of the ribbing.
TO FINISH
Weave in all looser ends and block to measurements
I hope you love it as much as I do.
You can purchase the easily printable PDF pattern here at the links below.
NEW!!! you can now purchase the PDF Written Pattern and the KIT here: Yarnsea.com



Comments are closed.