
“Starry Night” Blouse
The Add Free, Easy printable, instant download pdf version of this pattern is available in my shop
or
This beautiful “Starry Night” Blouse was supposed to be made with another yarn. Off course that if I would have used it another type of yarn the name wouldn’t be the same.
After I noticed that the yarn I had wasn’t enough for the project, I had to started all over using another yarn. Wow, and I am glad I did so!
The colors reminded me of Vincent van Gogh paintings, after just a few rows, but the name was suggested by @jane_love_knit, who commented on the first photo I posted that the colors reminds her of “Starry Night” painting of the artist. “What a wonderful name”, I said and voila: My latest pattern, The “Starry Night” Blouse.
Pentru postarea in limba romana click aici

Isn’t it just gorgeous? I don’t know, but lately I have ideas only for summery designs, but I think is not that bad since we all are impatient for warmer days.
Let’s see what is all about this “Starry Night” Blouse
About Design
When I first thank at this shape of blouse, I said that it will be a perfect garment project to try, for those of you who didn’t experiment this garments field of crocheting. Why? Because the main parts of the blouse are 2 triangle scarfs that are joined together and then we will add 2 triangles to complete the edges and to make the bottom of the blouse straight.
When working at the triangle panel, at some point we will stop increasing at the beginning and at the end of the row to make the ends of the sleeves straight. You can start with the straight edges when you get to the desired width (measuring from the neck to the end of the sleeve, depending on how long you want the sleeves to be ). Pay attention that working on the width you will also work on the length of the “Starry Night” Blouse. The sleeves can be made longer by adding at the end a few rounds.
Materials you will need
- Yarn
I used Lana Grossa Papaggallo. It’s 50% Cotton, 50% Microfiber and is a light weight, yarn. 1 Ball of yarn has 100 grams, 340 m/372 yds.
- Crochet hook
4.5 mm crochet hook (US size 7)
- Yarn Needle for sewing
- Scissors
- Stitch markers
The pattern is available for sizes from S to 2X Large and is written in US terms.
The final measurements are represented in the diagram bellow. On the first line are values in Centimeters and on the second one in inches.

*the measurements above can be adjusted. For example if you want the blouse to be shorter you can make less rows on the main triangle, and extend at the end the sleeves if needed.
How much yarn do you need
*I made the back panel only in filet stitch (1 dc, ch 1, 1 dc). If you are using the same pattern as for the front, 1 row in dc, 1 row in filet stitch you might need a more yarn.
- S – 280 grams / 950 m/ 1040 yds (3 balls)
- M – 300 grams / 1020 m / 1112 yds (3 balls)
- L – 325 grams / 1100 m / 1200 yds ( 4 balls)
- XL – 350 grams / 1170 m / 1275 yds (4 balls)
- XXL – 370 grams / 1240 m / 1350 yds (4 balls)
About the stitch pattern
I used simple stitches for the pattern. The main stitch pattern is one row in double crochet, 1 row in filet stitch. Along the first panel I just played with the pattern and made some more rows in double crochet and more rows in filet stitch. For the back I used only filet stitch. So, be free to play with the pattern and make it your own.
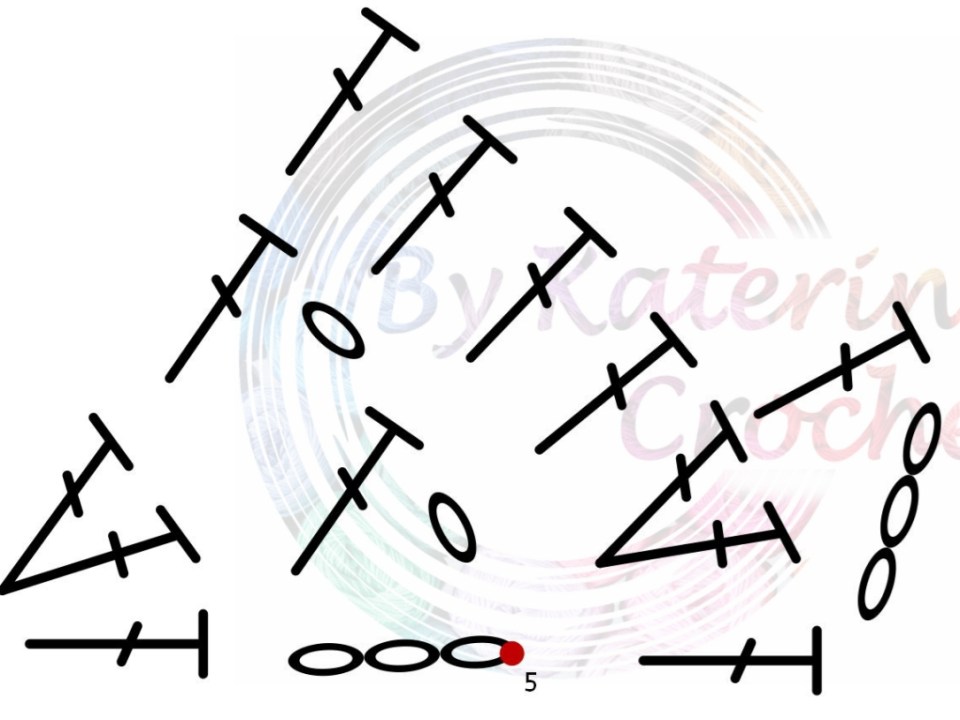
Bellow you will find the main stitch pattern chart:


The Add Free, Easy printable, instant download pdf version of this pattern is available in my shop
Abbreviations used in this pattern
Ch – chain
Dc – double crochet
St (s) – stitch (es)
Pdc – partial dc
Inc – increase
- Increase beginning: Ch 3, 2 dc in the 1st st on dc rows and ch 4, 1 dc in first st for the windows rows
- Increase end: 3 dc in the 3rd st of the starting chain, for the dc rows, and (1 dc, ch 1, 1 dc) in the 3rd st of the starting chain for windows rows.
- Middle increase: 2 dc, ch 2, 2 dc on the dc rows and 1 dc, ch 2, 1 dc on the filet rows (windows rows)
Dec – Decrease
- Decrease beginning of the row : Ch 3, skip 1, 1 dc in next
- Decrease end of the row : 1 pdc, skip 1, 1 pdc in next or as a wide 2 dc together with a st in between
- Decrease middle : when we are working the sides, 1 dc, skip 4 sts (1 ch, 1 dc, 1 dc, 1 ch), 1 dc in next
Special stitches
Filet st or window st pattern: 1 dc, ch 1, skip 1, 1 dc in next
The skill level required for the “Starry Night” Blouse pattern is easy so, don’t be afraid to try it.
Let’s start:
Like I said in the pattern description, we will work 2 identical panels, front and back.
*for all sizes
Start with ch 4 and slip stitch to join the ends and make a circle.
Row 1
ch 3, 6 dc inside the circle
Row 2
Inc, (ch 3, 2 dc in the first st), 1 dc in the next 2 sts, inc middle (Center point)in the next st (2 dc, ch 2, 2 dc), 1 dc in the next 2 sts, inc end (3 dc in the 3rd st of the starting chain)
Row 3
Inc Beginning ( Ch 4, 1 dc in the 1st stitch), ch 1, [skip 1, 1 dc, ch 1] repeat this section to the center point (ch 2, from the previous row middle increase. Inc middle in the ch 2 space (1 dc, ch 2, 1 dc), [ch 1, 1 dc, skip 1] repeat the section until you get to the last st. Inc end in the last st (1 dc, ch 1, 1 dc)
Row 4
Ch 3, 2 dc in the 1 st stitch, 1 dc in each st until you get to the center point (the chain 2 space). Inc middle (2 dc, ch 2, 2 dc) in the ch 2 space. Continue with 1 dc in each st until you get to the last one. Inc end in the last st (3 dc in the last stitch).
Now, repeat rows 3 and 4 until you have the desired width or until you have in total:
- S – 31 rows
- M – 33 rows
- L – 34 rows
- XL – 36 rows
- XXL – 37 rows
Well after finishing these rows the one panel of the “Starry Night” Blouse has to look as a triangle scarf.
Next, we will have to stop increasing at the beginning and at the end of the rows and start decreasing so the edges to be straight.
In the stitch charts bellow you can see in symbols how we make the decreases.
Decrease Beginning
Decrease End
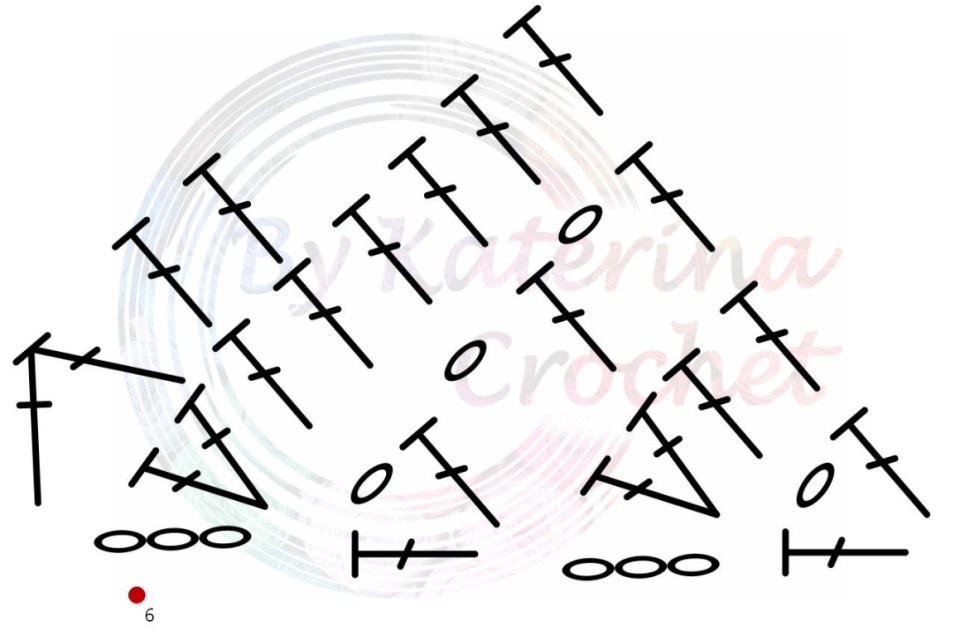
We will keep working a few more rows just until now. Only that the rows will start and end different. For each kind of row, in dc or window row, the beginning and the end will be the same.
Start the next row:
Ch 3, skip 1 st, 1 dc in next, continue with the st pattern to to Center Point, inc middle, continue with the st pattern until you have 3 sts left. In the last 3 sts make the decrease end (1 partial dc, skip 1, 1 partial dc, yarn over and pull the yarn trough all the loops on your hook.
Continue repeating this row until you have:
- S – 7 rows
- M – 8 rows
- L – 9 rows
- XL – 10 rows
- XXL – 11 rows
After completing these rows the panel is done and you have to make one more in the same way.
When you have the 2 panels done, lay them one over the other. The first is with the right side facing you and the second is with the wrong side facing you. We will assemble them and we have to sew on the wrong side.
*if needed block the 2 panels before assembling

To know how much we have to sew on the top part we have to mark the neck line. Use 2 stitch markers to be easier.
Mark counting from the middle to left and right:
- S – 9 rows
- M – 10 rows
- L – 11 rows
- XL – 12 rows
- XXL – 13 rows
Sew the sts before an after the st markers, letting the rounds in middle opened for the neck line .
Now we have to sew the sleeves ( the parts under the arms). To know how much we have to sew, we will mark the sts. Counting from the center point at the bottom mark:
- S – 59 sts
- M – 65 sts
- L – 71 sts
- XL – 77 sts
- XXL – 83 sts
Then sew the remaining sts.

After assembling we will work on the sides to make the bottom of the Starry Night Blouse straight. Each side will be worked separately.
I worked the sides only in windows st.
The row will start in the bottom corner ( center point) and it will end in the opposite corner. On the row we will have 3 decreases:
Decrease beginning of the row: ch 3, skip 1, 1 dc in next
Decrease middle : 1 dc, skip 4 sts, 1 dc in next
Decrease end: 1 partial dc, skip 1, 1 partial dc, yarn over and pull the yarn through all loops.
Row 1
Insert the Yarn and hook in the first st in corner, Ch 3, skip 1, 1 dc in next. Continue with the st pattern until you get to the middle. If your previous row was in dc, skip the last 2 st, on this side and 2 dc from the other side. If the previous row is a window row skip 1 ch, the seam in the middle, 1 ch. If the window st pattern is not ending with dc before the 2 sts left, you can skip on the first row less sts in the middle. Repeat this row until you have a straight bottom
the last row will be:
Ch 3, skip 1, 1 dc in next, skip 4 st, 1 partial dc, skip 1, 1 partial dc.
After completing the both sides the Starry Night Blouse is done. Make one row in single crochet or in different stitch pattern on the bottom of the Starry Night Blouse and on the neck line.
if you want, you can make a few rounds on sleeves to make them longer. I made 4 rows in windows st.
Hope you liked the Starry Night Blouse pattern and you will make it. Can not wait to see your photos.
Keep an eye here because other interesting patterns are about to come.
The Add Free, Easy printable, instant download pdf version of this pattern is available in my shop
https://nl.pinterest.com/katerina6795/free-crochet-patterns/


5 Comments
Jenny
Hi Katerina.
Thanks for your pattern, this is the third pattern of yours I’m using.
Just a question about working the sides, do you start from the pointy end (that is the front of the blouse) or the sides where the 2 panels were joined? I hope this makes sense. Thanking you in advance.
Jenny
Hi Katerina. Thanks for your pattern, this is the third one of yours I’m using.
Just a question about making the sides, do you start from the pointy end (the front of the blouse) or the sides where the two panels were joined? Thanks in advance for your assistance. BTW your creations look so gorgeous on you 🙂
Bykaterina
Hi Jenny. Thank you so much. I’m so glad you love my designs. You have to start the sides from the pointy end, middle of the blouse, where you increased to make the triangle shape.
Jenny Wong
Thanks Katerina for your prompt response. So after you do the sides separately, do you see them together at the front and back?
Bykaterina
make the 2 sides and then sew them on the top, letting a space for neck and on sides edges. The work the sides starting from the center of one panel and ending the row at the other center. The middle of row, when working the side will be the seam that you made when joining parts on sides