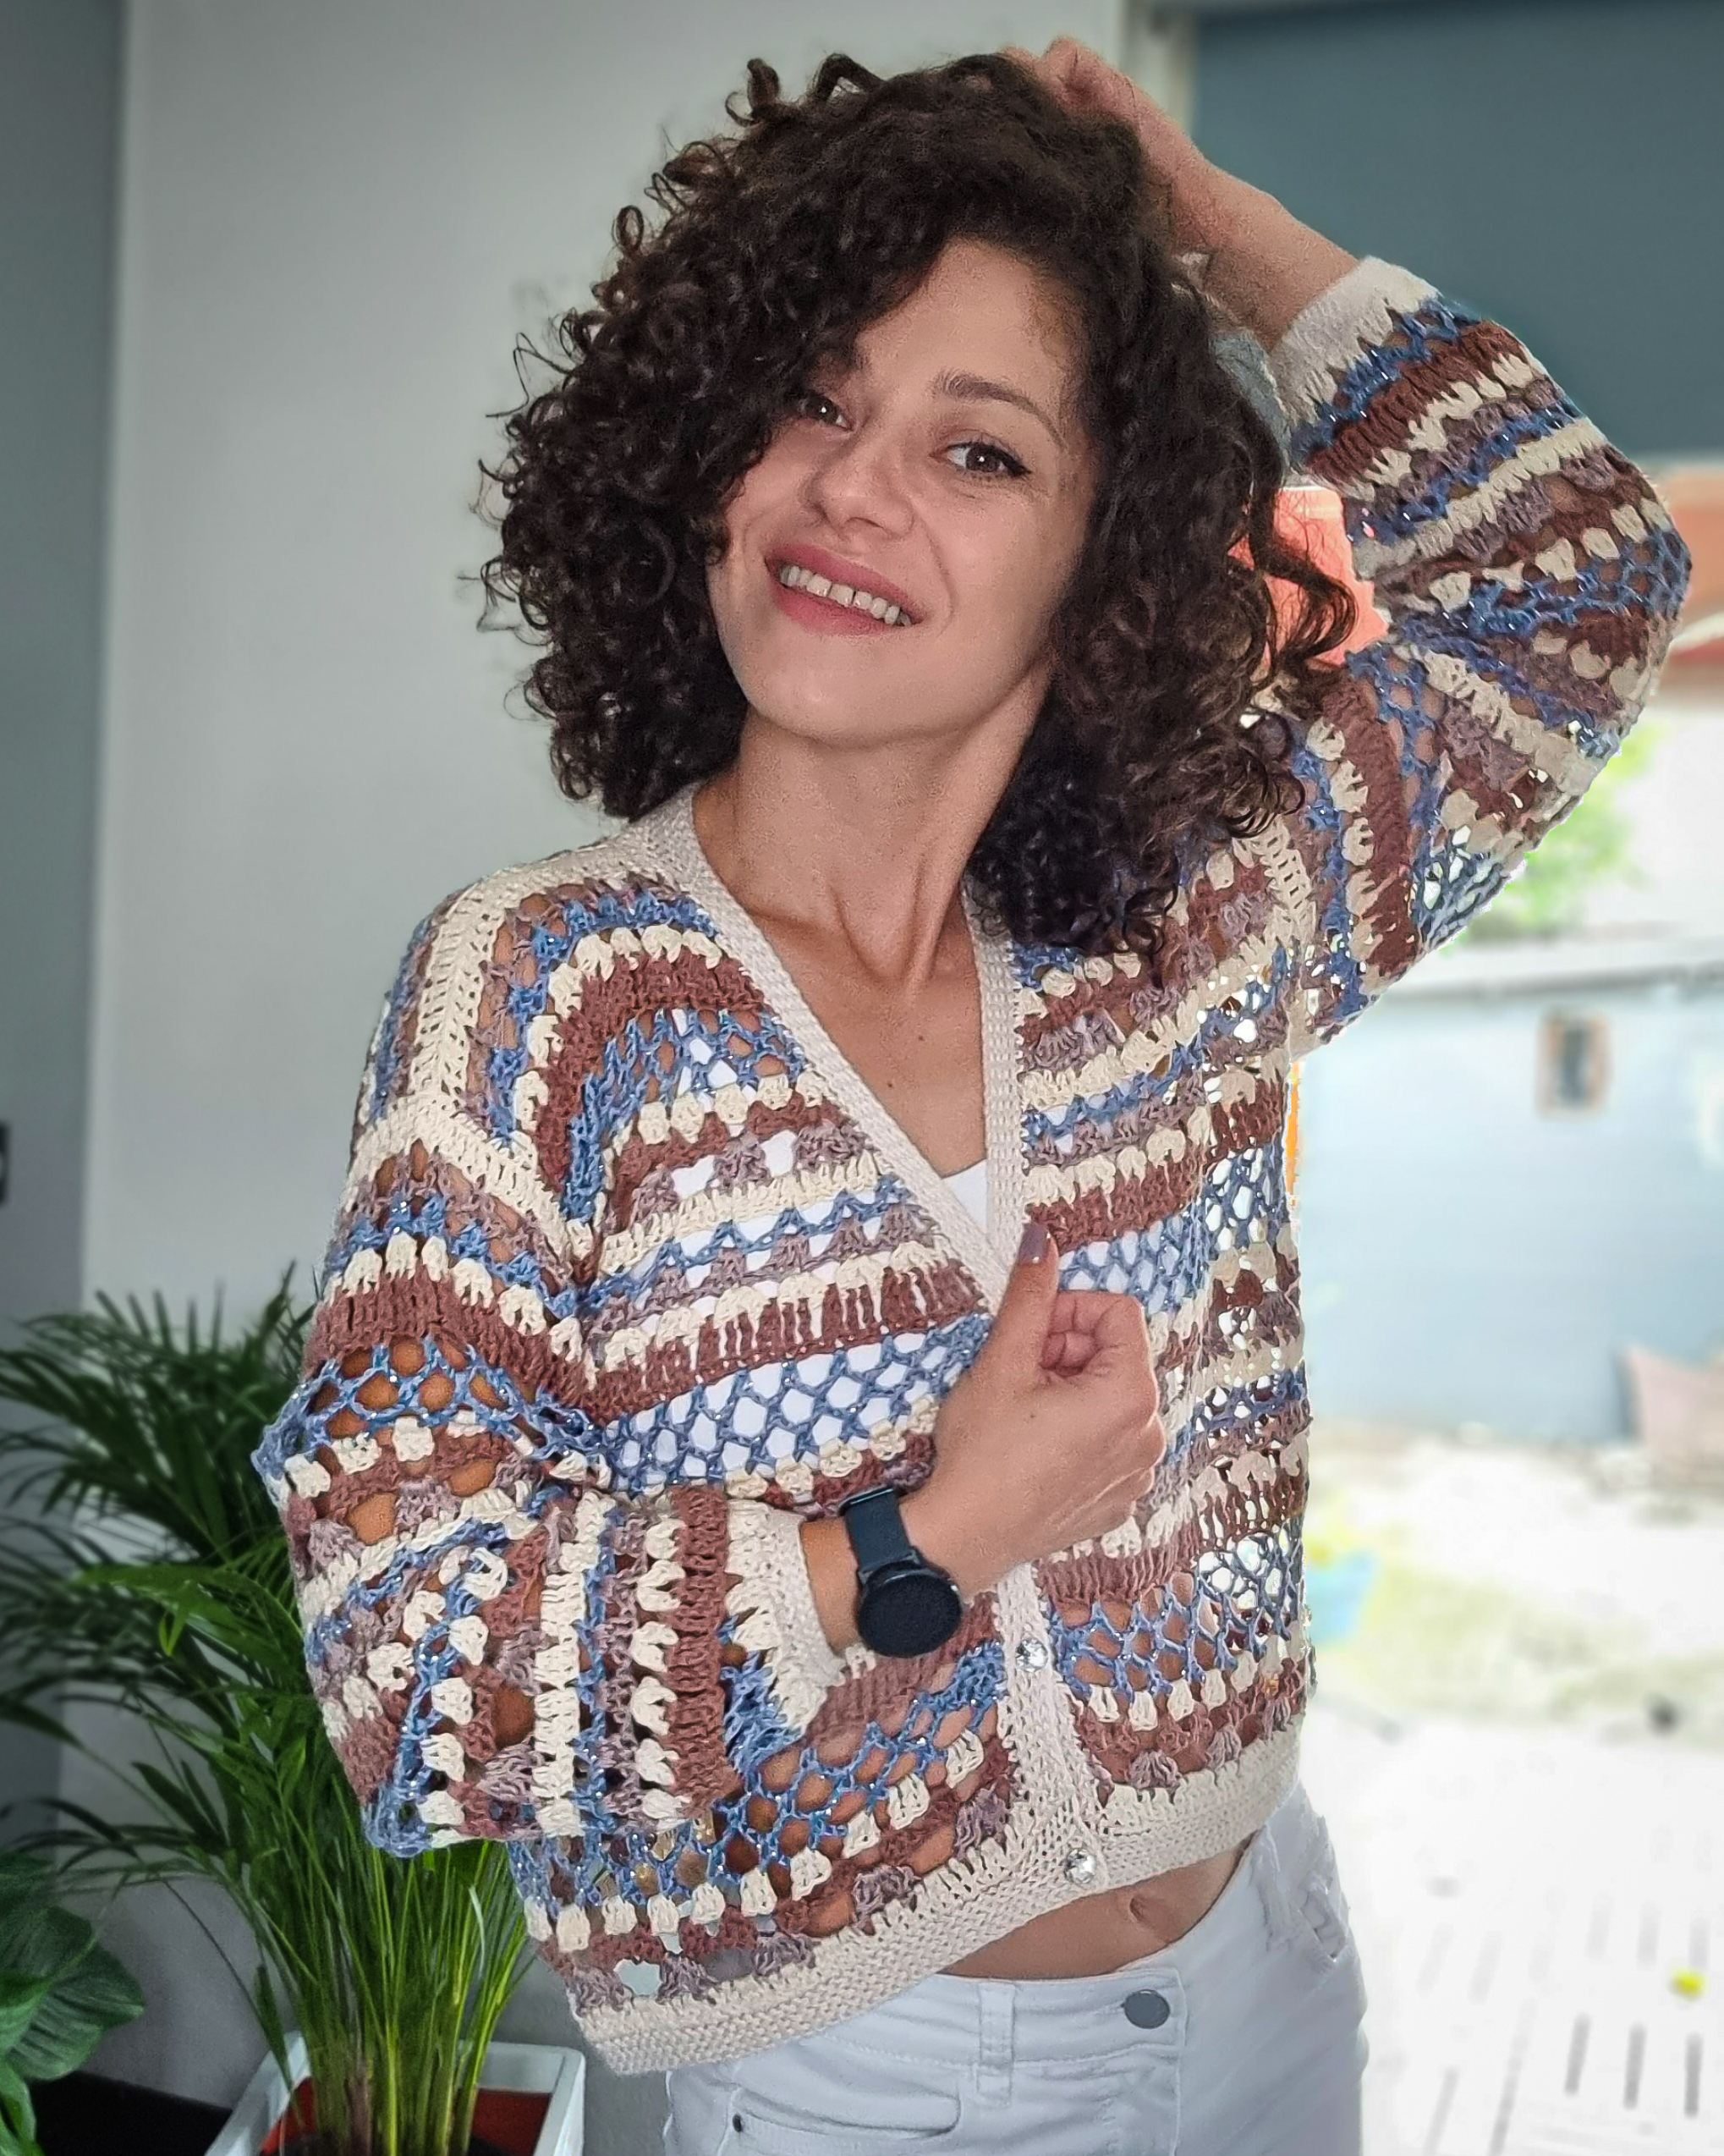
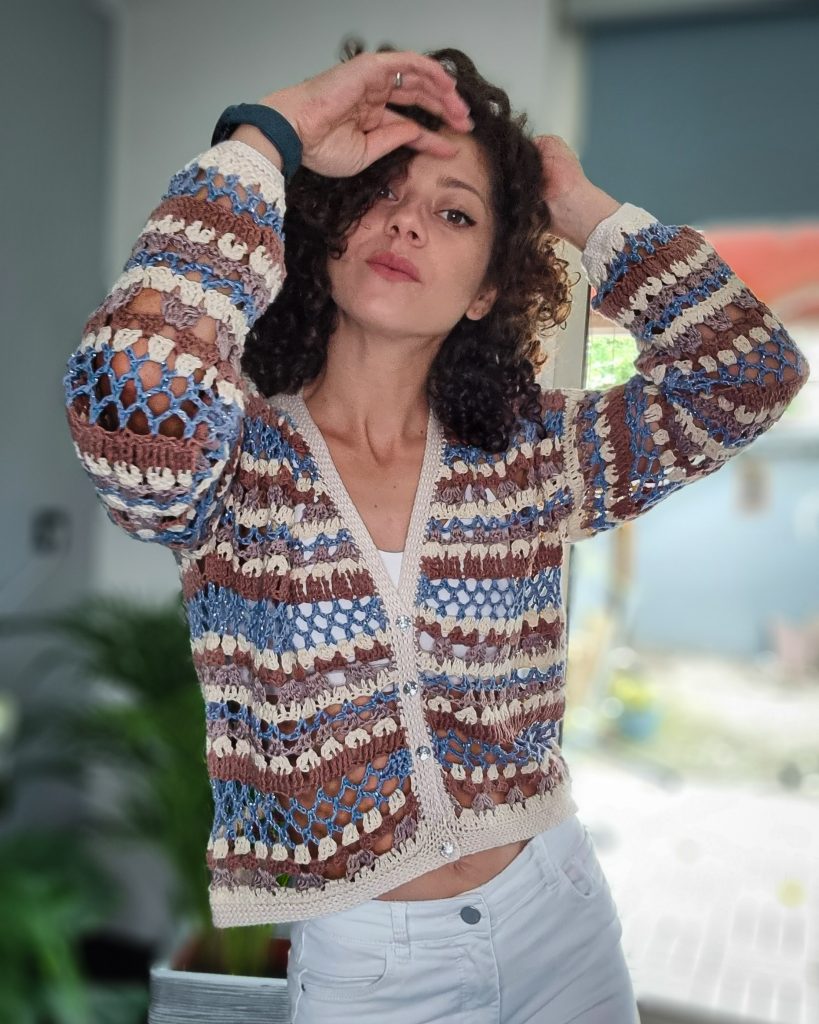
I had in mind for such a long time a blouse, cardigan with an opened stitch pattern, but long sleeves.
Actually, I have a few tops I made, that I imagined the same at first, with long sleeves but always ended up with short sleeves or no sleeves at all.
But never, is too late, right?
Even, the summer is almost over, I think this blouse can be perfect as a lightweight cardigan if the weather is still warm, or as a blouse under the jacket if is starting to be chili. Or, maybe you will want to use another fiber why not, and make it cozier. (I have this in plan :))
Anyway. Your feedback was amazing with every single post that I made with this project and I was planning to post the pattern, later on, this month, but I was working like crazy for the last couple of days, to manage to make it available early.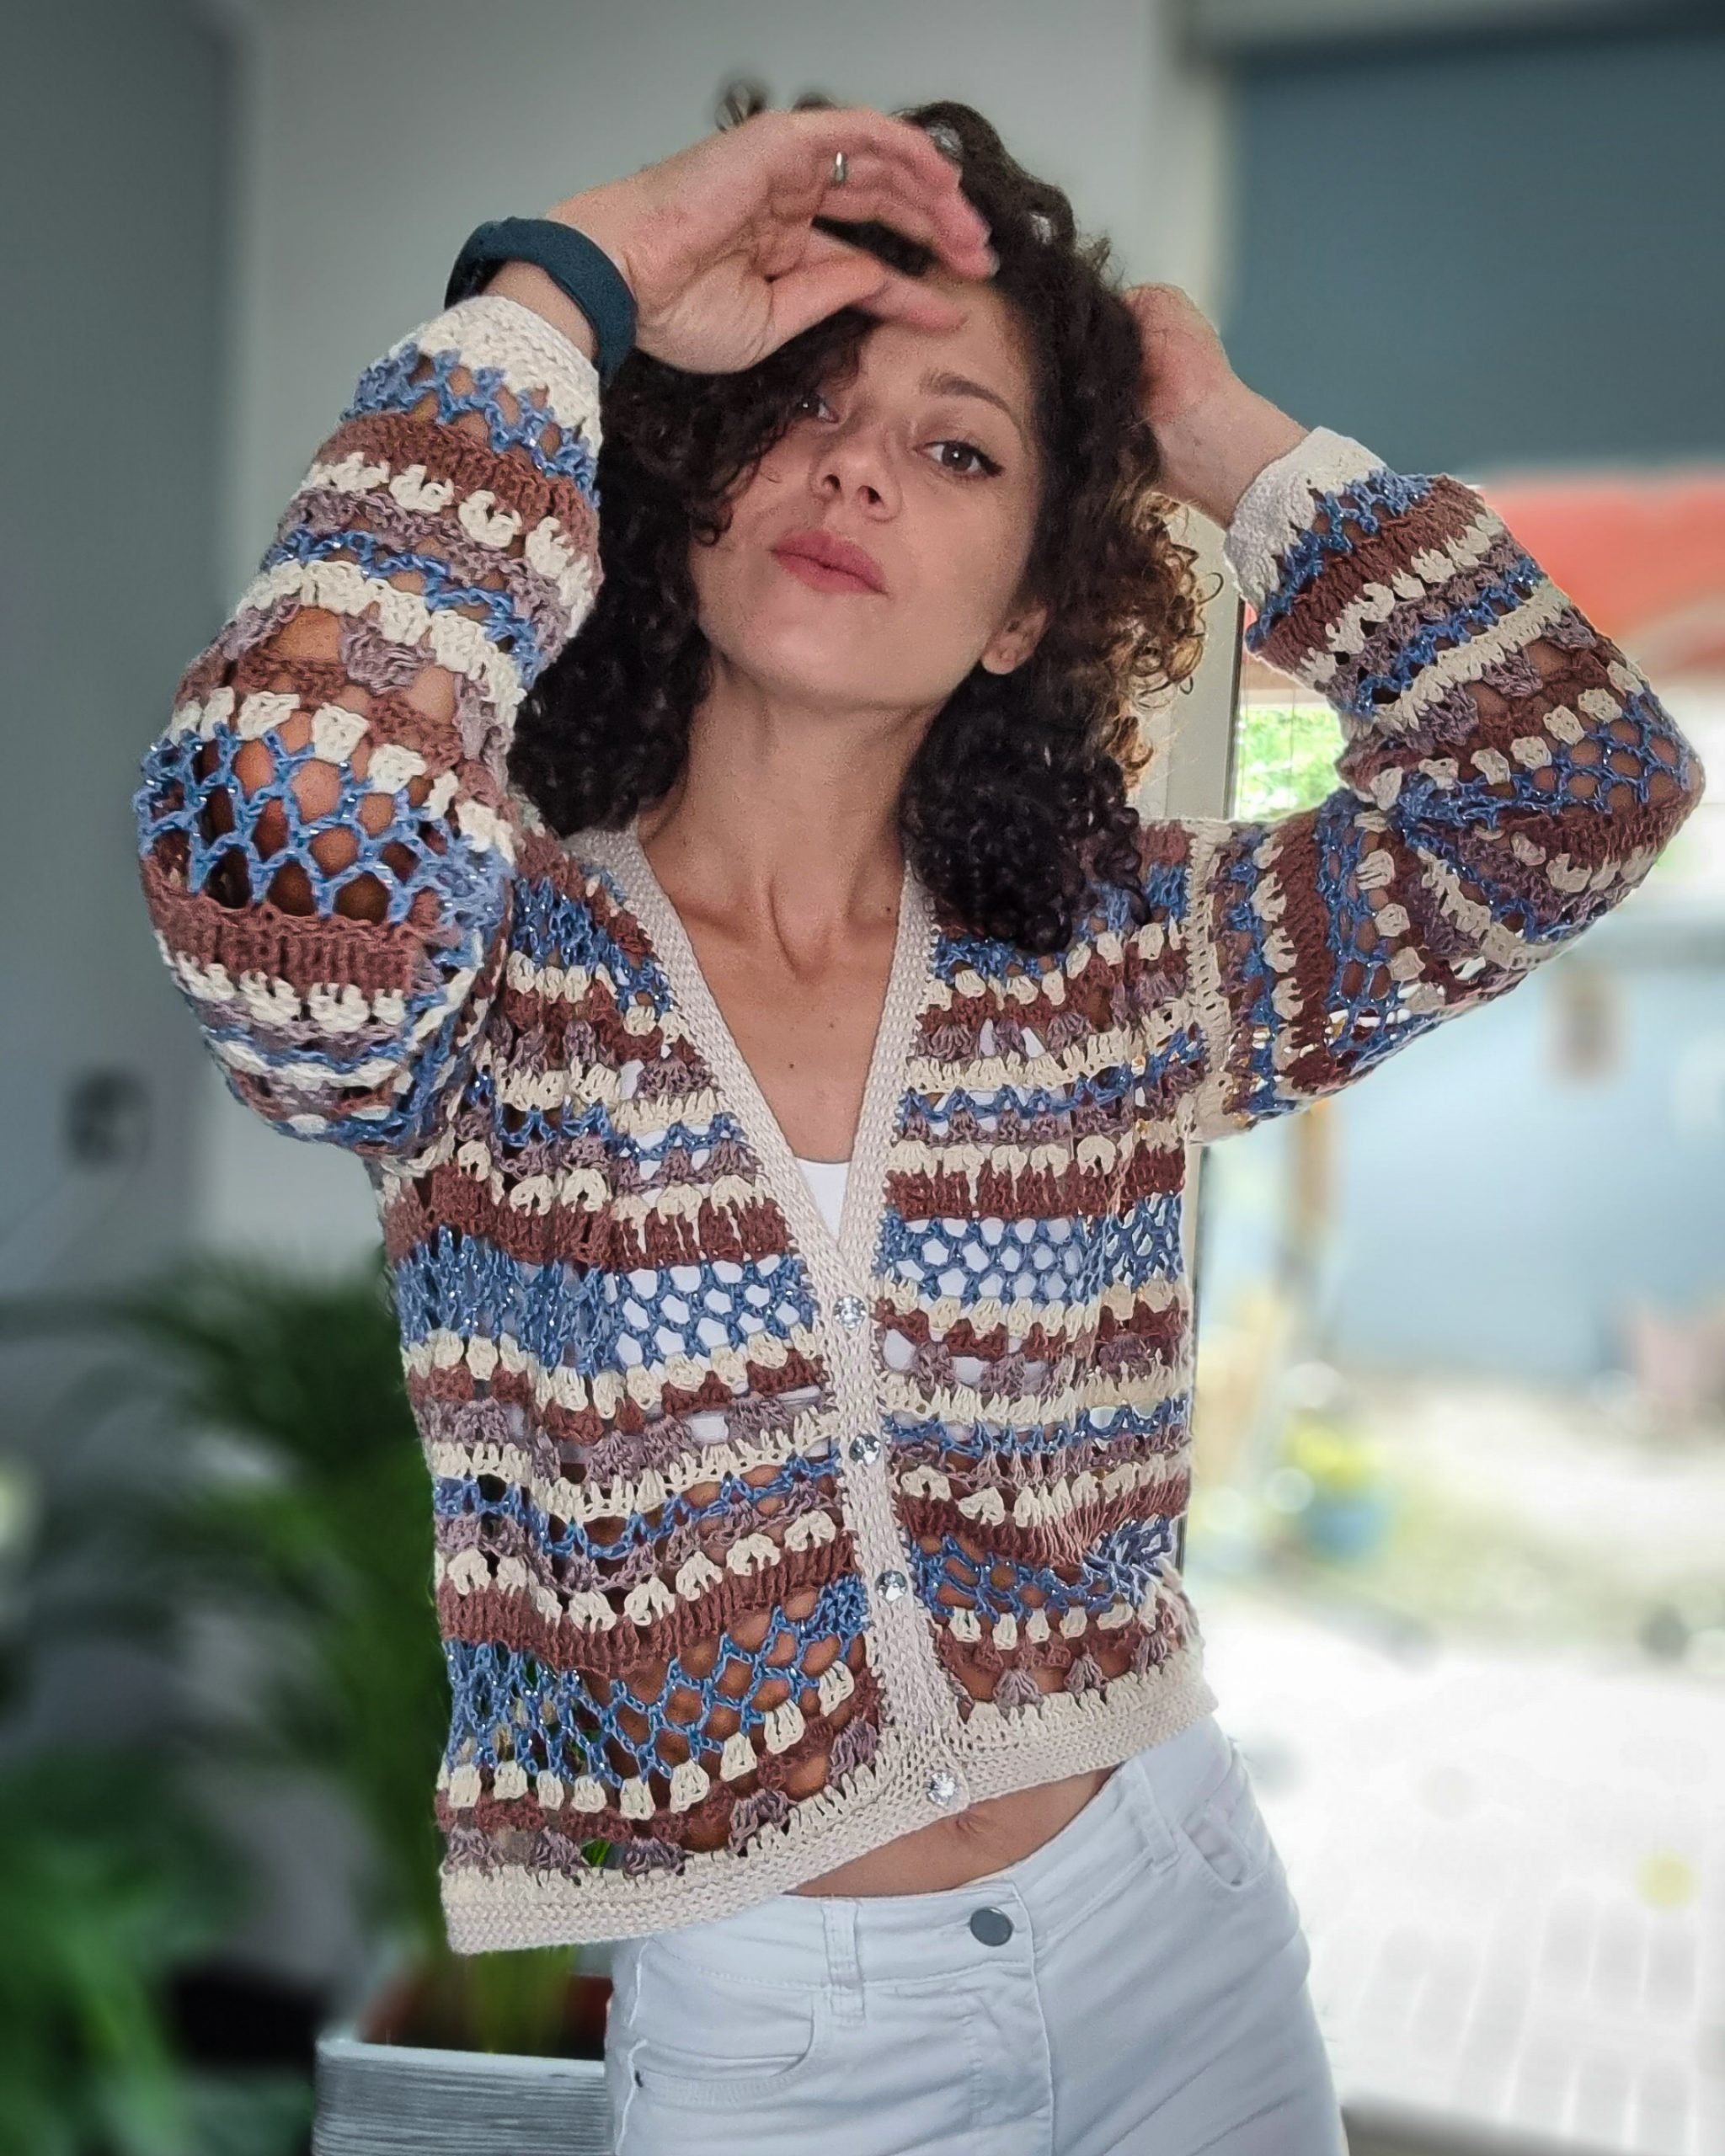
You can Purchase the easily printable PDF pattern, with step by step instructions, stitch and row counts from S up to 5XL sizes here:
But, let’s see what is all about with this beautiful blouse I made:
MATERIALS
• Yarn: Fingering Weight yarn (Size 2)
o Cotton
o Cotton mix
• Crochet Hook:
o 4 mm crochet hook ( I used Furls Streamline Wood by Furls Crochet)
o 3.5 mm crochet hook
• yarn needle for weave in ends
4 buttons 1cm diameter
• Stitch markers
• Scissors
NOTES ABOUT DESIGN
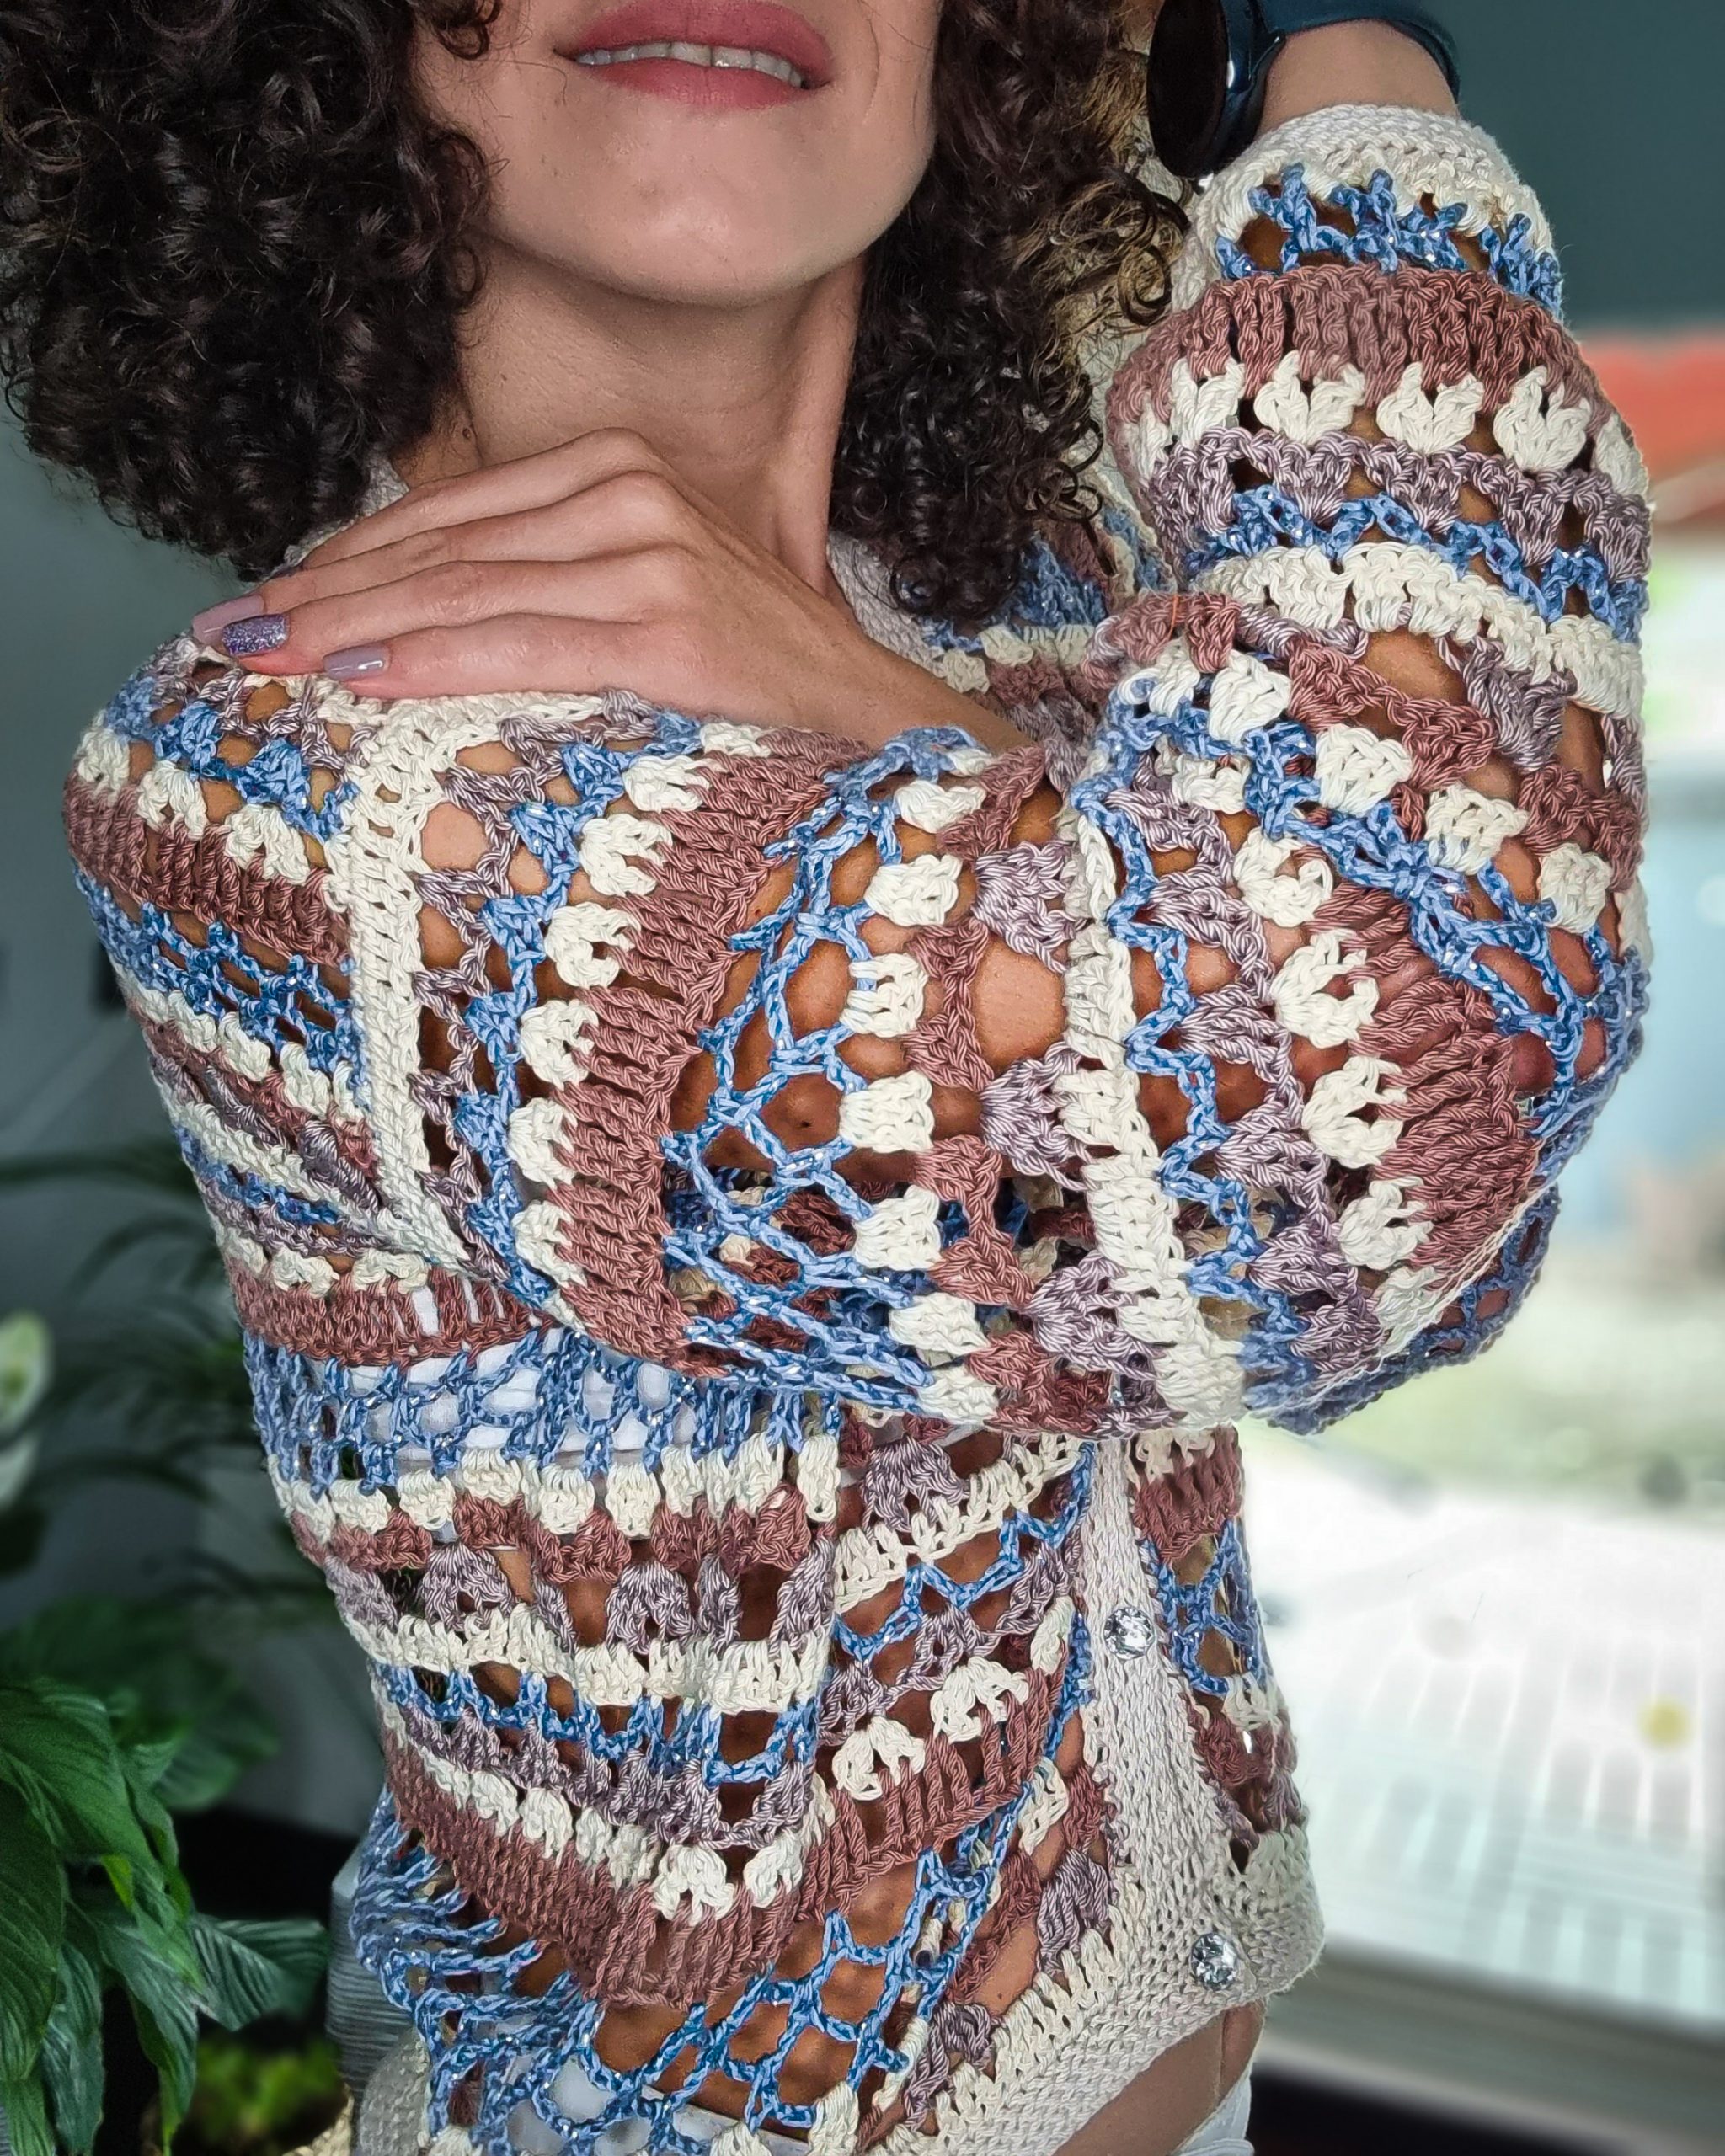
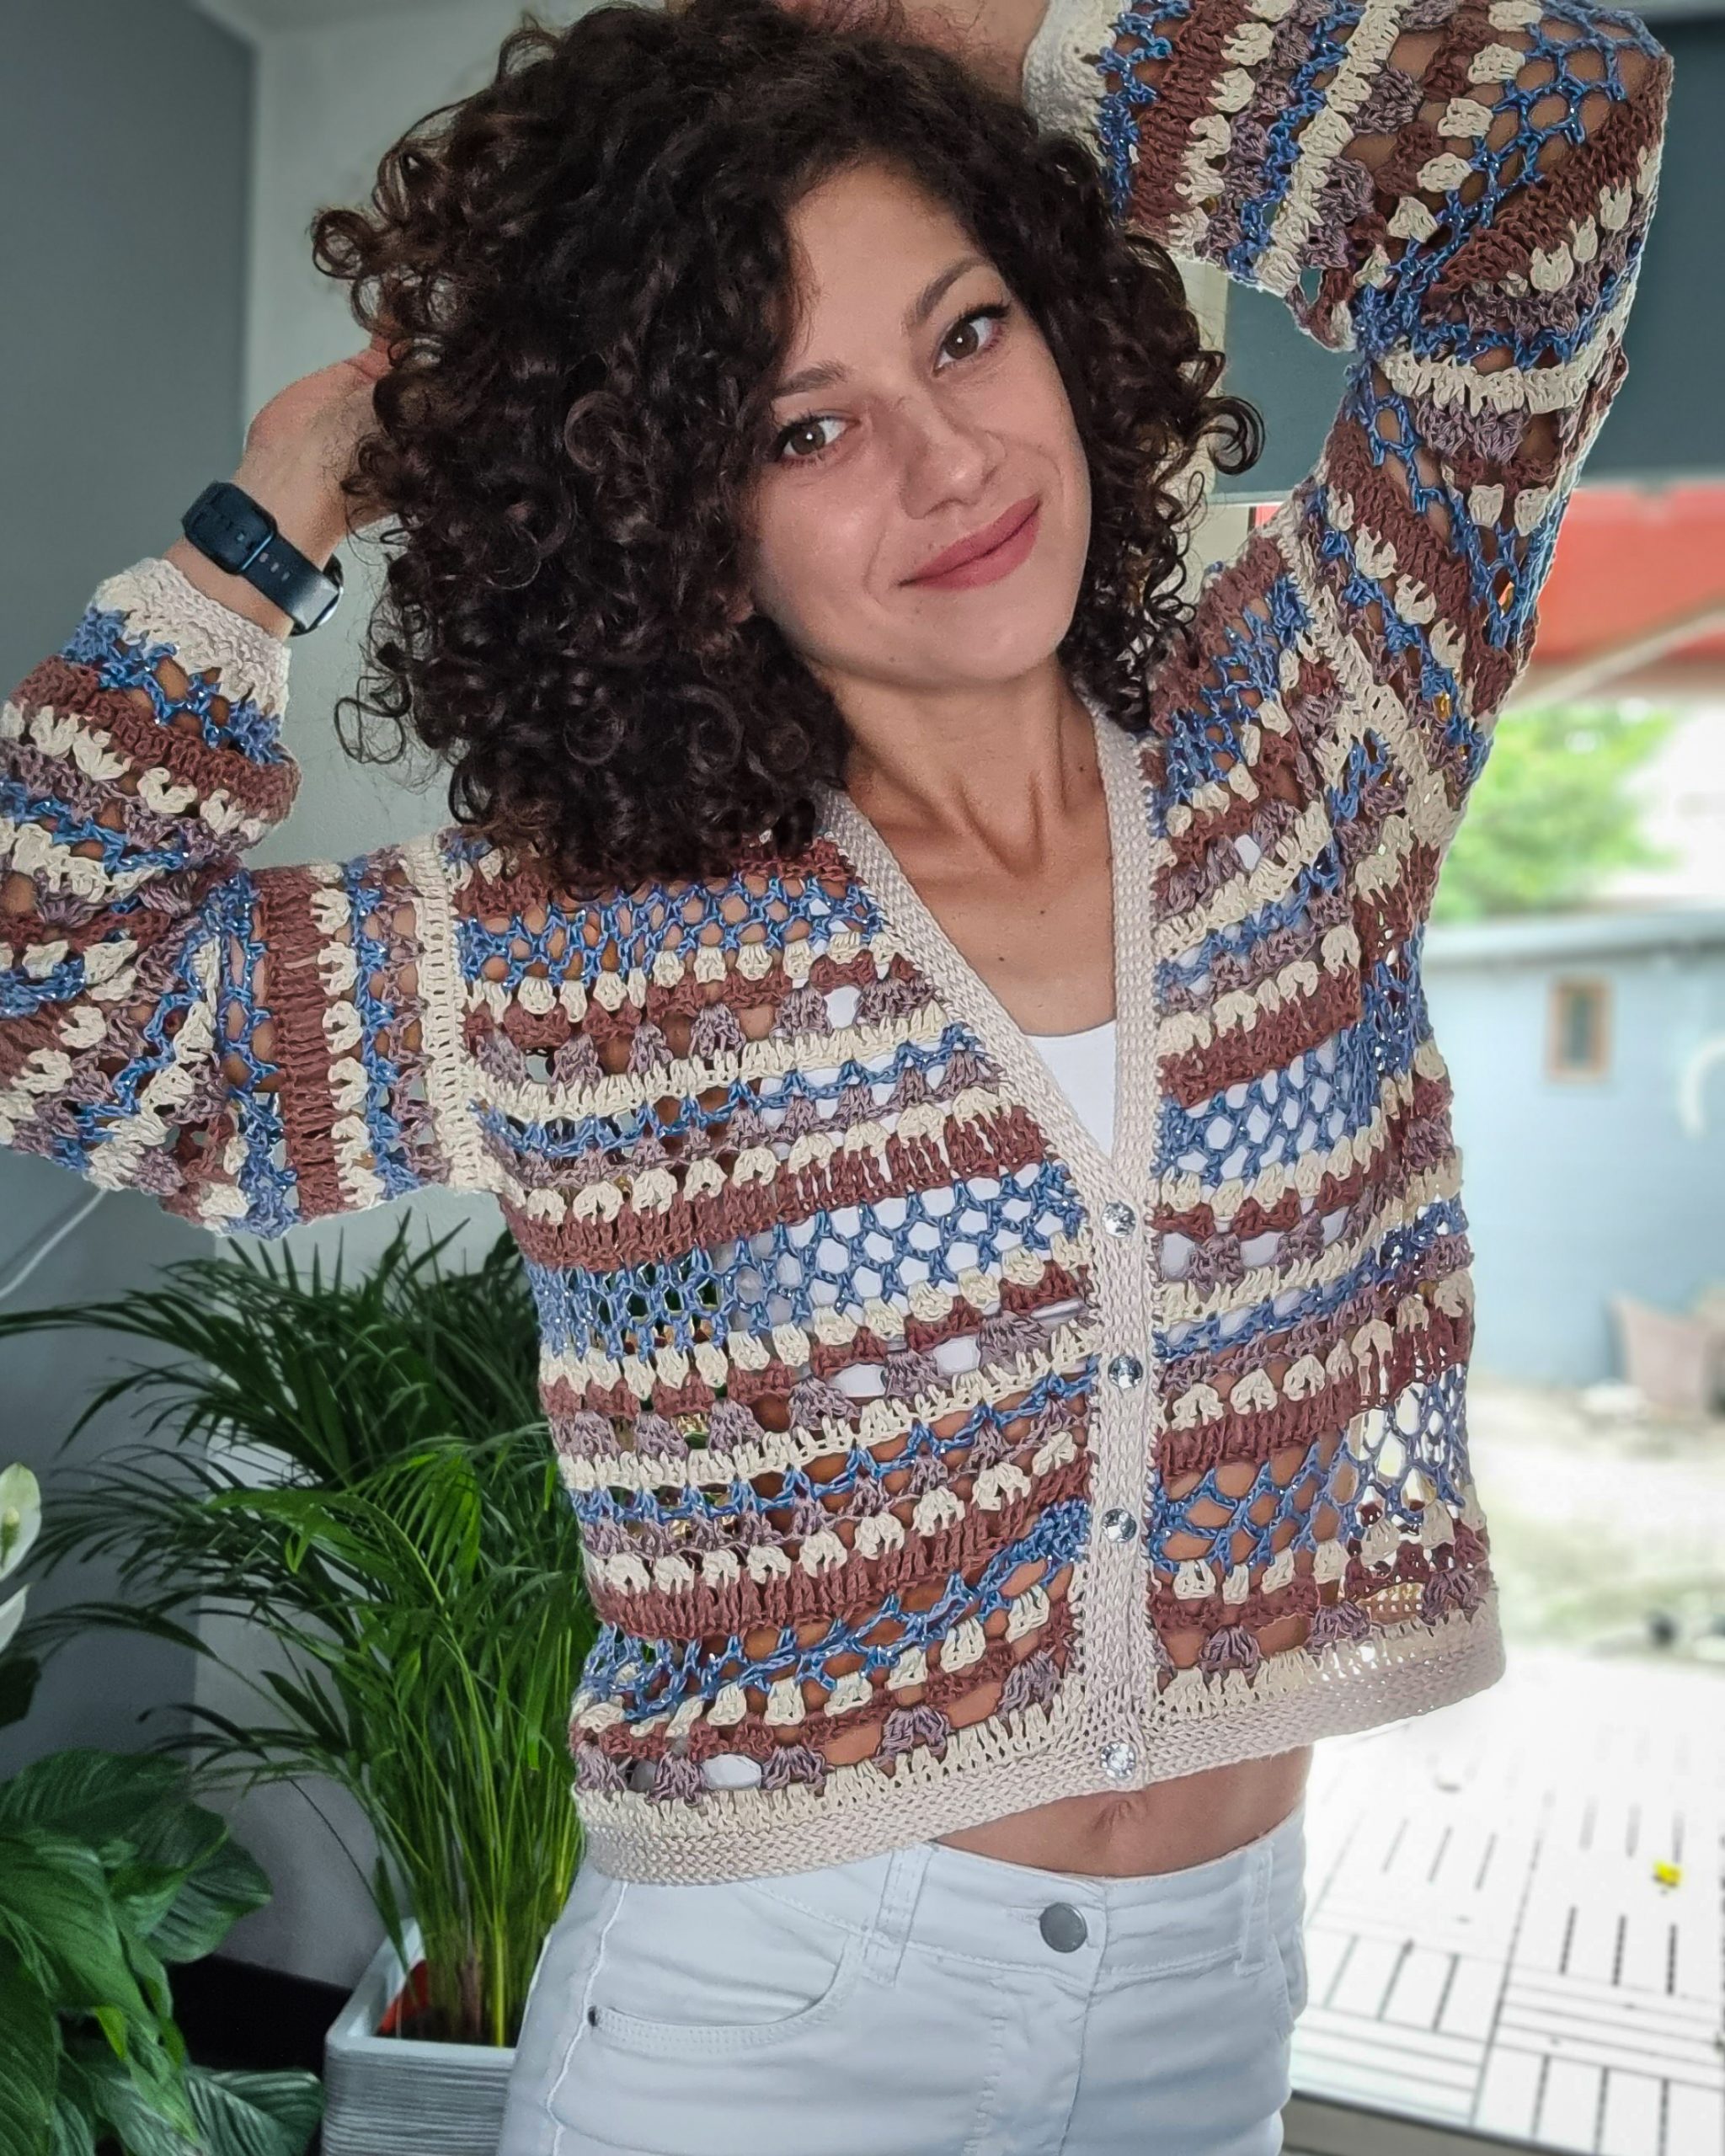
The Late Summer Blouse has a drop-sleeve construction with a slightly V neckline.
The blouse is worked top-down, starting with the back from the neck up to the armpit.
Next, the front panels are worked from the neck up to the armpit.
After the top part is done, the front and back panels are joined at the armpit. The torso is worked in one single piece from the armpit until the desired length.
The sleeves are worked in the round starting into the armhole.
MEASUREMENTS AND SIZES
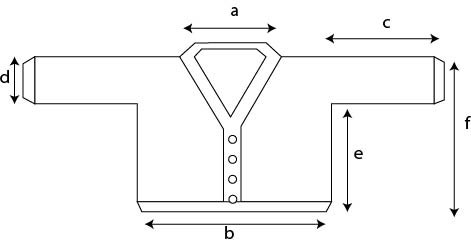
The Late Summer Blouse Pattern is available in 8 sizes, from Small up to 5X Large.
The model is 168 cm and wears size Small.
Neckline a: 22 cm (23, 23, 22, 23, 23, 22)
Bust width b: 55 cm (60, 68, 70, 75, 80, 85, 90)
Sleeve length c: 42 cm (42, 44, 44, 45, 45, 46, 46)
Sleeve width d: 19 cm (22, 22, 25, 25, 28, 28, 28)
Armpit Length e: 26 cm (26. 26. 26. 26. 26. 26. 26)
Length f: 47 cm (50, 50, 53, 53, 56, 56, 56)
How much yarn do you need?
I used:
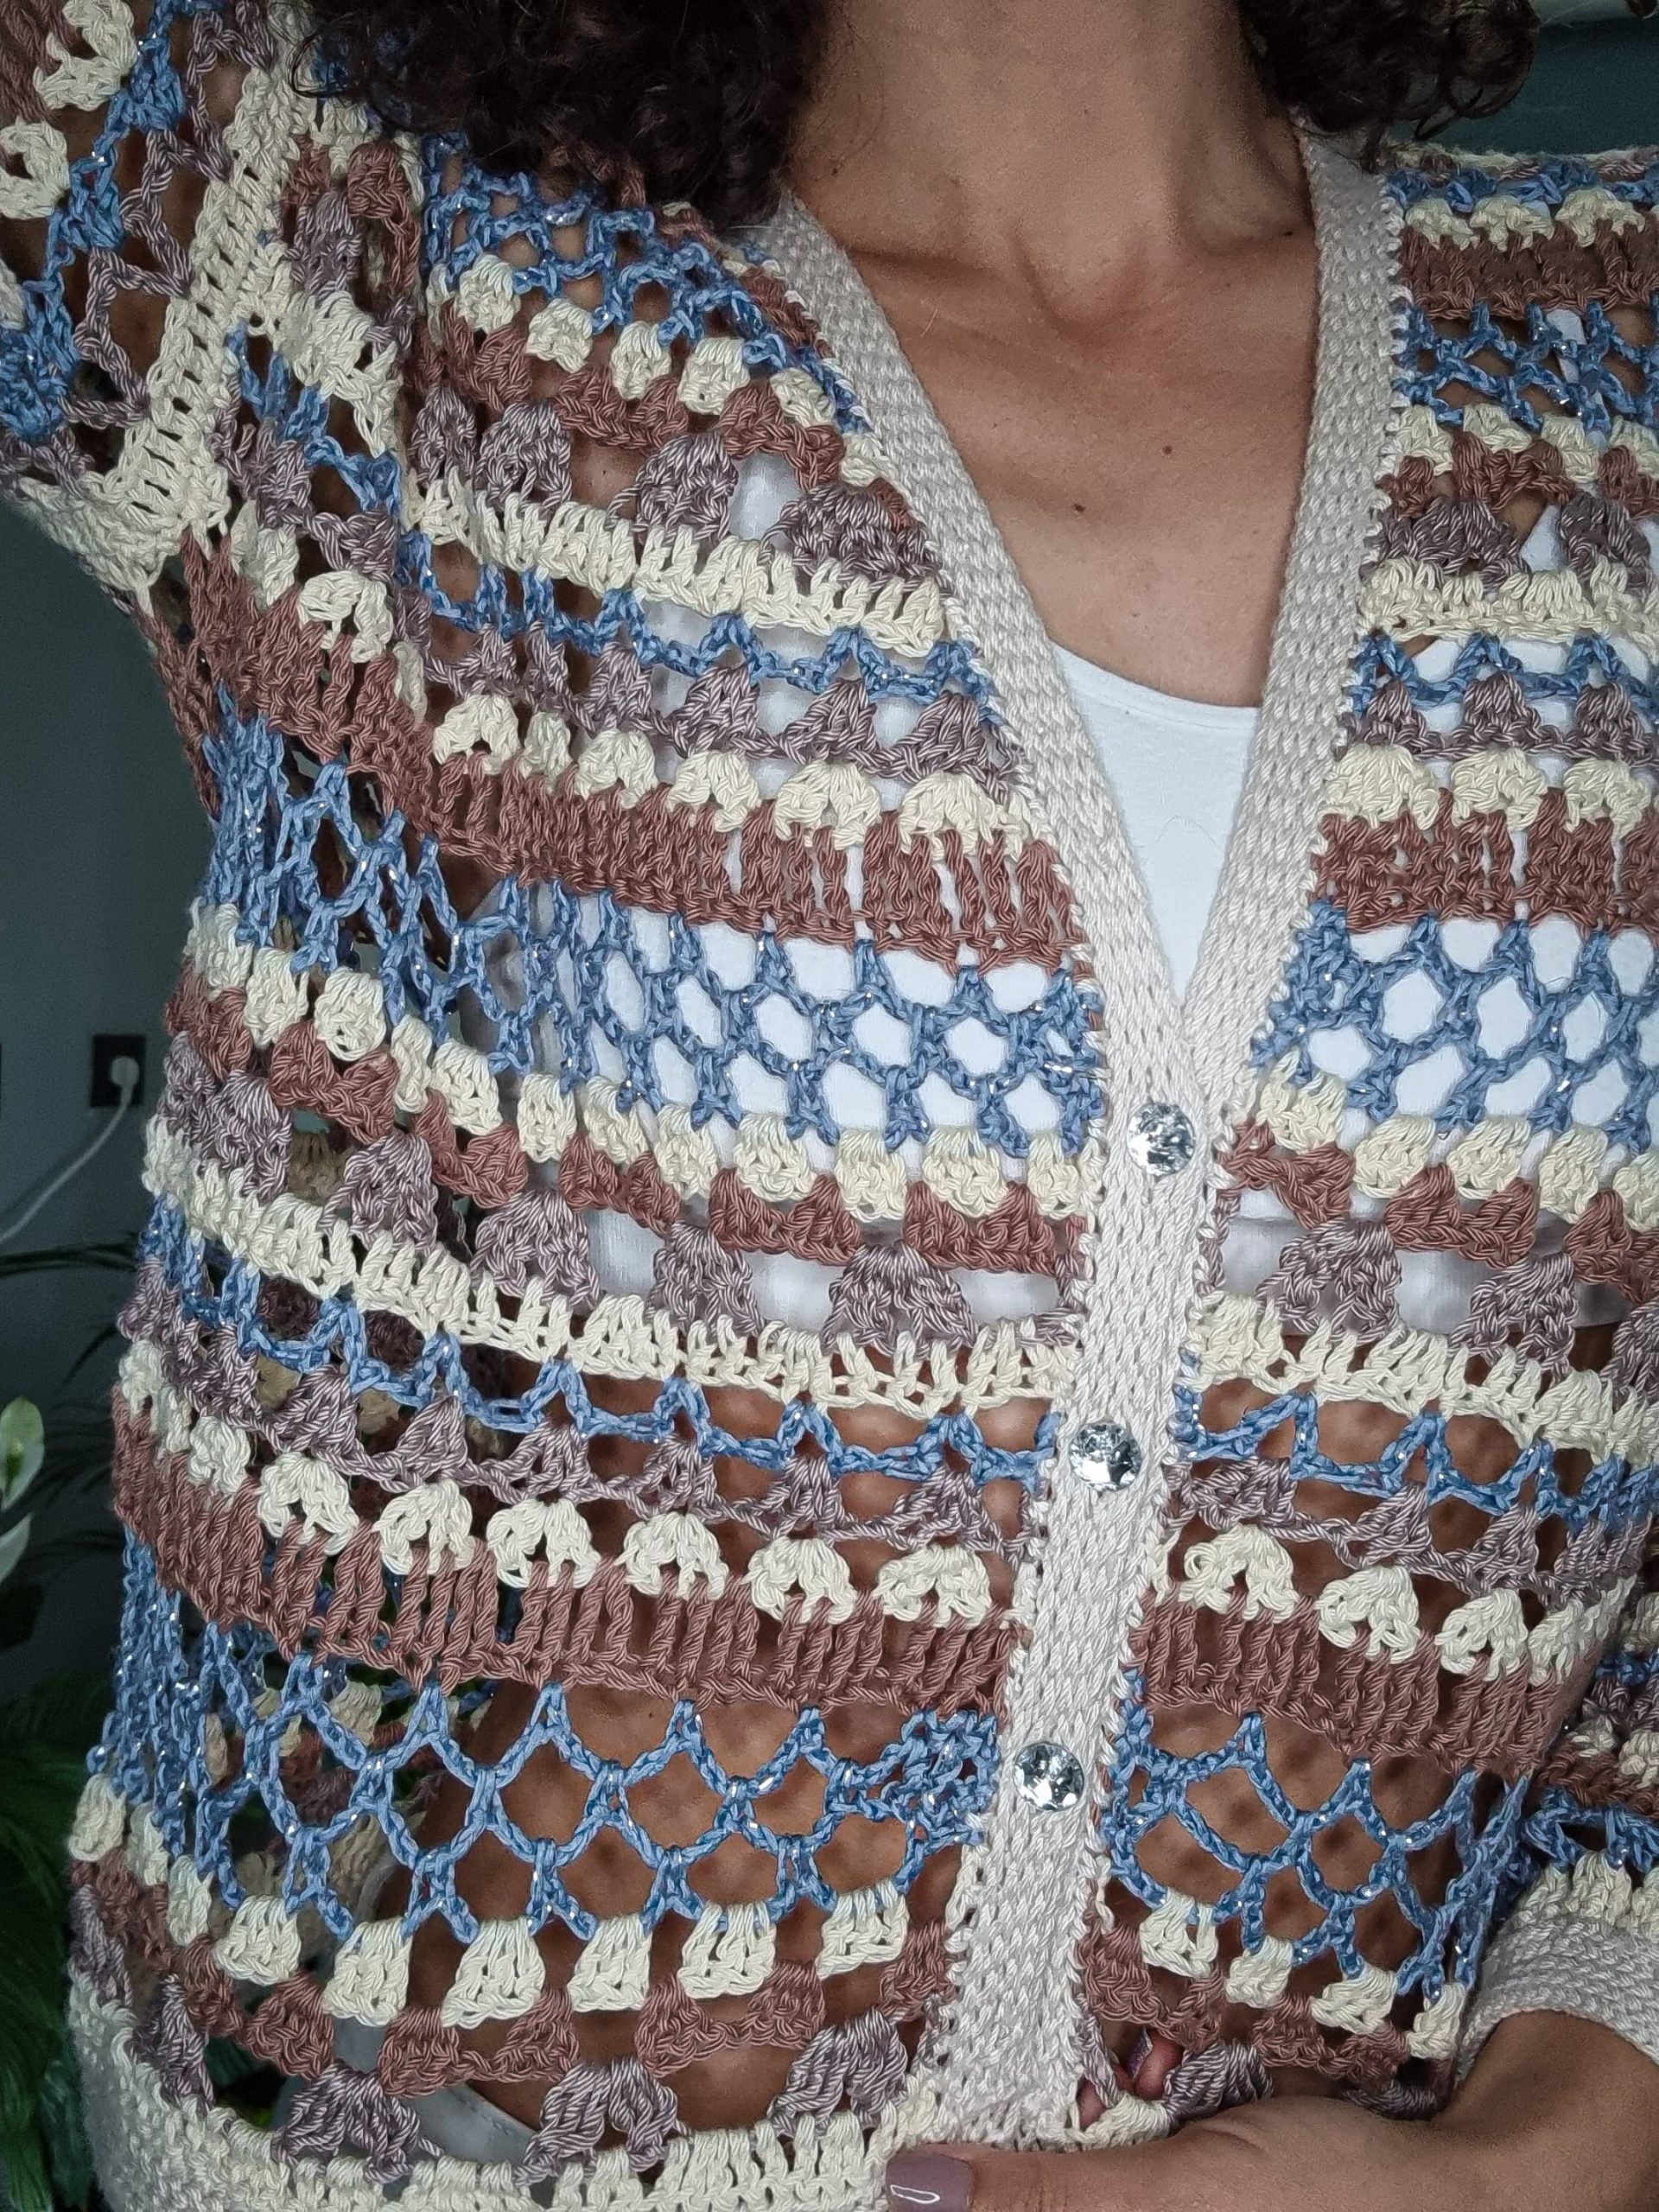
Scheepjes Cotton 8 in colors 501 – Natural and 659 – light Brown.
Scheepjes Catona in color 406 – Soft Beige
Concept by Katia Versailles in color 90 – Jeans/Silver
For each size you will approximate need:
Scheepjes Cotton 8 in colors 501: 3 (4, 4, 5, 5, 6, 6, 6) skeins
Scheepjes Cotton 8 in colors 659: 2 (3, 3, 3, 3, 4, 4, 4) skeins
Scheepjes Catona in color 406: 2 (3, 3, 3, 3, 4, 4, 4) skeins
Concept by Katia Versailles in color 90: 2 (3, 3, 3, 3, 4, 4, 4) skeins
ABBREVIATIONS
Ch – chain
Sc – single crochet
Dc – double crochet
2dc-Group
3dc-group
Vst – V stitch
Trc – Tr crochet
St(s) – stitch(es)
R – rounds
** – repeated section.
TENSION
Using a 4 mm crochet hook in the used stitch pattern
16 sts = 10 cm
11 rows = 15 cm
STITCH PATTERN
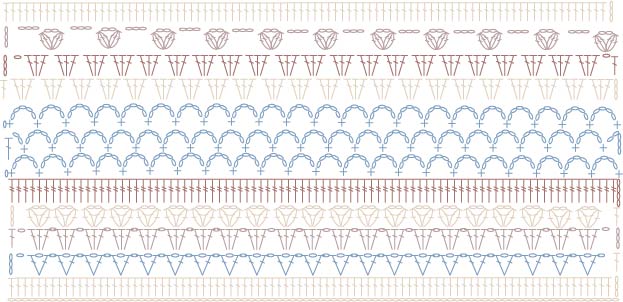
The stitch pattern has a combination of 11 rows and requires a multiple of 4+1 sts.
You can see the stitch chart below:
Special stitches:
2dc-group/3dc-group: *yarn over insert the hook into the indicated st, yarn over and pull out a loop, yarn over and pass it through first 2 loops on your hook*. Rep. from * to * 2/3 times. Yarn over and pass it through all loops on your hook.
Vst: (1dc, 2ch, 1dc) in the same st, 1ch, skip next 3 sts.
The stitch pattern requires a 2dc-group and a 3dc-group V.
Work in the same st/space:
2dc-group/3dc-group, 2ch, 2dc-group/3dc-group
PATTERN NOTES
Work 3ch before starting any row with dc. 3ch counts as the first dc.
Work 1ch before starting a row with sc. 1ch does not count as first sc.
If you want to adjust the number of chain stitches, to begin with, work a multiple of 4+1 plus 3ch to start the first row.
work 4ch before starting a trc row.
When joining the back and front panels, continue the pattern as you are working on one single piece.
In case you need it, adjust the number of stitches to have a multiple of 4+1.
use a 3.5 mm crochet hook to work the first row into a side row, when starting the sleeves or the neckline edging. This will help to go with the hook into the sts and not around.
Work the sleeves into the armholes side rows, in the round; work the first row with a 3.5 mm crochet hook in single crochet; work 2sc in each side row.
Work the first row of the neckline edging with a 3.5 mm crochet hook in single crochet; work 3sc in each side row.
The written pattern below does not mention the color changing
See the color order in the stitch chart above.
change the color at the end of the row, by finishing the last st with the next color you want to use
numbers for sizes M, L, XL, XXL, 3XL, 4XL, and 5XL are written between brackets;if not pattern applies for all sizes.
INSTRUCTIONS
Top back panel
Start: ch89 (97, 109, 113, 121, 129, 137, 145)
R1: 3ch, start in the 5th ch, 1dc in each st until the end of the row. 4ch and turn
R2: skip the next 3sts, *1Vst in next st, 1ch, skip next 3 sts. *rep until the end of the row. Finish the row with 1dc in the third ch. 4ch and turn.
R3: skip next 1ch-sp, *3dc in the next Vst, 1ch, skip next 1ch-sp. *rep until the end of the row. Finish the row with 1dc in the third ch, 3ch, and turn.
R4: (2dc-group, 2ch, 2dc-group) into the second dc of each group of 3dc. Finish the row, with 1dc into the third ch, 4ch, and turn.
R5: 2trc before the first 2dc-group V, 4dc into each 2dc-group V, 1trc after the last
2dc-group V, 1trc into the third ch. 1ch and turn.
R6: 1sc, *ch5, skip next 3sts, 1sc in next st. *rep. until the end of the row. 5ch and turn.
R7: 1sc in next 5ch-sp, *5ch, 1sc in next 5ch-sp. *rep. until the end of the row. Finish the row with 2ch and 1dc in the last sc. 1ch and turn.
R8: 1sc, *5ch, 1sc in next 5ch-sp. *rep. until the end of the row. 3ch and turn.
R9: 3dc in each 5ch-sp. Finish the row with 1dc in the last sc. 4ch and turn.
R10: 3dc between each 3dc. Finish the row with 1ch, skip the last 3dc, 1dc in the third ch. 3ch and turn
R11: 3dc-group V in the first 1ch sp, *3ch, skip next 6dc, 3dc-group V in the next space. *rep, until the end of the row. Finish the row with 3ch, 1dc in the third ch. 3ch and turn.
R12: 4dc in each 3cg-sp and 3dc-group V
You can Purchase the easily printable PDF pattern, with step by step instructions, stitch and row counts from S up to 5XL sizes here:
Next, rep from R2 to R12 until you have in total 15 (17, 17, 20, 20, 22, 22, 22) rows.
Stop at the corespondent row from the stitch pattern repeat.
Fasten off.
Top Front Panels
Start to work into the foundation stitches of the Top Back Panel (shoulders)
Use stitch markers to mark the front panels sts: 27 (31, 35, 39, 43, 47, 51, 55) sts.
Work each front panel individually.
Work for the front panel in the mirror.
You can follow either the stitch chart or the written pattern below.
The stitch chart is drawn for size Small. Follow the chart for increases, but with the corresponding number of stitches according to your size.
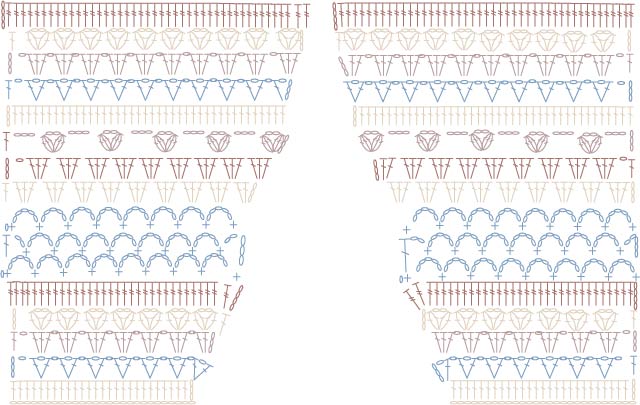
Right front panel (A)
Rejoin yarn into the first stitch at the right.
R1A: 3ch, 1dc into each st until the end of the row. 4ch and turn,
27 (31, 35, 39, 43, 47, 51, 55) sts.
R2A: 1dc in the same st (same as ch4), 1ch, skip next 3 sts, *1Vst in next st, 1ch, skip next 3 sts. *rep until the end of the row. finish the row with 1dc in the third ch. 4ch and turn.
29 (33, 37, 41, 45, 49, 53, 57) sts.
R3A: *3dc in next Vst, 1ch. *rep. until the end of the row. Finish the row with 3dc in the last 1ch-sp. 3ch and turn.
29 (33, 37, 41, 45, 49, 53, 57) sts.
R4A: (2dc-group, 2ch, 2dc-group) into the second dc of each group of 3dc. Finish the row, with 1dc into the third ch, 4ch, and turn.
30 (34, 38, 42, 46, 50, 54, 58) sts.
R5A: 2tr crochet before the first 2dc-group V, 4tr into each 2dc-group V, 2tr into the third ch. 1ch and turn.
33 (37, 41, 45, 49, 53, 57, 61) sts.
R6A: 1sc, *5ch, skip next 3sts, 1sc in next st. *rep until the end of the row. 5ch and turn
R7A: 1sc in next 5ch-sp, *5ch, 1sc in next 5ch-sp. *rep. until the end of the row. Finish the row with 2ch and 1dc in the last sc. 1ch and turn.
R8A: 1sc, *5ch, 1sc in next 5ch-sp. *rep. until the end of the row. 3ch and turn.
R9A: 3dc in each 5ch-sp. Finish the row with 3dc in the last sc. 3ch and turn.
28 (32, 36, 40, 44, 48, 52, 56 ) sts.
R10A: 2dc in the first st, 3dc between each group of 3dc. Finish the row with 1ch and 1dc into the third ch. 6ch and turn
29 (33, 37, 41, 45, 49, 53, 57) sts.
R11A: skip next 3dc, *3dc-Group V in the next space, 3ch, skip next 6dc. *rep until the end of the row. Finish the row with 3dc-group V into the third ch. 3ch and turn,
36 (40, 44, 48, 52, 56, 60, 64) sts.
R12A: 4dc in each 3ch-sp and 3dc-group. 4ch and turn.
41 (45, 49, 53, 57, 61, 65, 69) sts.
R13A: skip next 3 sts, *1vst in next st, 1ch, skip next 3sts. *rep until the end of the row. Finish the row with 1Vst into the third ch 3ch and turn
41 (45, 49, 53, 57, 61, 65, 69) sts.
R14A:2dc in first Vst, 1ch, *3dc in next Vst, 1ch. *rep until the end of the row. Finish the row with 1dc in third st. 3ch and turn
41 (45, 49, 53, 57, 61, 65, 69) sts.
R15A: 2dc-group V in the second dc of each 3dc. Finish the row with 1dc into the third ch. 4ch and turn
42 (46, 50, 54, 58, 62, 66, 70) sts.
For the Small Size, R15A is the last row of the front panel.
On the next row, the joining row, make the R16 increase on the front panels.
Only for sizes M, L, XL, XXL, 3XL, 4XL, and 5XL
R16A: 1trc in the first st, same as ch4, 4trc in each 2dc-Group V, 2trc in the space after the last 2dc-group V, 1trc in the third ch.
49 ( 53, 57, 61, 65, 69, 73) sts.
Left front panel (B)
For the left front panel, you can follow the stitch chart above, if you want to work it in the mirror.
To be easier, follow the same written pattern as the right front panel. The stitch pattern allows you to do that without major differences in how the stitch pattern is looking.
TORSO
Before start working on the body of the blouse, you need to join at the armpit front and back panels.
The joining row will be the correspondent row in the stitch pattern repeat according to the size you are making.
Only on the size Small, you need to increase at the beginning and at the end of the row with 2sts (the front panel edges).
When working the joining row, make sure you end up with a multiple of 4+1 sts, so the stitch pattern work. You can adjust that by adding armpit sts.
Continue working on the length of the blouse, by repeating the stitch pattern.
For the sample, I worked 19 rows, but you can work as many rows as you want to get to the desired length.
SLEEVES
To start the sleeves, follow the instructions in the Pattern Notes Section.
Rejoin yarn at the armpit:
R1: 1sc in each st around. (working 2sc in each side row).
60 ( 68, 68, 80, 80, 88, 88, 88) sc
R2: 3ch, 1dc in each st around
R3: 4ch, 1dc in the same st, 1ch, skip 3sts, *1Vst in next, 1ch, skip 3sts. *rep until the end of the round. Close the round with an slst into the third ch.
R4: start the round into the first Vst
(3ch, 2dc) in the same Vst, 1ch, *3dc in next Vst, 1ch. *Rep. until the end of the round. Close the round with slst into the third ch.
R5: start the round into the second dc
(3ch, 1dc, 2ch, 2dc-group) in the same st, 2dc-group V in the second st of each 3dc. Close the round with slst into the first dc.
R6: 4ch, 4tr in each 2dc-group V.
R7: 1ch, 1sc, 5ch, skip next 3sts, *1sc in next st, 5ch, skip next 3sts. Rep. until the end of the round. Close the round with slst in first sc.
You can Purchase the easily printable PDF pattern, with step by step instructions, stitch and row counts from S up to 5XL sizes here:
R8:5ch, 1sc in next 5ch-sp, *5ch, 1sc in next 5ch-sp. *rep until the end of the round. Close the round with 2ch and 1dc in the third st.
R9: 1ch, 1sc, 5ch, *1sc in next 5ch-sp, 5ch. *rep until the end of the round. Close the round with slst into first sc.
R10:3ch, 2dc in the first 5ch-sp, 3dc into each 5ch-sp until the end of the round. Close the round with slst into the third ch.
R11: start the round into the first space (between 2 groups of 3dc),
3ch, 2dc in the same space, 3dc in each space around. Close the round with slst into the third ch.
R12: 3ch, *3dc-Group V in the next space, 3ch, skip next 6dc. *rep. until the end of the round. Close the round with slst into the first 3dc-group.
R13: start the round into the last 3ch-sp.
(3ch, 3dc) into the same 3ch-sp, 4dc in each 3dc-Group V and 3ch-sp until the end of the round.
Next, rep. R3 to R13 until you complete the length of the sleeve or you have in total:
30 (30, 32, 32, 33, 33, 34, 34) rounds.
EDGING
Before working the edging, weave in all looser ends especially if you worked with more than one color.
Work the edging around the cuffs, neckline and buttons line, and bottom hem.
Follow the instructions in the Pattern Notes when working the Button line edging.
Work first the bottom hem and then the button line.
R1: 1sc in each st.
R2: 1slst in the back loop only in each st until the end of the row.
Rep. R2 until the edge has desired width. For the sample, I worked 9 rows in slst in the back loop only.
On the Button line, in row 5, make buttonholes.
Work the first hole after 4 stitches from the bottom, and then at every 8sts, until you have 4 in total.
Make the buttonhole by chaining 1 and skip 1st.
TO FINISH
Weave in all looser ends and block to measurements.
And, done!
I really like this blouse and I hope you will like too. Can’t wait to make one more in a different fiber than cotton and see how it will be.
But, until then, Happy Crochet!
You can Purchase the easily printable PDF pattern, with step by step instructions, stitch and row counts from S up to 5XL sizes here:



Comments are closed.