I can not tell you how much I love this job! How amazing is to let your mind explore the creativity inside and get out from there some amazing things.
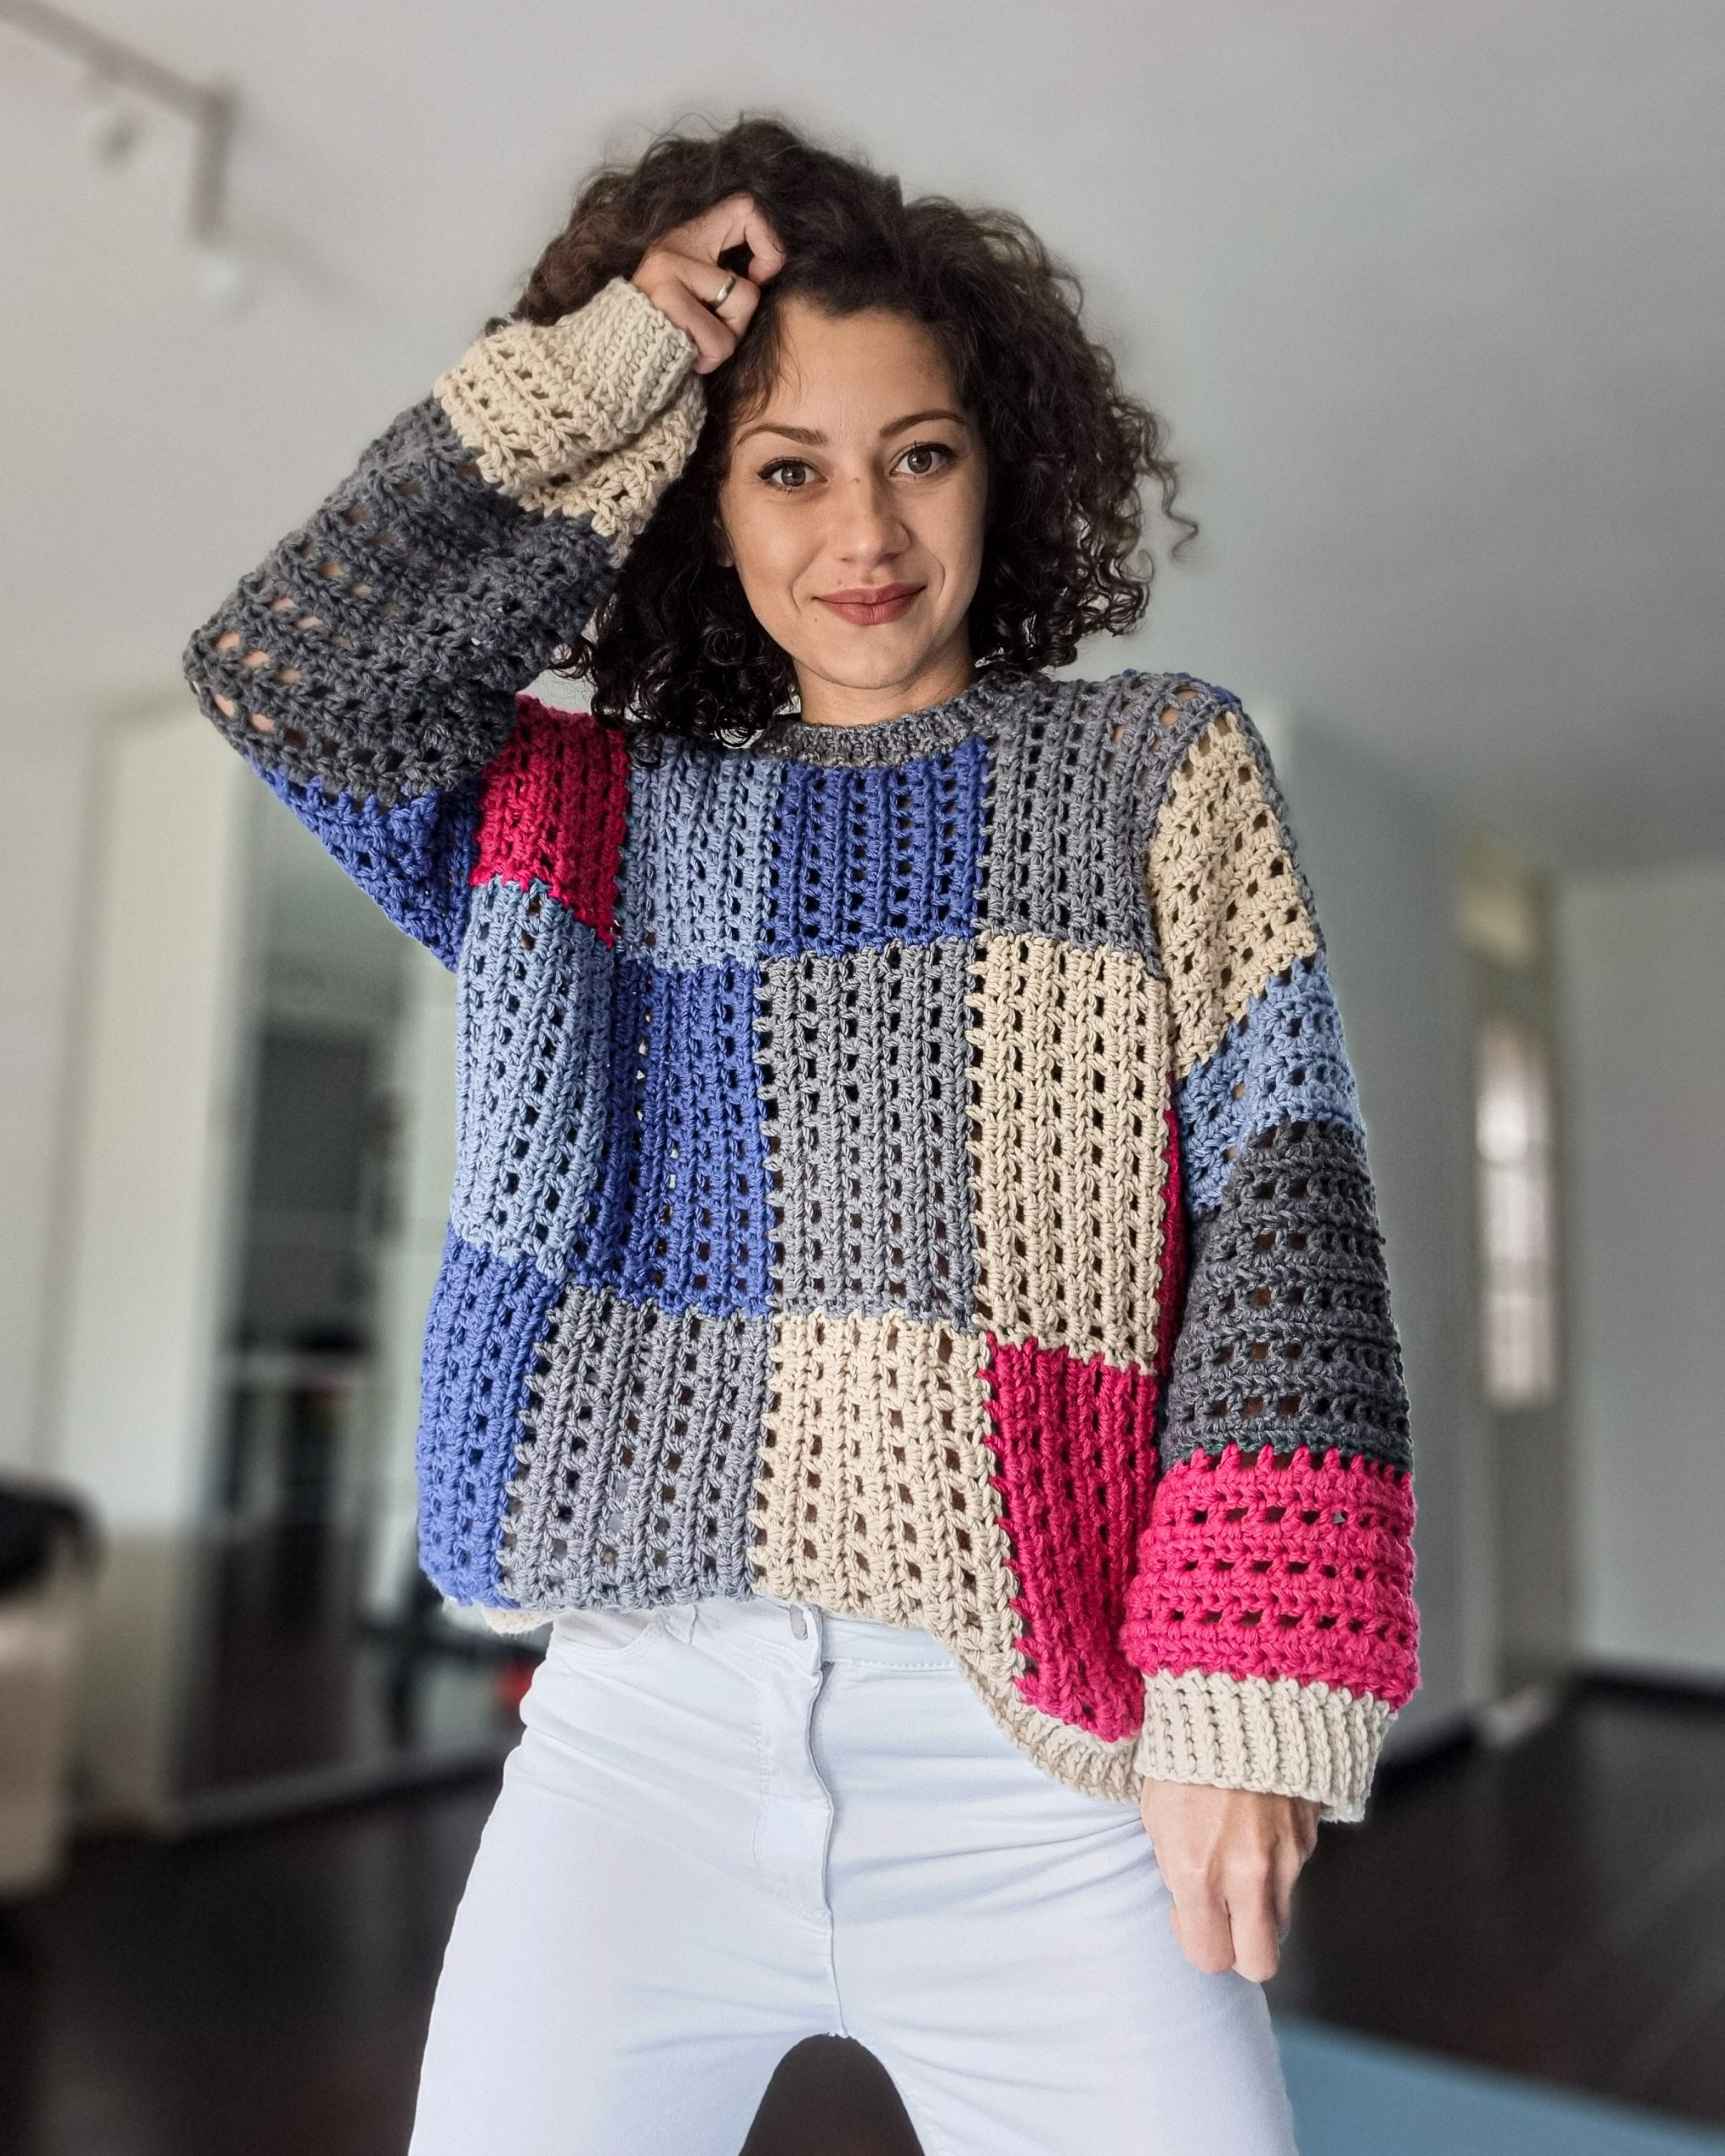
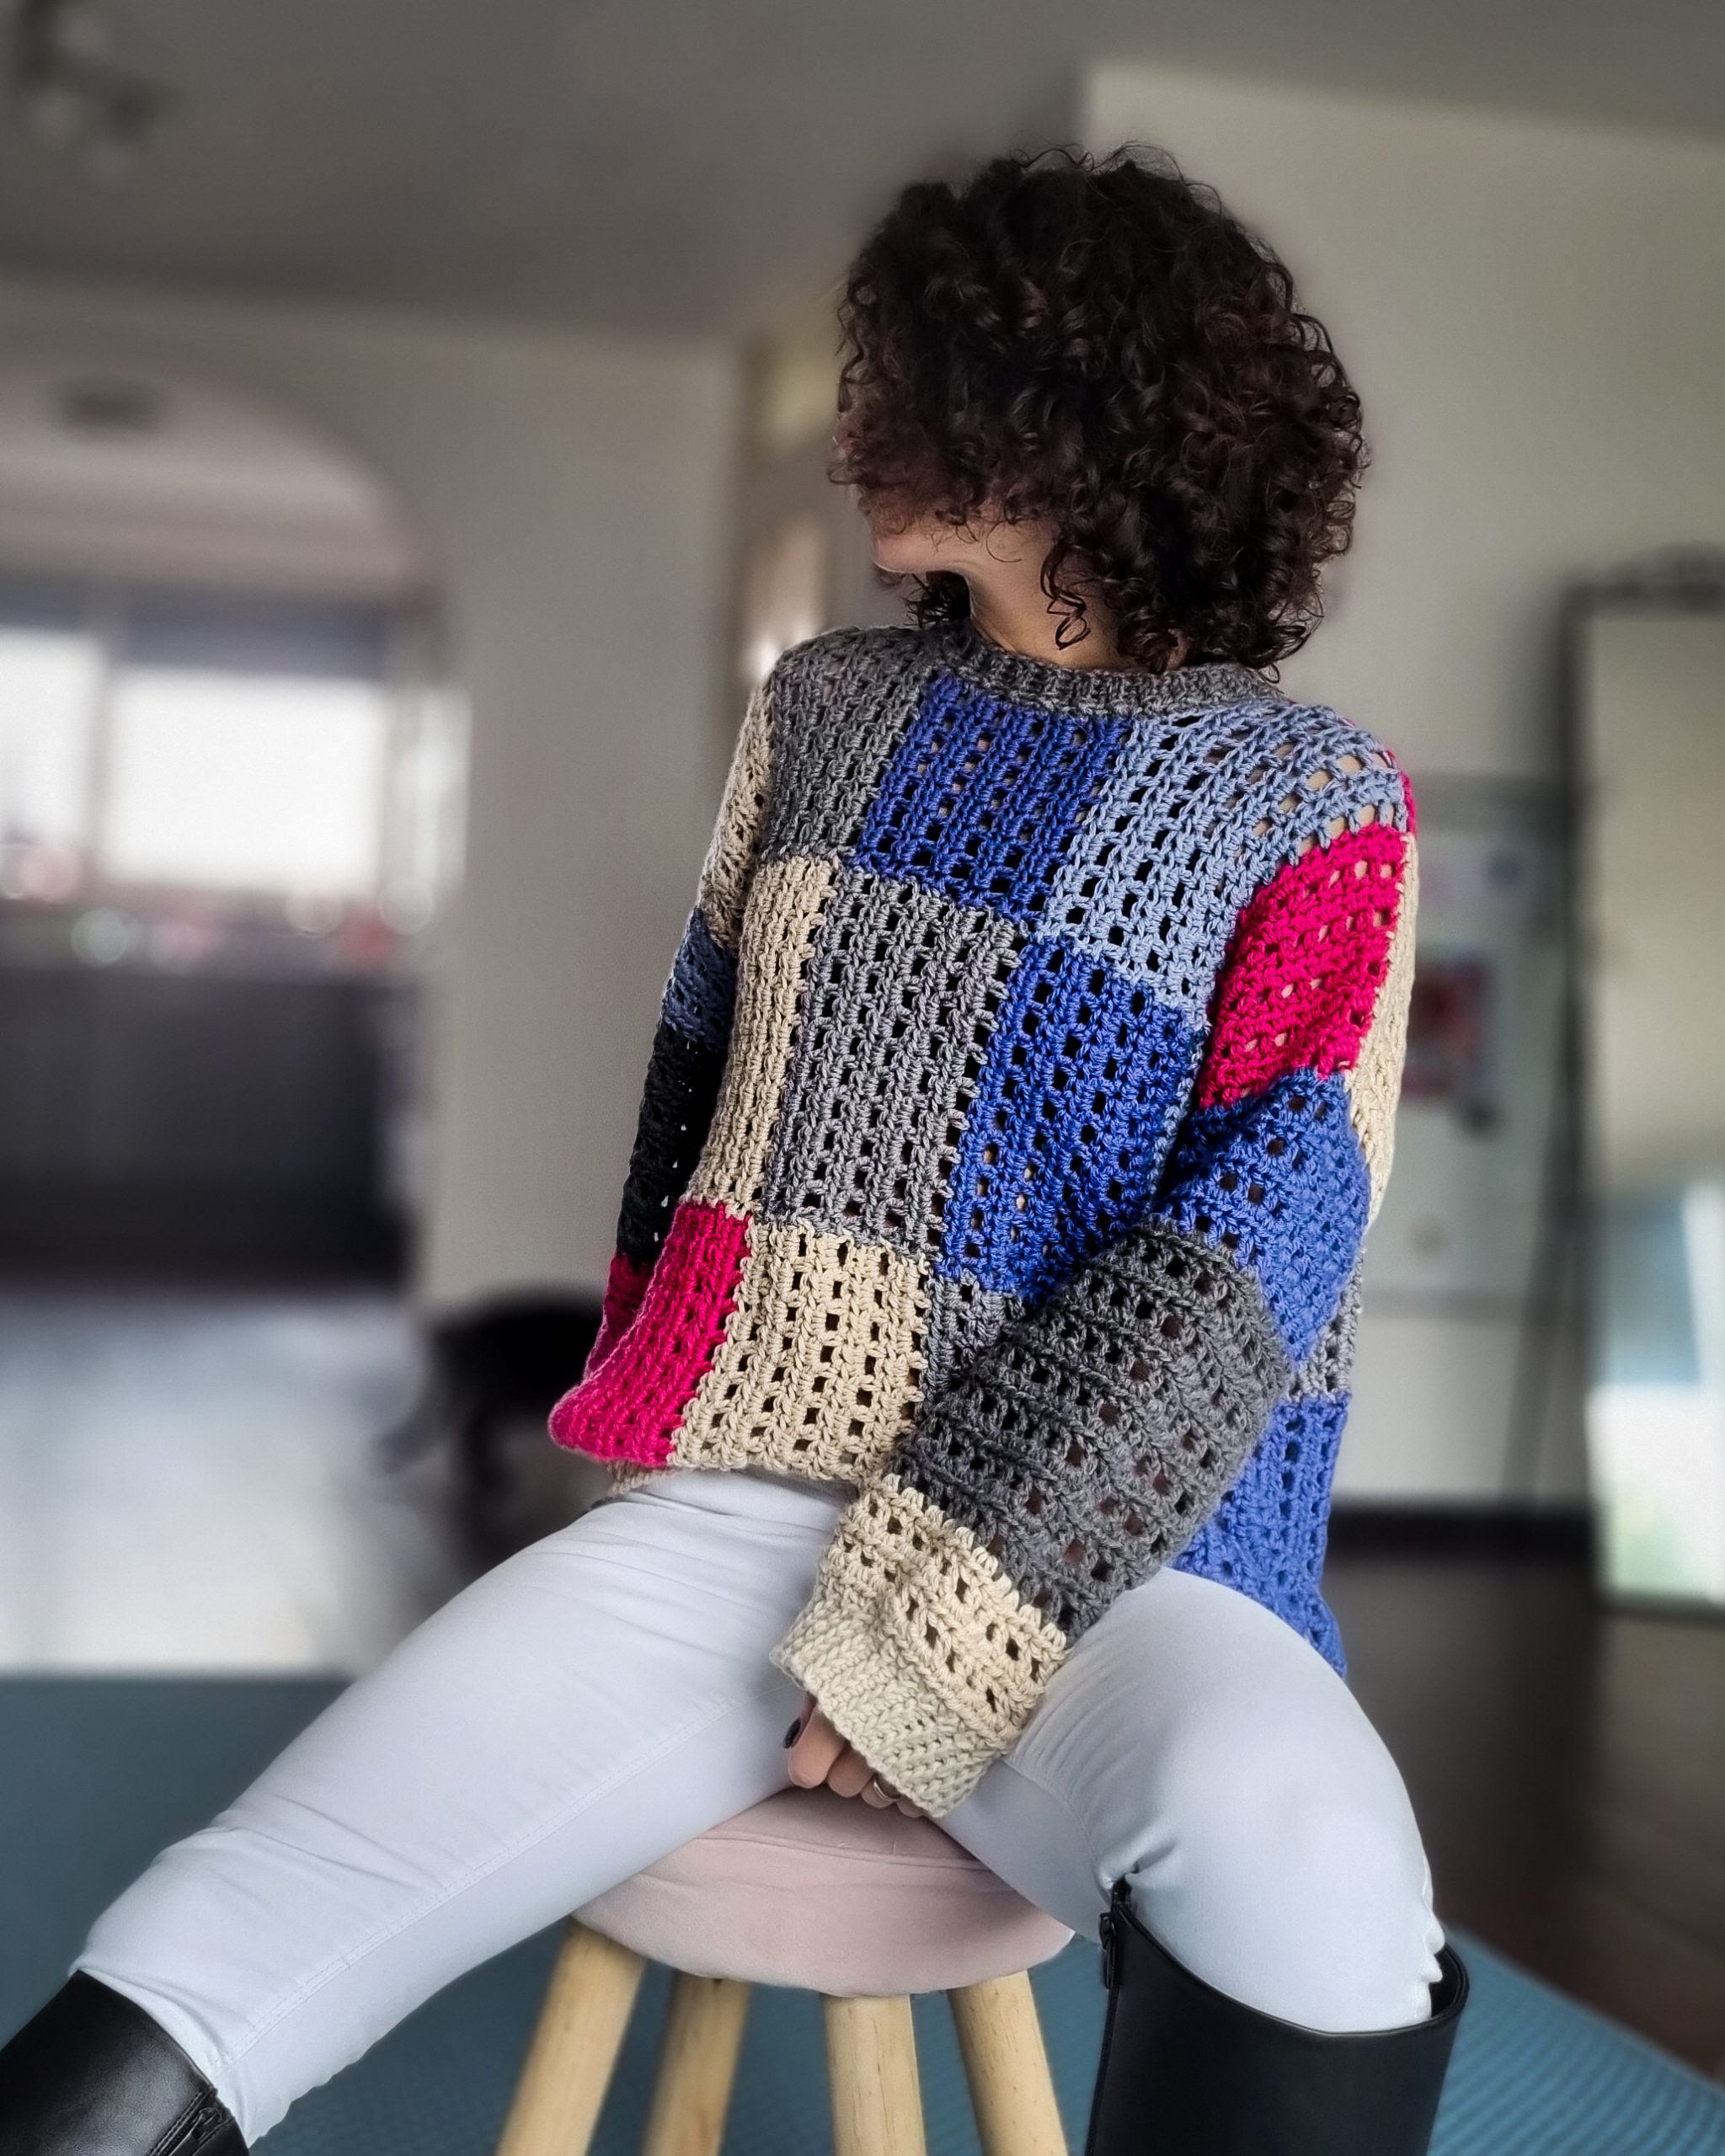
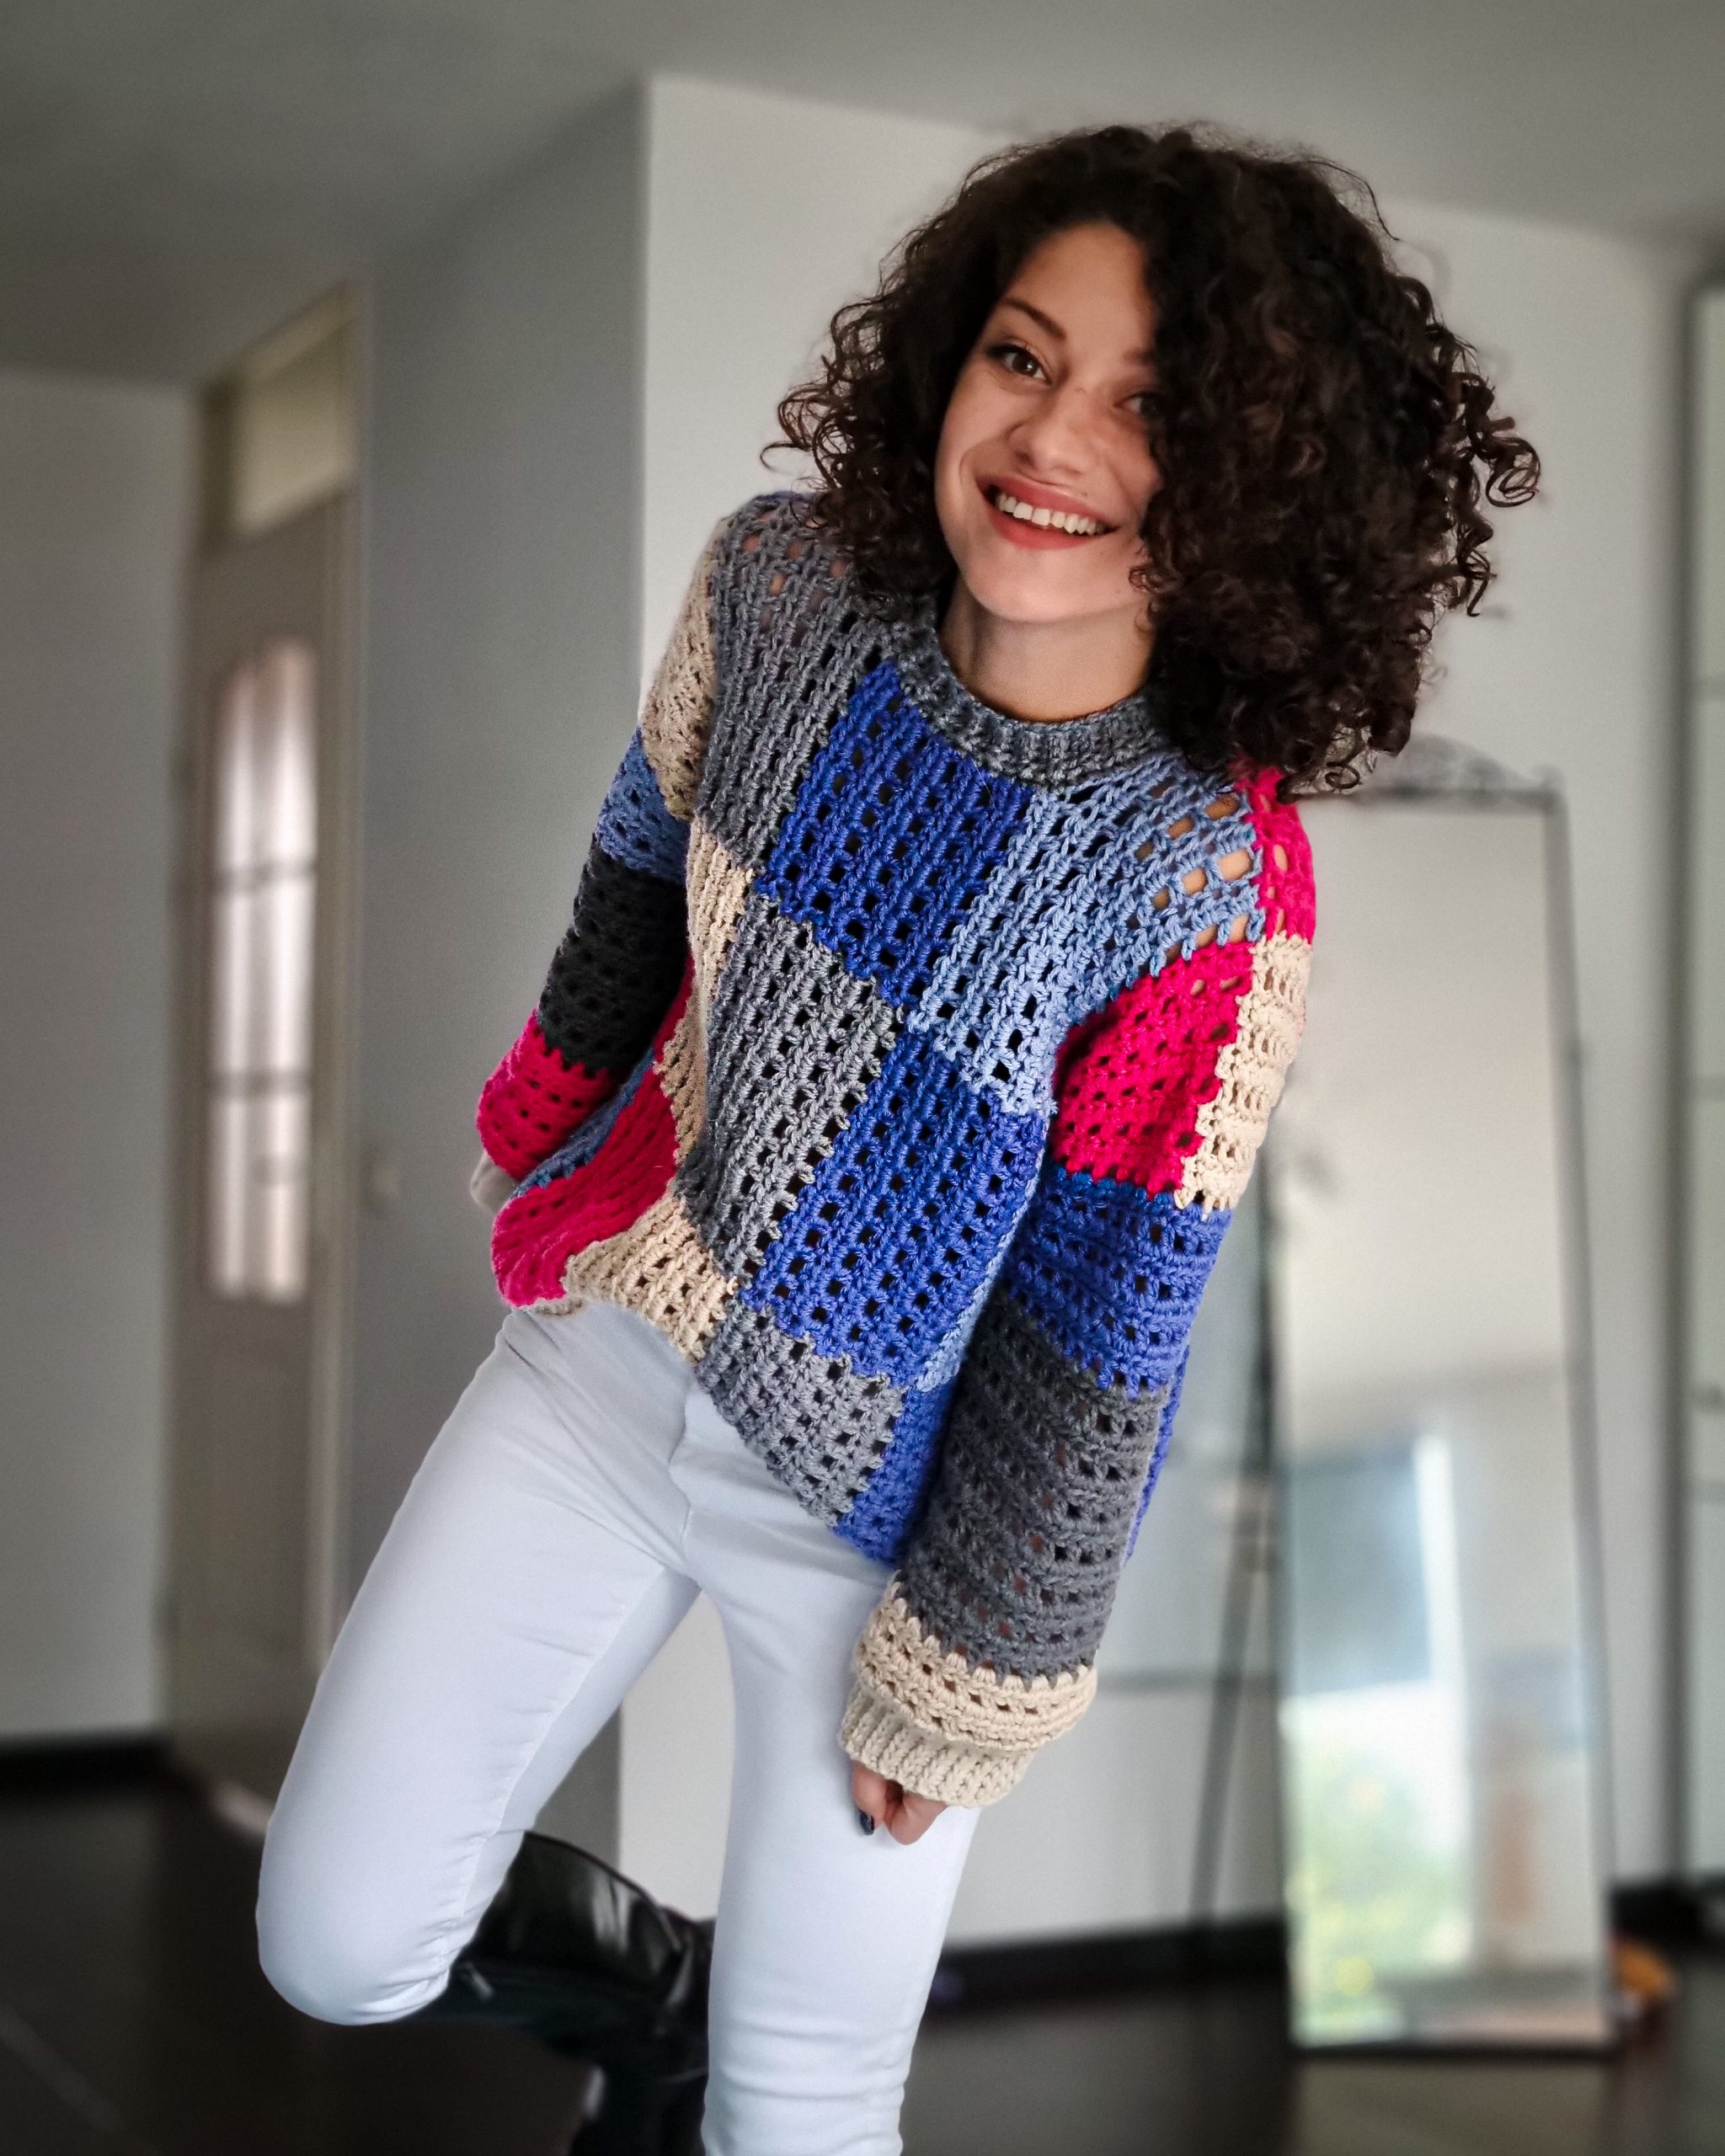
The Pane Sweater that I am about to share with you the pattern today, was born of nothing. No idea of a design, not even the urge to design something new, or to start something new. It simply happened.
One weekend, when I planned to have some time with my daughter it happened that she had a friend over. My husband was doing some work in the backyard and I had a few hours for myself. I couldn’t work on something that was already in progress, because all were on hold because needed to film the next steps for the video tutorial.
So, I simply jumped into my yarn and picked one ball randomly and started to swatch something simple, because my mind wasn’t needed a rest and wasn’t in the mood for taking notes, thinking about what I wanted to make, calculating everything. After finishing the first swatch, I changed colors and keep adding squares.
By the end of square 5, the idea of making a sweater out of squares came into my mind. It was the perfect project because I only had one single ball in 5 different colors from that yarn. And I continued with that idea. I was so excited that I worked on the Pane Sweater the entire weekend, and by the end, it was almost done!
You can Purchase the easily printable PDF pattern here:
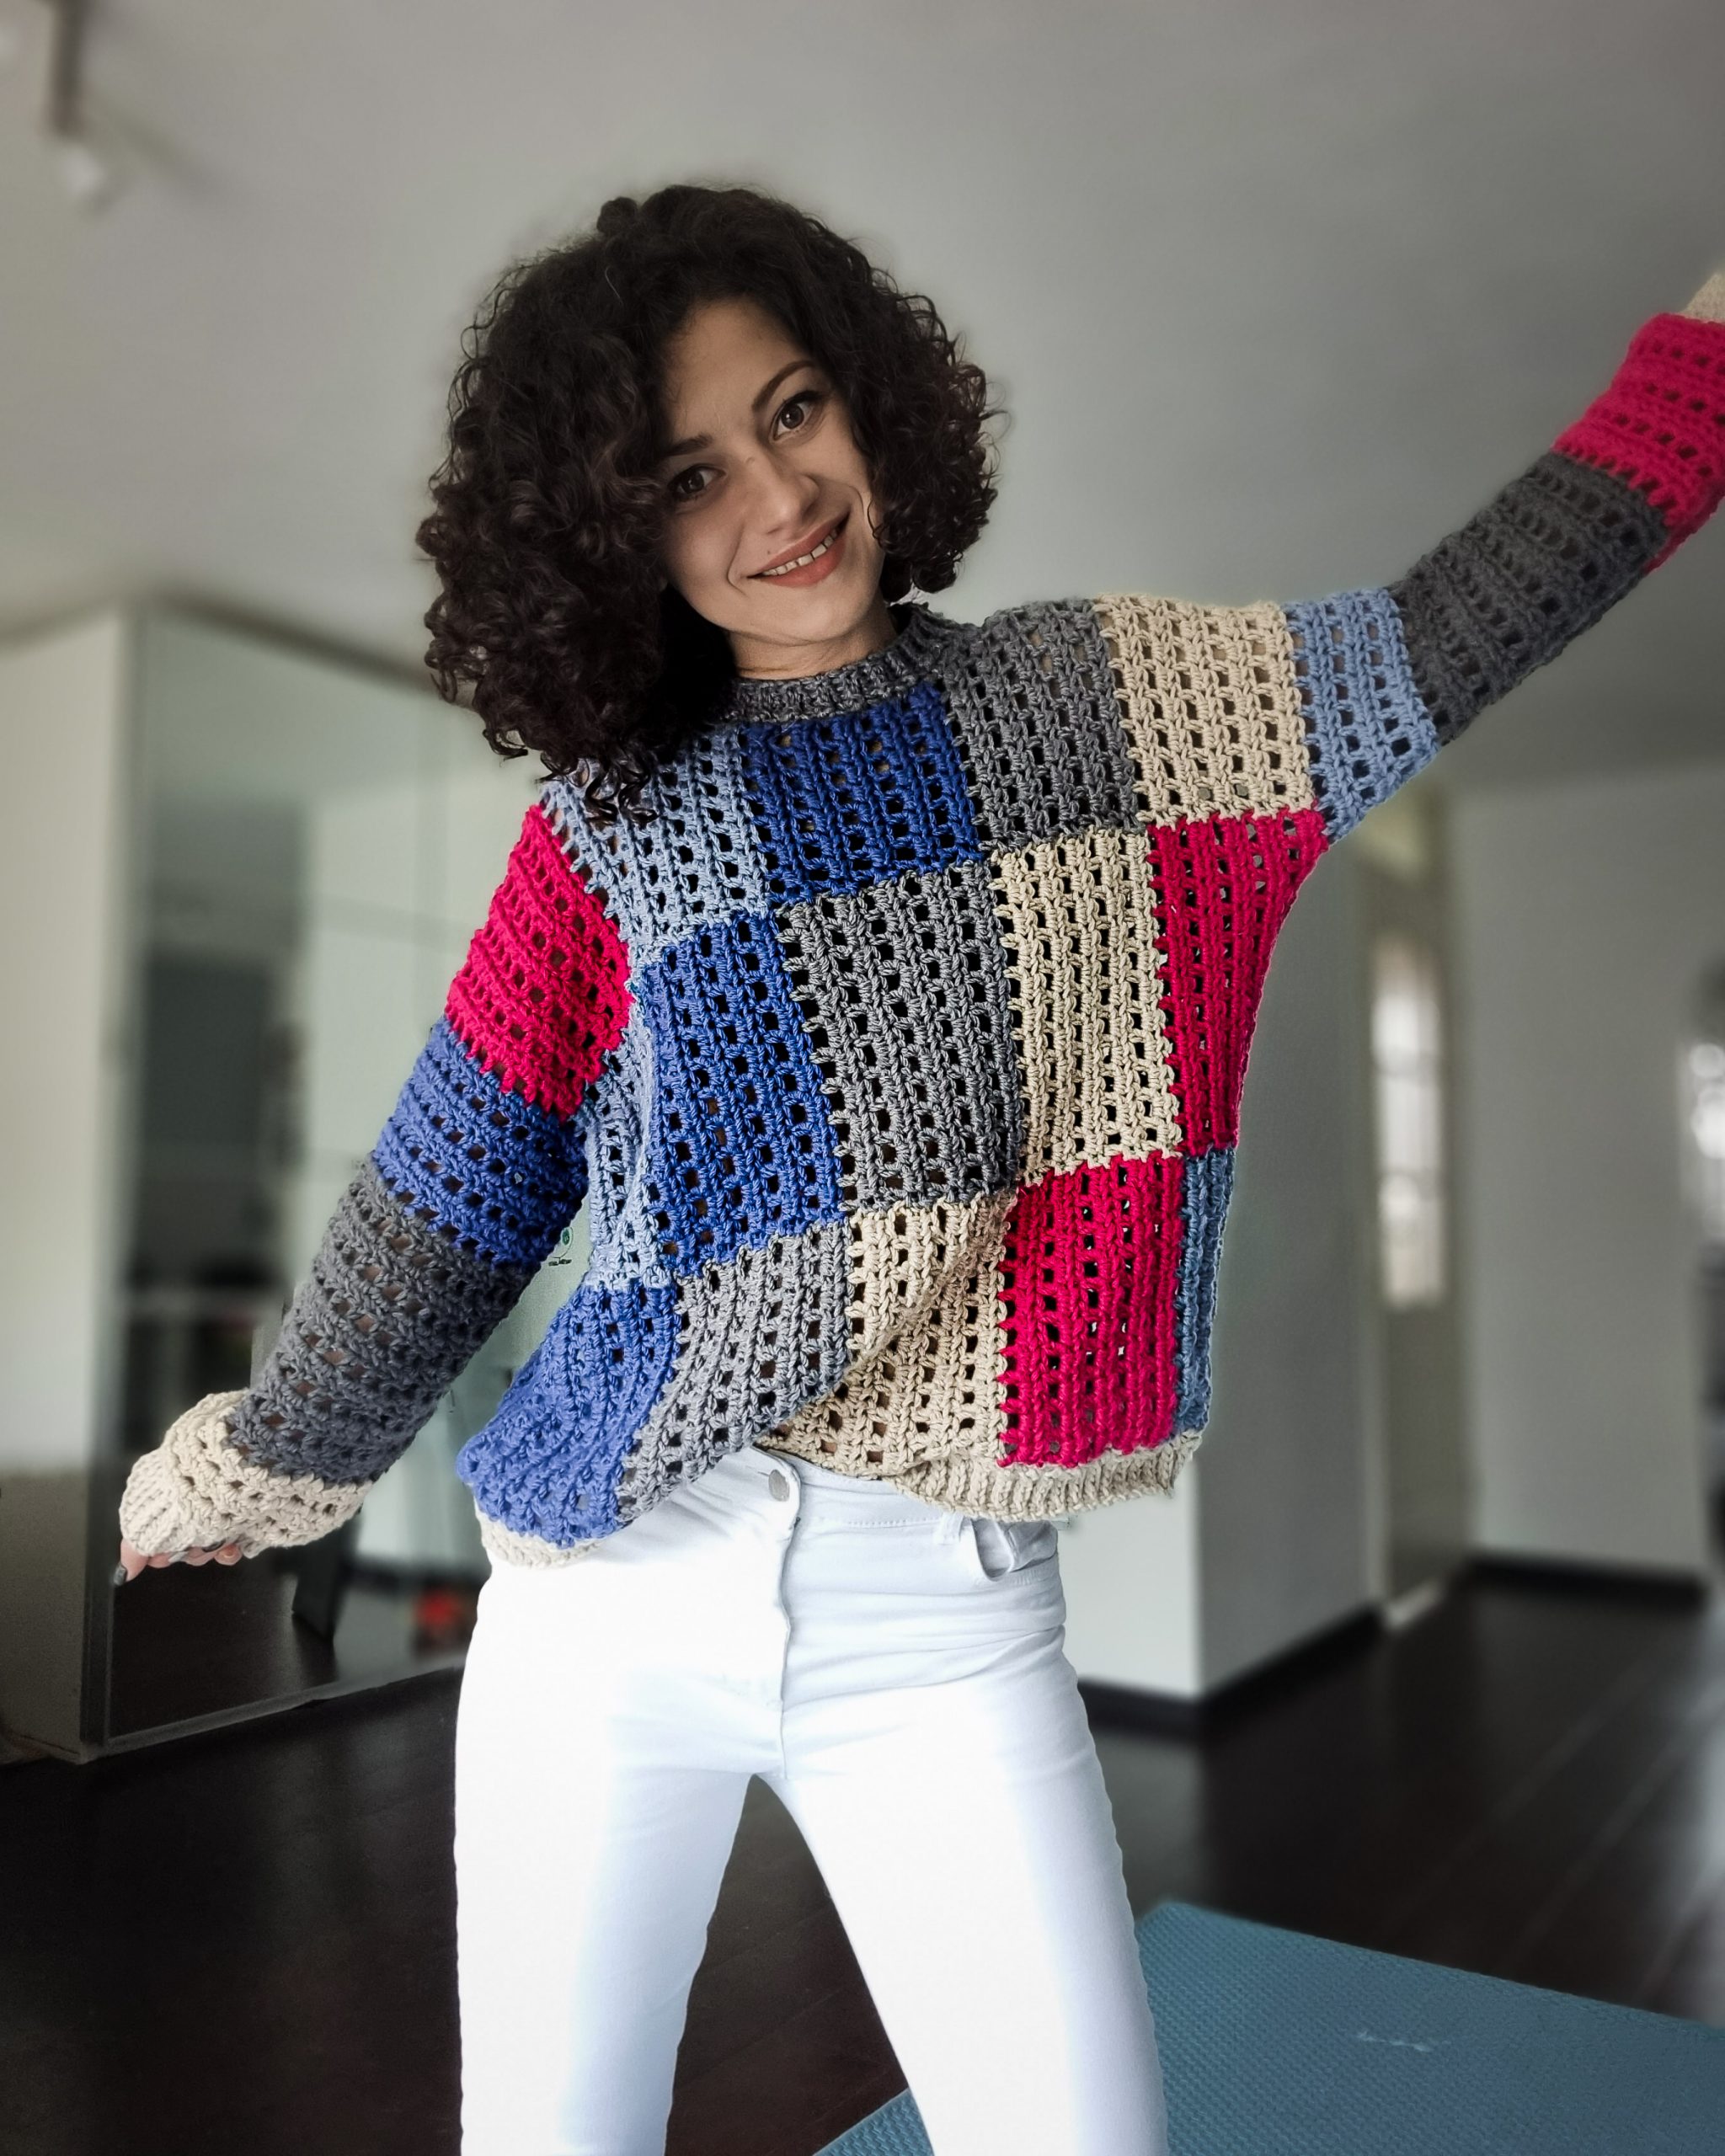
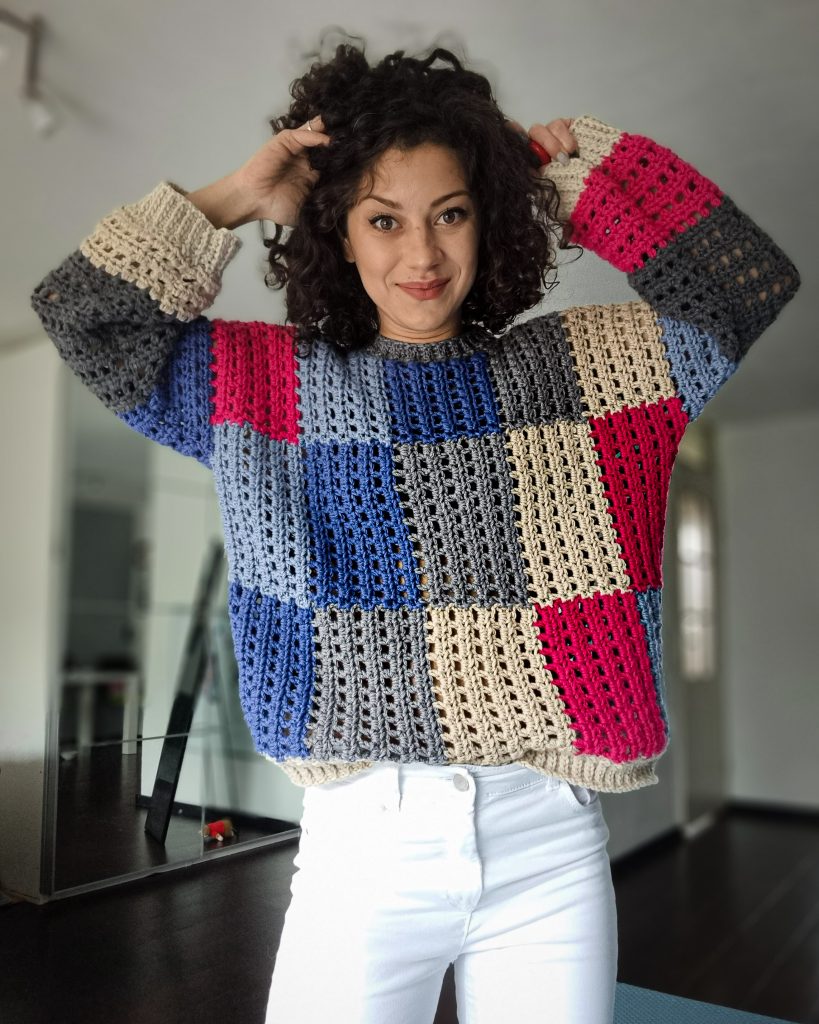
I called this new design Pane Sweater, inspired by the windows panes because besides the squares (rectangles) this sweater is like a window that I used to escape from other things that maybe I had to do, but instead I choose to make this sweater and I am so happy I did so.
Ok! Now that you read about the story of this sweater, I am sure that you want to see how to make one! So, let’s get started!
MATERIALS
• Yarn: Aran (heavy worsted)yarn weight (Size 4)
• Crochet Hook:
o 6 mm crochet hook (I used Streamline Pride by Furls Crochet)
• yarn needle for weave in ends
• Stitch markers
• Scissors
NOTES ABOUT DESIGN
The Pane Sweater is a classic drop shoulders sweater. Has an oversized fit with a positive ease of about 38 cm around bust circumference! For a closer fit check the Measurements section and work a smaller size.
The Pane Sweater has a modular construction. The first section or row with squares (rectangles) is worked in one single piece, changing the color after completing the required number of rows for one square (rectangle). The second section and the following ones are worked in the same way, only that they are joined as you go with the previous section’s side rows.
Front and back panels are worked in one single piece, then the sleeves are worked into the armhole, in flat rows.
To assemble the sweater, fold the piece in half and stitch the sides.
At the end add the bottom, neckline, and cuffs ribbing.
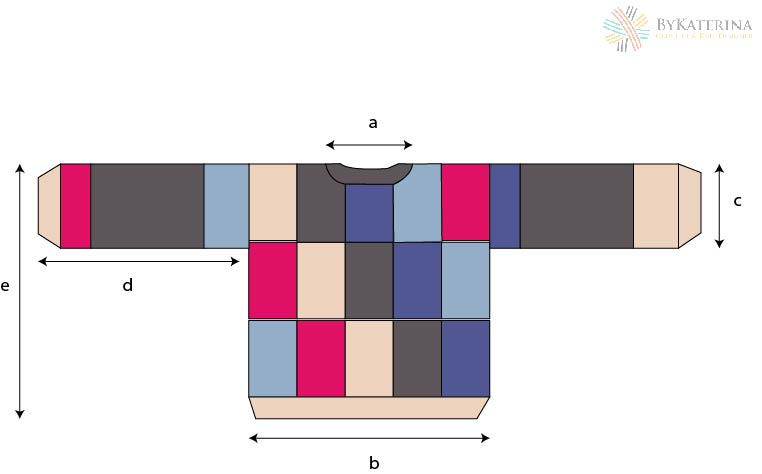
MEASUREMENTS AND SIZES
The Pane Sweater Pattern is available in 8 sizes, from Small up to 5X Large.
The model is 168 cm tall and wears size Small.
Neckline a: 20 cm (21, 23, 25, 24, 25, 26, 25 )
Bust width b: 62 cm (68, 75, 75, 81, 87, 93, 93)
Sleeve width c: 20 cm (23, 23, 26, 26, 29, 29, 29)
Sleeve length d: 39 cm (39, 41, 41, 42, 42, 43, 43 )
Length e: 57.5 cm (57.5, 57.5, 57.5, 62.5, 62.5, 62.5, 62.5)
How much yarn do you need?
I used:
Merino Aran by Katia. Is a mix of 52% merino and 48% acrylic. Each ball has 100 grams and approximate 155 meters
For each size you will need:
Fuchsia (52): 1 (2, 2, 2, 2, 2, 2, 2) balls
Dark Grey (14): 2 (3, 3, 3, 3, 4, 4, 4) balls
Light Blue (59): 1 (2, 2, 2, 2, 2, 2, 2) balls
Light Beige (10): 2 (3, 3, 3, 3, 4, 4, 4) balls
Blue (45): 1 (2, 2, 2, 2, 2, 2, 2) balls
You can Purchase the easily printable PDF pattern here:
ABBREVIATIONS
Ch – chain
sc – single crochet
hdc – hald double crochet
ss – slip stitch
St(s) – stitch(es)
R – rows
** – repeated section.
TENSION
Using 6 mm crochet hook in half double crochet stitch pattern
12 hdc = 10 cm
8 rows (1hdc, 1 hdc mesh) = 10cm
STITCH PATTERN
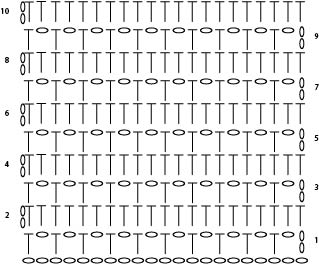
The main stitch pattern used for the Pane Sweater is half double crochet. We will alternate one row in half double crochet stitches, with one row in a mesh stitch of 1 half double crochet, 1 chain, skip the next stitch.
When joining sections, at the end of the forward row (right side row) we will use slip stitches.
For increasing on neckline we will also use foundation half double crochet (fhdc)
Yarn over, insert the hook into the side of the last st, yarn over and pull out a loop, yarn over and pass it through the first loop on your hook, yarn over and pass it through all 3 loops. Next, insert the hook into the bottom loops (v shape) of the previous stitch and repeat the above steps.
Below you can see the crochet chart, for 1 individual square (rectangle) of one color, and in the PDF version, you can find the chart with the front and back panel construction.
Both charts are for size Small. The only difference between size small and the other big sizes, is that the one color square has a different number of stitches and rows, to rich the required measurements.
PATTERN NOTES
Work the piece flat; turn after each row.
Work 2ch before starting a row; 2ch does not count as first st on solid rows but counts as a first half double crochet on mesh rows.
The square (rectangle) has a different number of stitches and rows depending on which size you are working.
Once you choose the square (rectangle) number of stitches and rows, then you will need to follow the same pattern for all sizes.
if you want to adjust the width or length of the sweater, you will need to establish the desired measurements, and then see how many stitches and rows you will need for 1 square to rich those measurements.
Divide those numbers of stitches and rows to the numbers of squares you will want in width and length and then follow the instructions to work the sweater.
In this particular pattern, the number of total stitches will give you the length and the number of rows the width.
change the color at the end of the row, by finishing the last stitch (or making the last slip stitch of the join) with the next color you will want to use.
You can Purchase the easily printable PDF pattern here:
INSTRUCTIONS
The numbers for sizes M, L, XL, XXL, 3XL, 4XL, and 5XL are written between brackets.
Follow the measurements diagram for the color pattern or use the colors as you want.
FRONT PANEL
FIRST ROW OF SQUARES (RECTANGLES)
SQUARE (RECTANGLE)
Start: ch 21 (21, 21, 21, 23, 23, 23, 23) sts
R1: ch3, 1hdc in the 6th st from the hook, *1ch, skip next st, 1hdc in next st. *rep. until the end of the row. 2ch and turn.
R2: 1hdc in each hdc and ch sts, until the end of the row. ch3 and turn.
R3: skip first 2 hdc, 1hdc in next, *1ch, skip next st, 1hdc in next st. *rep. until the end of the row. 2ch and turn.
Rep. R2 and R3 until you have in total 10 (11, 12, 12, 13, 14, 15, 15) rows. Change to the next color.
Rep. the same pattern until you have in total 5 (5, 5, 5, 5, 5, 5, 5) squares (rectangles).
Cut the yarn.
SECOND ROW OF SQUARES (RECTANGLES)
Rejoin yarn into the first st of the first square on the first row of squares.
R1:ch 21 (21, 21, 21, 23, 23, 23, 23) sts
R1: ch3, 1hdc in the 6th st from the hook, *1ch, skip next st, 1hdc in next st. *rep. until the end of the row. 1ss into the top of the next 2 st of the corespondent rows of the first row of square. turn
R2: 1hdc in each hdc and ch st until the end of the row.
R3: skip first 2 hdc, 1hdc in next, *1ch, skip next st, 1hdc in next st. *rep. until the end of the row. ss int the top of the next 2 st of the corespondent rows of the first row of square. turn
Rep. the same pattern until you have in total 5 (5, 5, 5, 5, 5, 5, 5) squares (rectangles).
Cut the yarn.
THIRD ROW OF SQUARES (RECTANGLES)
At this row, starting with square number 2 we will shape the neckline.
Square 1
Work the first square following the same pattern as the first square in row 2.
Square 2
Work the first 7 (8, 9, 9, 10, 11, 12, 12) rows of the second square.
Shaping Neckline S, L, XL, 3XL
Finishing the second square
Next row (solid row): 1hdc in each of the following sts until you have 2 sts left (1ch st and the turning chain). turn
Next row (mesh row): ss into the next 2 sts, and start the row from the 3rd st.
3ch, skip 1 st, 1hdc in next st, *1ch, skip next st, 1hdc in next st. *rep. until the end of the row. ss into the top of the next 2 st of the corespondent rows of the first row of square. turn.
Next row (solid row):1hdc in each of the following sts until you have 2 sts left (1ch st and the turning chain). change to the next color.
Square 3
Work the third square with the remaining stitches.
Square 4
R1: ch3, 1hdc into the first hdc, *1ch, skip next st, 1hdc in next st. *rep, until the end of the row. ss into the top of the next 2 st of the corespondent rows of the first row of square. turn.
R2: 1hdc in each st until the end of the row, 3fhdc (foundation half double crochet) in the last st. 3ch and turn.
R3: rep. R1.
At the end of the R3, you should have the same number of sts as for a complete square.
Starting with row 4, rep. the same pattern without increasing until you complete the square. change the color for Square 5
Square 5
Follow the same pattern as a complete square in row 2.
CUT THE YARN
Shaping Neckline M, 2XL, 4XL, 5XL
Next row (mesh row): ss into the next 2 sts, and start the row from the 3rd st.
3ch, skip 1 st, 1hdc in next st, *1ch, skip next st, 1hdc in next st. *rep. until the end of the row. ss into the top of the next 2 st of the corespondent rows of the first row of square. turn.
Next row (solid row): 1hdc in each of the following sts until you have 2 sts left (1ch st and the turning chain). turn
Next row (mesh row): ss into the next 2 sts, and start the row from the 3rd st.
3ch, skip 1 st, 1hdc in next st, *1ch, skip next st, 1hdc in next st. *rep. until the end of the row. ss into the top of the next 2 st of the corespondent rows of the first row of square. change the color and turn.
Square 3
Work the third square with the remaining stitches.
Square 4
R1: 1hdc in each st until the end of the row, 3fhdc in the last st. 3ch and turn.
R2: ch3, 1hdc into the first hdc, *1ch, skip next st, 1hdc in next st. *rep, until the end of the row. ss into the top of the next 2 st of the corespondent rows of the first row of square. turn.
R3: rep. R1.
At the end of the R3, you should have the same number of sts as for a complete square.
Starting with row 4, rep. the same pattern without increasing until you complete the square. change the color for Square 5
Square 5
Follow the same pattern as a complete square in row 2.
CUT THE YARN

You can Purchase the easily printable PDF pattern here:
BACK PANEL
For the back panel, continue adding 3 more rows of squares following the same instructions as the second row of squares of the front panel.
Exception on the first row of squares:
When working over the neckline, you don’t need to join. Finish and start the row as normally do, by chaining 2 or 3 sts at the end of the row and turn. (depending on the row pattern).
Start joining again at the end of R3 of Square 3.
SLEEVES
Work the sleeves into the armhole.
The sleeves will be worked in rows, in the stitch pattern of the square:
1 solid row and 1 mesh stitch row.
You will need a multiple of 2 plus 1 sts, divided evenly on the front and back panel.
Use stitch markers to mark the stitches for the sleeves:
51 (59, 59, 67, 67, 75, 75, 75) sts.
Alternate 1 solid row with 1 mesh stitch row until you will have in total:
27 (27, 29, 29, 30, 30, 31, 31) rows.
ASSEMBLING
Fold the entire piece in half and stitch the edges.
RIBBING
Work the ribbing around the bottom hem, neckline and sleeves.
On the bottom hem and neckline, before starting working on the ribbing, work one row in single crochet sts, by working *2 sc in each side row.
*depending on your tension; you can make in some side rows only one single crochet if the stitches are too close and the edge starts curling.
Ribbing pattern:
Start:ch7. turn
R1: 1sc in each st, 1ss into the next 2 sts of the edge.
R2: 1ss into each st until the end of the row. 1ch and turn.
R3: 1sc (sc into the back 2loops) into each st, ss into the next 2 sts of the edge. turn.
Rep.R2 and R2 until you complete all sts.
TO FINISH
Weave in all looser ends and block to measurements.
You can Purchase the easily printable PDF pattern here:
And done!
This Sweater is so perfect for leftover yarn, so if you have some it will be amazing to see some colorful Panes.
Don’t forget to tag me @bykaterinadesigns on social media because I love so much to see your makes.
Until next time, I wish you Happy Crochet!



4 Comments
Do you ever post videos of your patterns? I learn so much better by watching than trying to read a pattern. I am such a visual learner! I love the varsity and the all green sweater!
Hi Kathy!
Almost all my patterns have a video tutorial. The one for the Pane Sweater is about to come! 😊
Here is the link to my YouTube Channel where you can find them!
http://www.youtube.com/c/ByKaterinaCrochet
Very nice site. I will like doing some of your patterns. Thank you.