It’s been a long time since I wanted to make again this Summer Top I designed back in 2018. I am so glad I finally did it and that this design now has a brand new pattern with a lot more information than in the beginning.
Thinking back in time, it’s funny how I found it easy to make almost everything I had in mind without thinking about skill level and how I would write the pattern. I was jumping in! And I am glad I did. Even if my patterns weren’t that good, jumping in gave me the opportunity to learn and the desire to be better with what I am doing.
I am becoming a bit nostalgic, thinking about how everything started and how I got here! The truth is that I enjoyed so much to remake things I designed in the past. And I will not stop here!

The PDF version of this pattern includes stitch charts. You can Purchase the easily printable PDF pattern here:
But let’s jump into this pattern and see what we need and how to make this Top.
MATERIALS
• Yarn: Size 1, Super Fine, Fingering Weight yarn
• Crochet Hook:
o 4.00 mm crochet hook
• yarn needle for weaving in ends
• Scissors
• stitch markers
• 10 0.5 diameter buttons
NOTES ABOUT DESIGN
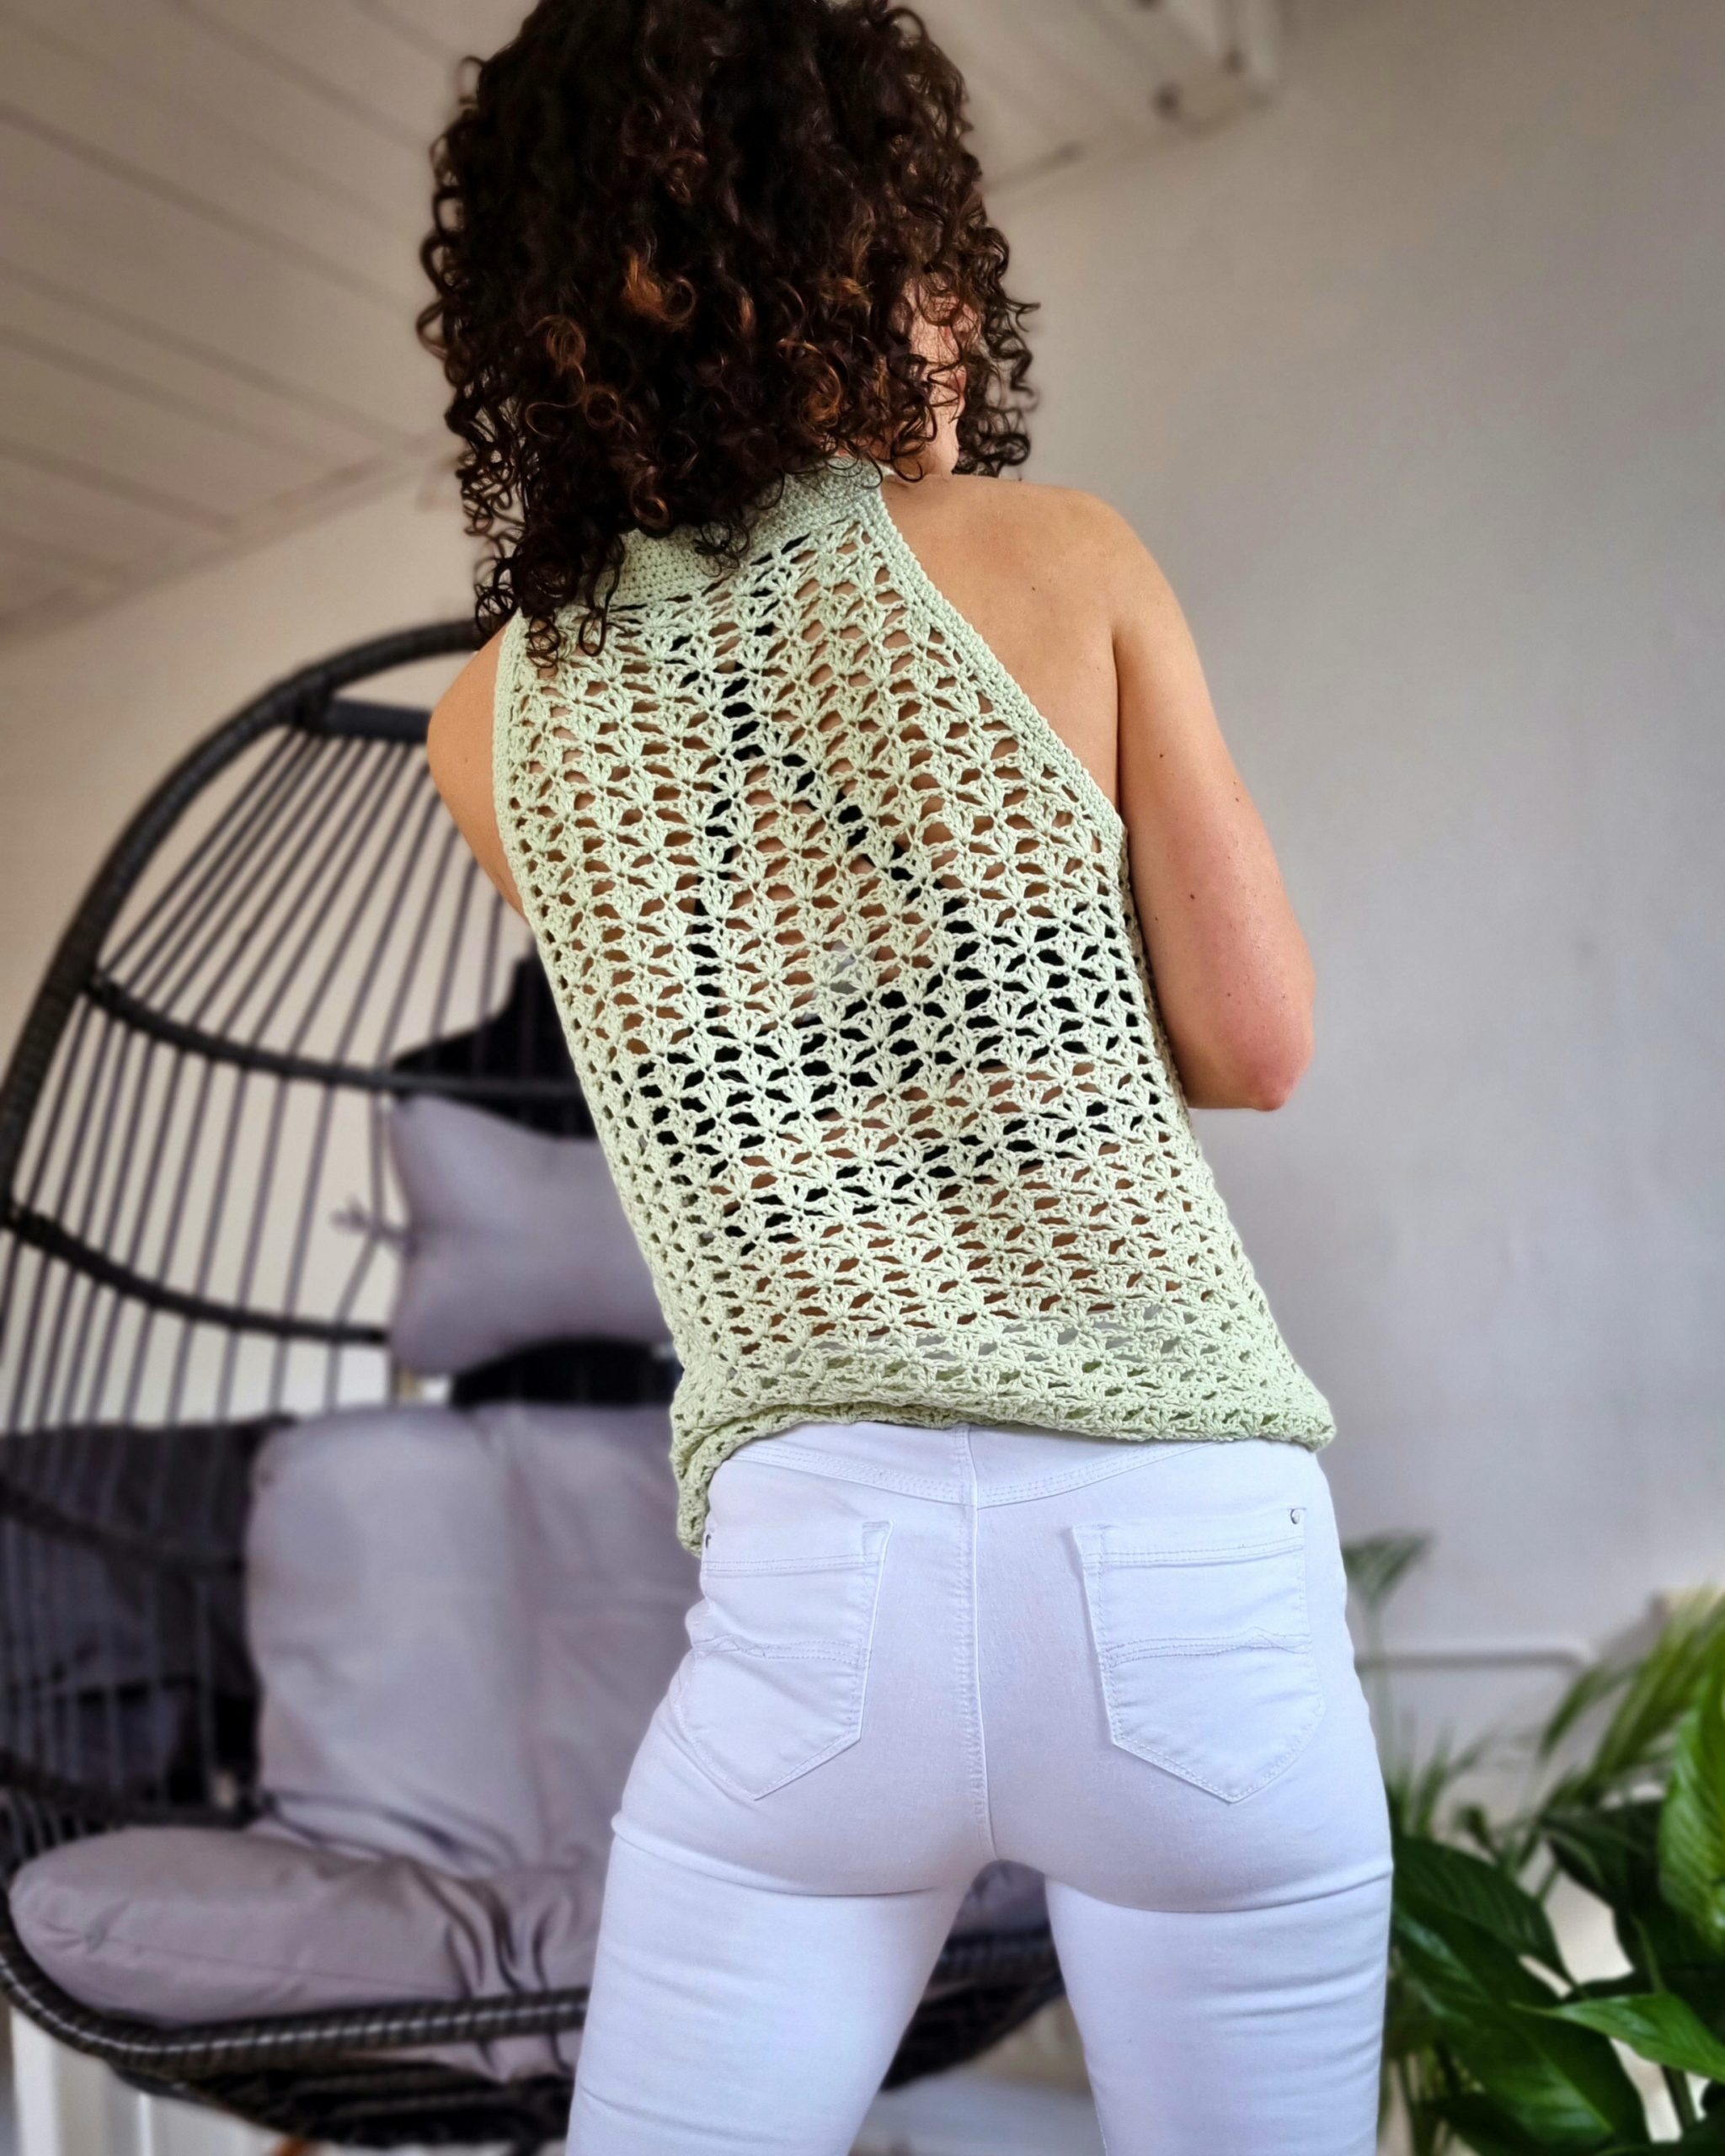
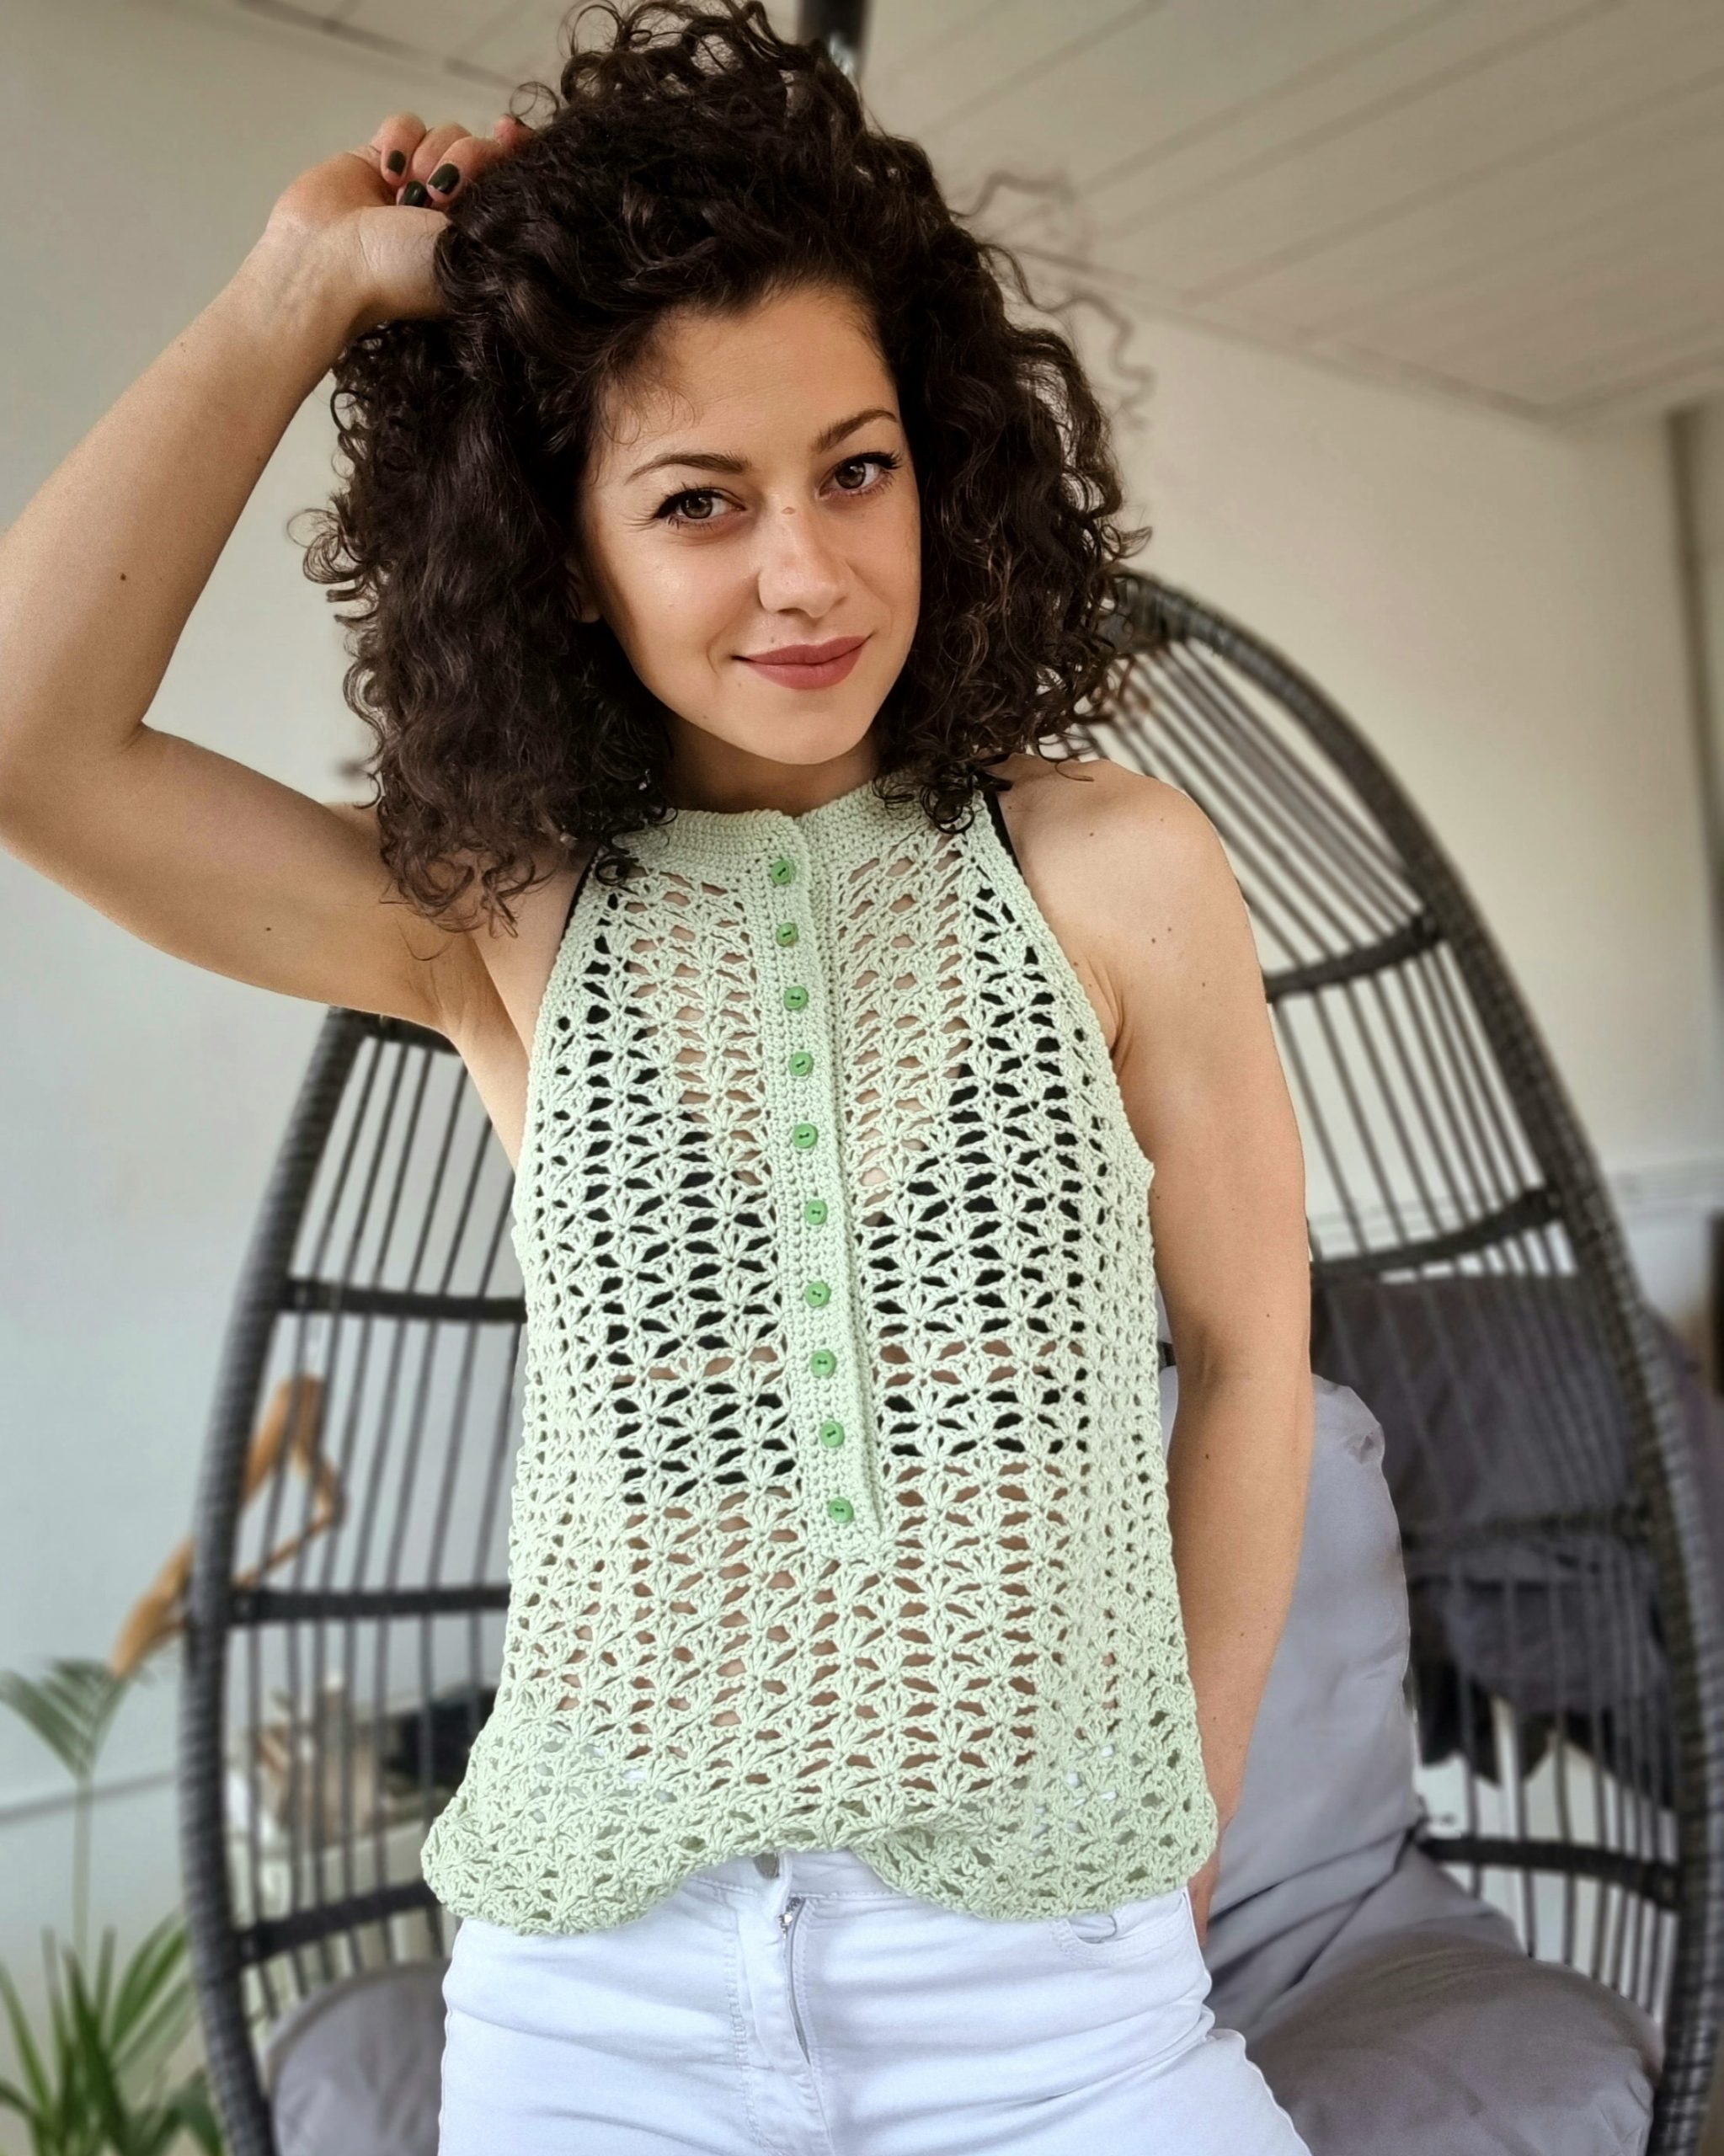
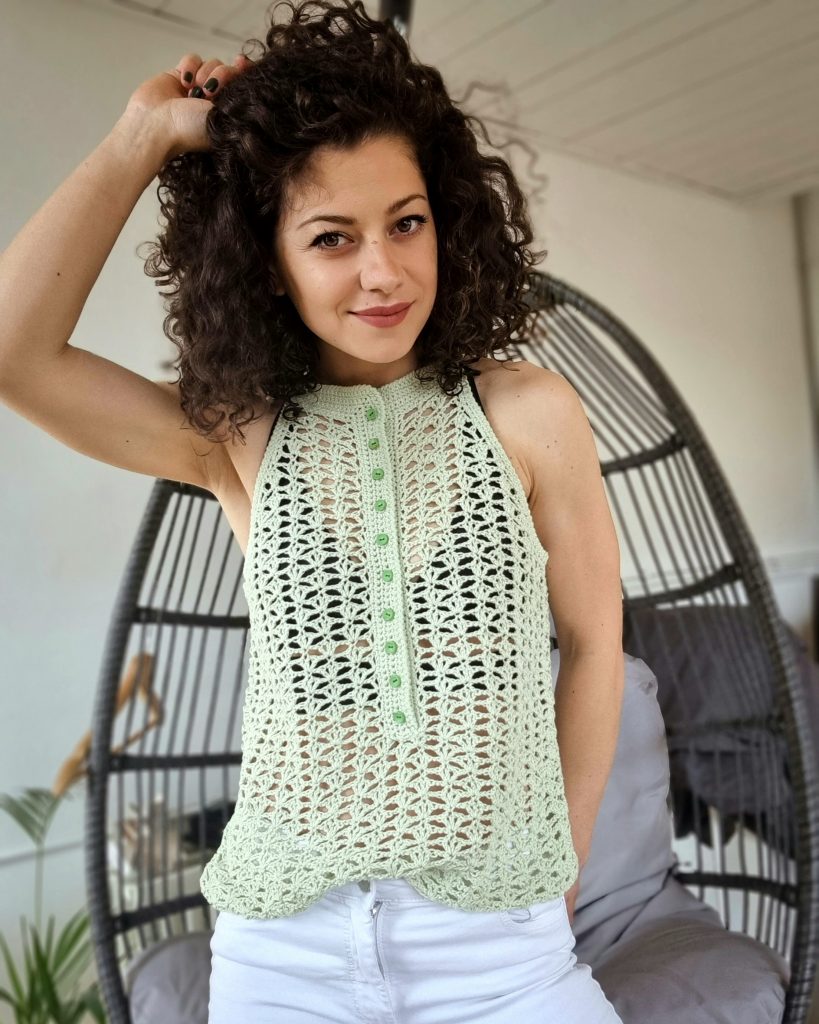
The Fern Top has a halter shape. The top construction is out of two panels which, in the end, are assembled. Both panels have the same shape, only that the front panel has a button line as detail. On the Top, the panels are connected with the neckline. The button line and neckline are worked in one piece at the end.
MEASUREMENTS AND SIZES
The Fern Top Pattern is available in 6 sizes, from XS to 2X Large. The model is 168 cm tall, with an 86 cm Bust circumference, and wears a size Small.
The numbers are written below as follows: XS (S, M), (L, XL, 2XL); the US sizes 0/2 (4/6, 8/10), (12/14W, 14/16W, 18/20W)
All the measurements use as reference Standard Body Measurements by ASTM International.
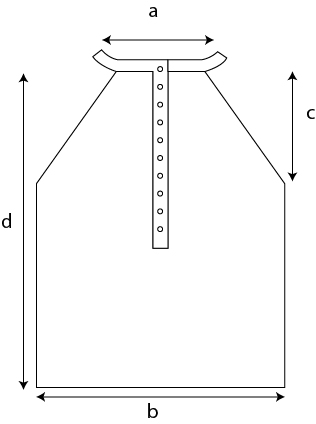
Final Measurements of the Fern Top
*Neckline width a: 21cm (21, 21), (25, 25, 25)
**Bust width b: 43cm (46, 51), (51, 55.5, 60.5)
Armhole depth c: 18cm (19, 19.5), (21, 22, 22.5)
Length d: 51cm (52, 53), (54, 55, 56)
* if you need a bigger neckline, chain more sts when connecting front and back panels
** because of the stitch pattern, size L has a closer fit. If you want a larger fit, you can make a size XL
How much yarn do you need?
For the Fern Top, I used:
Scheepjes Organicon; Yarn composition: 100% organic cotton. Each ball has 50 grams and is approximately 170 meters.
For each size, you will need:
3 (3, 4), (4, 4, 5) balls or 470 (510, 580), (590 660, 730) meters
ABBREVIATIONS
Ch – chain
sc – single crochet
dc – double crochet
shell – (1dc, 1ch, 1dc, 1ch, 1dc) in the same st
ss – slip stitch
St(s) – stitch(es)
R – rows
** – repeated section.
TENSION
Using a 4.00 mm crochet hook in the main stitch pattern
19sts = 10 cm
1patt repeat = 4 cm
10 rows = 10cm

The PDF version of this pattern includes stitch charts. You can Purchase the easily printable PDF pattern here:
STITCH PATTERN AND TECHNIQUES
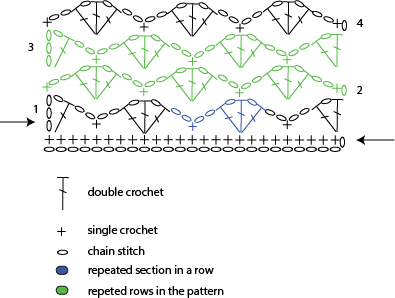
The stitch pattern is an opened shell stitch, a combination of dc, sc, and chain sts.
The main stitch pattern requires a multiple of 8 plus 1
Open Shell Stitch
R1: 4ch, 1dc in the same st, 2ch, skip 3sts, 1sc in next st, 2ch, skip 3sts, *1shell in next, 2ch, skip 3sts, 1sc in next, 2ch, skip 3sts. *repeat until the end of the row (1dc, 1ch, 1dc) into the last st; 1ch and turn.
R2: 1sc in the first st, *2ch, 1shell into the next sc, 2ch, 1sc into the second dc of the shell. *rep until the end of the row. 4ch and turn
R3: 1dc in the first st, 2ch, 1sc into the second dc of the shell, 2ch, *1shell into the next sc, 2ch, sc into the second dc of the shell, 2ch. *rep. until the end of the row; finish the row with (1dc, 1ch, 1dc) into the last st. 1ch and turn.
Rep. R2 and R3 to the desired length.
Twisted sc
Insert the hook into the next st, yarn over, pull out a loop, twist the hook 180 degrees clockwise, yarn over, and pass it through both twisted loops
PATTERN NOTES
- work both panels flat; turn after each row.
- when chaining 4 at the beginning of the row, ch3 counts as the first dc
- 1ch at the beginning of a row does not count as first sc;
- the pattern is written in US terms. You can make the button line shorter; work more rows before splitting into the right front panel and left front panel.
- is not mandatory to use the same number of buttons; to place the buttons evenly, divide the total number of sts you have along with the buttons line by the number of buttons you want to use to see how many sts to let in between.
The PDF version of this pattern includes stitch charts. You can Purchase the easily printable PDF pattern here:
INSTRUCTIONS
BACK PANEL
Start: ch 82 (90,98), (98, 106, 114) and turn
Foundation row: 1sc, in each of the following sts; 4ch and turn
R1: 1dc in the first st, 2ch, skip 3sts, 1sc in next st, 2ch, skip 3sts, *1shell in next, 2ch, skip 3sts, 1sc in next, 2ch, skip 3sts. *repeat until the end of the row, (1dc, 1ch, 1dc) into the last st; 1ch and turn.
R2: 1sc in the first st, *2ch, 1shell into the next sc, 2ch, 1sc into the second dc of the shell. *rep until the end of the row. 4ch and turn
R3: 1dc in the first st, 2ch, 1sc into the second dc of the shell, 2ch, *1shell into the next sc, 2ch, sc into the second dc of the shell, 2ch. *rep. until the end of the row; finish the row with (1dc, 1ch, 1dc) into the last st. 1ch and turn.
Rep. R2 and R3 until you have *36 rows (not counting the foundation row)
*if you want the Top to be longer or shorter, adjust the number of rows in this section.
After finishing the last row, turn without turning ch.
R37 (decrease row): 11ss (to start the row from the second sc), 3ch, 1sc into the second dc of the next shell, *2ch, 1shell into the next sc, 2ch, 1sc into the second dc of the next shell. *rep. to the second to last shell. Finish the row with a dc into the next sc. 4ch and turn.
R38: 1dc into the first sc, 2ch, 1sc into the second dc of the next shell, 2ch, *1shell into the next sc, 2ch, sc into the second dc of the next shell, 2ch. *rep to the last shell st. Finish the row with 1dc into the next sc, 1ch, and 1dc into the third ch. 1ch and turn.
R39: 1sc into the first st, 2ch, 1shell into the next sc, *2ch, 1sc into the second dc of the next shell, 2ch, 1shell into the next sc. *rep. to the last sc; finish the row with 2ch and 1sc into the third ch.
Rep. R37, R38, R39 until you have 48 (51, 52), (51, 54, 55) rows.
Sizes XS and L only
Next row: rep. R3
Next Row: rep. R2
For all sizes:
Second to last row: 6ch, 1sc into the second dc of the next shell, 3ch, *1dc into the next sc, 3ch, 1sc into the second dc of the next shell, 3ch. *rep. until the end of the row; finish the row with 1dc in the last sc. 1ch and turn.
Last Row: 1sc in each st across.
Fasten off.
FRONT PANEL
Start: ch 82 (90,98), (98, 106, 114) and turn
Foundation row: 1sc, in each of the following sts; 4ch and turn
R1: 1dc in the first st, 2ch, skip 3sts, 1sc in next st, 2ch, skip 3sts, *1shell in next, 2ch, skip 3sts, 1sc in next, 2ch, skip 3sts. *repeat until the end of the row, (1dc, 1ch, 1dc) into the last st; 1ch and turn.
R2: 1sc in the first st, *2ch, 1shell into the next sc, 2ch, 1sc into the second dc of the shell. *rep until the end of the row. 4ch and turn
R3: 1dc in the first st, 2ch, 1sc into the second dc of the shell, 2ch, *1shell into the next sc, 2ch, sc into the second dc of the shell, 2ch. *rep. until the end of the row; finish the row with (1dc, 1ch, 1dc) into the last st. 1ch and turn.
Rep. R2 and R3 until you have 19 (19, 21), (21, 23, 23)
At this point, we will start to split the front panel into Right Front Panel and Left Front panel.
The last row ended up with (1dc, 1ch, 1dc) into the last st.
Use st markers to mark the Right and Left Front Panel sts:
We will count pattern repeats, from the second dc of a shell to the second dc of a shell; count the same for the right and left front panels, starting from the edge
XS: 4.5 pattern repeats; place the stitch marker into the next sc after the 4th shell
S: 5 pattern repeats; place the stitch marker into the second dc of the 5th shell st.
M: 5.5 pattern repeats; place the stitch marker into the next sc after the 5th shell
L: 5.5 pattern repeats; place the stitch marker into the next sc after the 5th shell
XL: 6 pattern repeats; place the stitch marker into the second dc of the 6th shell st.
XXL: 6.5 pattern repeats; place the stitch marker into the next sc after the 6th shell
RIGHT FRONT PANEL
Sizes XS, M, L, XXL
At the end of the last row, 1ch, and turn
R20 (-, 22), (22, -, 24): 1sc in the first st, *2ch, 1shell into the next sc, 2ch, 1sc into the second dc of the shell. *rep until the end of the row; finish the row with 2ch and (1dc, 1ch, 1dc) into the last st.
R21 (-, 23), (23, -, 25) to *R36: Rep. previous row.
*not counting the foundation row.
Sizes S, XL
At the end of the last row, ch4 and turn
R: – (20, -), (-, 24, -): rep. R2
R: – (21, -), (-, 25, -): Rep. R1
Rep. the previous 2 rows until you have 36 rows (not counting the foundation row)
After 36 rows, we got to the armpit, and we will start decreasing for the armhole.
Decrease for Armhole
Sizes XS, M, L, XXL
11ss (to start the row from the second sc),
R37 (decrease row): 3ch, 1sc into the second dc of the next shell, *2ch, 1shell into the next sc, 2ch, 1sc into the second dc of the next shell. *rep. until the end of the row. 4ch and turn.
R38: 1dc into the first sc, 2ch, 1sc into the second dc of the next shell, 2ch, *1shell into the next sc, 2ch, sc into the second dc of the next shell, 2ch. *rep to the last shell st. Finish the row with 1dc into the next sc, 1ch, and 1dc into the third ch. 1ch and turn.
R39: 1sc into the first st, 2ch, 1shell into the next sc, *2ch, 1sc into the second dc of the next shell, 2ch, 1shell into the next sc. *rep. to the last sc; finish the row with 2ch and 1sc into the third ch. 4ch and turn
R40: 1dc into the first sc, 2ch, 1sc into the second dc of the next shell, 2ch, *1shell into the next sc, 2ch, sc into the second dc of the next shell, 2ch. *rep to the last shell st. Finish the row with 1dc into the last sc. 4ch and turn
R41:1dc into the first sc, 2ch, 1sc into the second dc of the next shell, *2ch, *1shell into the next sc, 2ch, sc into the second dc of the next shell. *rep. until the end of the row. 4ch and turn
R42: Rep. R41
Follow this 6rows repeats (R37 – R42) until you have in total 48 (-, 52), (51, -, 55) rows.
Sizes XS only
Next row: Rep. R41
Next row: Rep. R41
Size L only
Next row: 1dc in the first st, 2ch, skip 3sts, 1sc in next st, 2ch, skip 3sts, *1shell in next, 2ch, skip 3sts, 1sc in next, 2ch, skip 3sts. *repeat until the end of the row, (1dc, 1ch, 1dc) into the last st; 1ch and turn.
Next row: 1sc in the first st, *2ch, 1shell into the next sc, 2ch, 1sc into the second dc of the shell. *rep until the end of the row. 4ch and turn
Sizes XS, M only
Second to last row: 6ch, 1sc into the second dc of the next shell, 3ch, 1dc into the next sc, 3ch, 1sc into the last st, 1ch and turn
Sizes L, XXL only
Second to last row: 6ch, 1sc into the second dc of the next shell, 3ch, *1dc into the next sc, 3ch, 1sc into the second dc of the next shell, 3ch. *rep. until the end of the row; finish the row with 1dc in the last sc. 1ch and turn.
Sizes XS, M, L, XXL
Last Row: 1sc in each st across.
Fasten off.
Decrease for Armhole
Sizes S, XL
11ss (to start the row from the second sc)
R37: 3ch, 1sc into the second dc of the next shell, *2ch, 1shell into the next sc, 2ch, 1sc into the second dc of the next shell. *rep. until the last shell; finish the row with 2ch, (1dc, 1ch, 1dc) into the last st. 1ch and turn
R38: 1sc into the first st, *2ch, 1shell into the next sc, 2ch, 1sc into the second dc of the next shell. *rep. to the last shell, 2ch, (1dc, 1c, 1dc) into the last sc.
R39: rep. R38
R40: 1sc into the first st, *2ch, 1shell into the next sc, 2ch, 1sc into the second dc of the next shell. *rep. to the last shell, 1dc into the last sc. 4ch and turn
R41: 1dc into the first sc, 2ch, 1sc into the second dc of the next shell, 2ch, *1shell into the next sc, 2ch, sc into the second dc of the next shell, 2ch. *rep to the last shell st. Finish the row with (1dc,1ch, 1dc) into the last sc. 1ch and turn
R42: sc into the first st, *2ch, 1shell into the next sc, 2ch, 1sc into the second dc of the next shell. *rep. until the end of the row.
Follow the 6 rows repeat (R37 -R42) until you have in total: – (51, -), (-, 54, -) rows.
Size S only
Second to last row: 1sc into the first st, 3ch, 1dc into the next sc, 3ch, 1sc into the second dc of the next shell, 3ch, 1dc into the last st.
Size XL only
Second to last row:
6ch, 1sc into the second dc of the next shell, 3ch, *1dc into the next sc, 3ch, 1sc into the second dc of the next shell, 3ch. *rep. until the end of the row; finish the row with 1dc in the last sc. 1ch and turn.
Sizes S, XL
Last Row: sc in each st across.
Fasten off.
The PDF version of this pattern includes stitch charts. You can Purchase the easily printable PDF pattern here:
LEFT FRONT PANEL
Sizes XS, M, L, XXL
Rejoin yarn into the marked st and ch4
R20 (-, 22), (22, -, 24): 1dc into the first st, 2ch, 1sc into the second dc of the next shell, * 2ch, 1shell into the next sc, 2ch, 1sc into the second dc of the shell. *rep until the end of the row.
R21 (-, 23), (23, -, 25) to *R36: Rep. previous row.
*not counting the foundation row.
Sizes S, XL
Rejoin yarn into the marked st and ch1
R: – (20, -), (-, 24, -): rep. R2
R: – (21, -), (-, 25, -): Rep. R1
Rep. the previous 2 rows until you have 36 rows (not counting the foundation row)
Decrease for Armhole
Sizes XS, M, L, XXL
R37:1sc into the first st, *2ch, 1shell into the next sc, 2ch, 1sc into the second dc of the next shell. *rep. to the last shell, 1dc into the last sc. 4ch and turn
R38: 1dc into the first sc, 2ch, 1sc into the second dc of the next shell, 2ch, *1shell into the next sc, 2ch, sc into the second dc of the next shell, 2ch. *rep to the last shell st. Finish the row with (1dc,1ch, 1dc) into the last sc. 1ch and turn
R39: sc into the first st, *2ch, 1shell into the next sc, 2ch, 1sc into the second dc of the next shell. *rep. until the end of the row.
R40: 3ch, 1sc into the second dc of the next shell, *2ch, 1shell into the next sc, 2ch, 1sc into the second dc of the next shell. *rep. until the last shell; finish the row with 2ch, (1dc, 1ch, 1dc) into the last st. 1ch and turn
R41: 1sc into the first st, *2ch, 1shell into the next sc, 2ch, 1sc into the second dc of the next shell. *rep. to the last shell, 2ch, (1dc, 1c, 1dc) into the last sc.
R42: Rep. R41
Follow this 6rows repeats (R37 – R42) until you have in total 48 (-, 52), (51, -, 55) rows.
Sizes XS only
Next row: Rep. R41
Next row: Rep. R41
Size L only
Next row: 1dc in the first st, 2ch, skip 3sts, 1sc in next st, 2ch, skip 3sts, *1shell in next, 2ch, skip 3sts, 1sc in next, 2ch, skip 3sts. *repeat until the end of the row, (1dc, 1ch, 1dc) into the last st; 1ch and turn.
Next row: 1sc in the first st, *2ch, 1shell into the next sc, 2ch, 1sc into the second dc of the shell. *rep until the end of the row. 4ch and turn
Sizes XS, M only
Second to last row: 1sc into the first st, 3ch, 1dc into the next sc, 3ch, 1sc into the second dc of the next shell, 3ch, 1dc into the last st.
Sizes L, XXL only
Second to last row: 6ch, 1sc into the second dc of the next shell, 3ch, *1dc into the next sc, 3ch, 1sc into the second dc of the next shell, 3ch. *rep. until the end of the row; finish the row with 1dc in the last sc. 1ch and turn.
Sizes XS, M, L, XXL
Last Row: 1sc in each st across.
Fasten off.
Decrease for Armhole
Sizes S, XL
R37:1dc into the first sc, 2ch, 1sc into the second dc of the next shell, 2ch, *1shell into the next sc, 2ch, sc into the second dc of the next shell, 2ch. *rep to the last shell st. Finish the row with 1dc into the last sc. 4ch and turn
R38: 1dc into the first sc, 2ch, 1sc into the second dc of the next shell, *2ch, *1shell into the next sc, 2ch, sc into the second dc of the next shell. *rep. until the end of the row. 4ch and turn
R39: Rep. R39
R40: 3ch, 1sc into the second dc of the next shell, *2ch, 1shell into the next sc, 2ch, 1sc into the second dc of the next shell. *rep. until the end of the row. 4ch and turn.
R41: 1dc into the first sc, 2ch, 1sc into the second dc of the next shell, 2ch, *1shell into the next sc, 2ch, sc into the second dc of the next shell, 2ch. *rep to the last shell st. Finish the row with 1dc into the next sc, 1ch, and 1dc into the third ch. 1ch and turn.
R42: 1sc into the first st, 2ch, 1shell into the next sc, *2ch, 1sc into the second dc of the next shell, 2ch, 1shell into the next sc. *rep. to the last sc; finish the row with 2ch and 1sc into the third ch. 4ch and turn
Follow the 6 rows repeat (R37 -R42) until you have in total: – (51, -), (-, 54, -) rows.
Size S only
Second to last row: 6ch, 1sc into the second dc of the next shell, 3ch, 1dc into the next sc, 3ch, 1sc into the last st, 1ch and turn
Size XL only
Second to last row:
6ch, 1sc into the second dc of the next shell, 3ch, *1dc into the next sc, 3ch, 1sc into the second dc of the next shell, 3ch. *rep. until the end of the row; finish the row with 1dc in the last sc. 1ch and turn.
Sizes S, XL
Last Row: sc in each st across.
Fasten off.
ARMHOLE EDGING
- work 3sc into the dc or 3ch side rows and 1sc into the sc side row.
- rejoin yarn into the first st of the armhole, facing the panel on the right side, and ch1
R1: 1sc in each st accross, 1ch and turn
R2: rep. R1
R3: 1sc into the first st, 1twisted sc into each st except the last one, 1sc into the last st.
Fasten off
Rep. on each of the 4 armholes.
BUTTON LINE AND NECKLINE
The Button Line and Neckline are worked in one single piece using sc stitches.
When working into the side rows, work 2sc into the dc or ch3 side row and 1sc into the sc side row.
The sketch below shows the crochet direction.
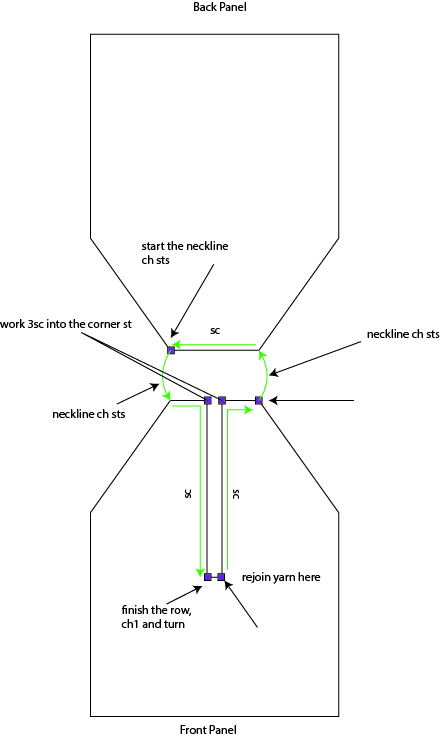
Rejoin yarn as indicated (into the first bottom st of the left panel (represented as the right panel in the sketch) and ch1
R1: 1sc in each st until the last top st of the left panel, 3sc into the top st, 1sc in each st of the left panel width, ch10, 1sc into each st of the back panel width, ch10, 1sc in each st of the right front panel width, 3sc into the top st of the right front panel, 1sc until the end of the row. 1ch and turn
R2: 1sc into each st, until the second sc of the inc on the right front panel, 3sc, 1sc in each st until the second st of the inc of the left front panel, 3sc, 1sc to the end of the row. 1ch and turn.
R3: rep: R2
R4: Next row will be the button holes row.
Count the sts you have and divide them by the number of buttons you want to use. Mark the button holes sts and ch1 and skip that st when you get there. For the rest of the row, Rep. R2.
R5, R6: Rep. R2
R7: Rep. R2 but with Twisted sc sts. First, increase, and last st are regular sc.
ASSEMBLING
Use a darn needle and insert a piece of 1m-1.5m yarn.
Place both panels on top of the other, facing the right size, and stitch the sides.
TO FINISH
Stitch the button line base
Weave in all ends and block to measurements.
That was it! I hope you will give it a try to this, even if it looks complicated because I know you can make it.
The PDF version of this pattern includes stitch charts. You can Purchase the easily printable PDF pattern here:






Comments are closed.