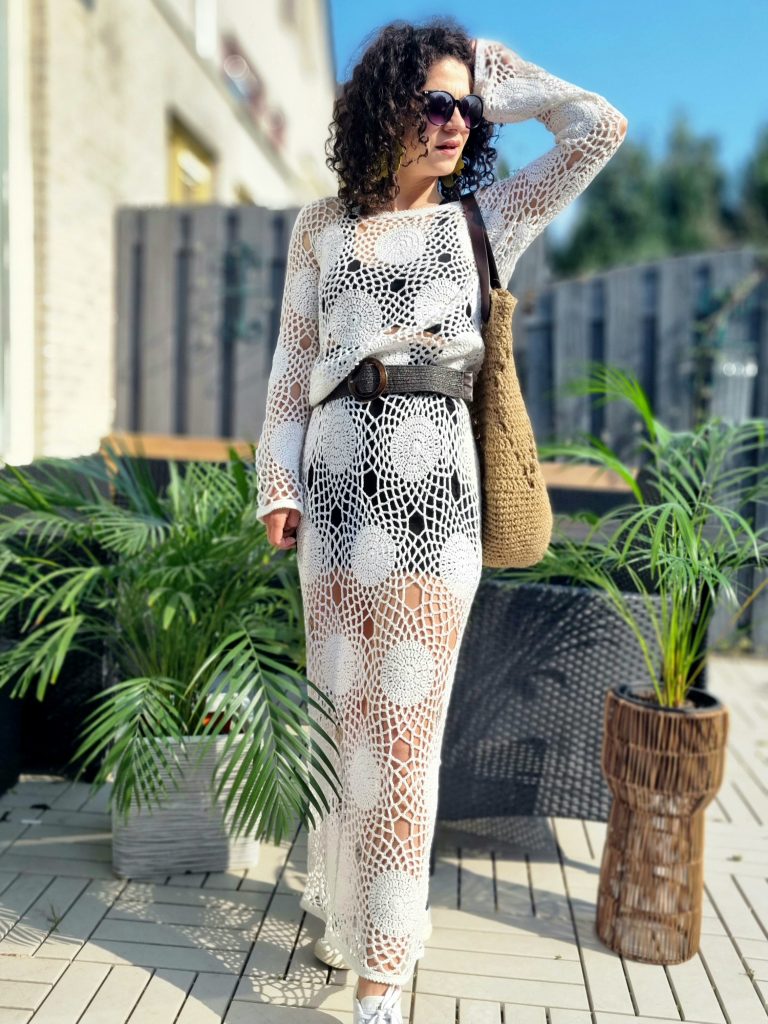
Welcome back to our crochet tutorial! Today, I’m excited to share with you the process of making the stunning Desire Dress. This project was quite a challenge for me, but I’m thrilled with how it turned out.
Let me tell you the backstory of how this dress came to be. Back in February, a friend sent me a photo of a non-crocheted dress and expressed her desire for a crocheted version. Without hesitation, I accepted the challenge. I studied the photo carefully, figured out the motif placement and dress construction, and started working with the yarn I had on hand.
After completing the waistline on my first sample, I felt confident to move forward and create the dress for my friend. She requested it in black, which I knew would be challenging to film in a tutorial. As I worked on the length of the dress, I encountered some difficulties and had to undo my work several times. Despite the challenges, I persevered and completed the dress. However, I still had a nagging feeling that something wasn’t quite right with it.
I made another sample using leftover yarn to create a tutorial for this dress. As I joined the motifs and filmed the tutorial, I finally realized what was wrong with the previous dress construction. With this newfound knowledge, I started a final sample, which I’m excited to share today.
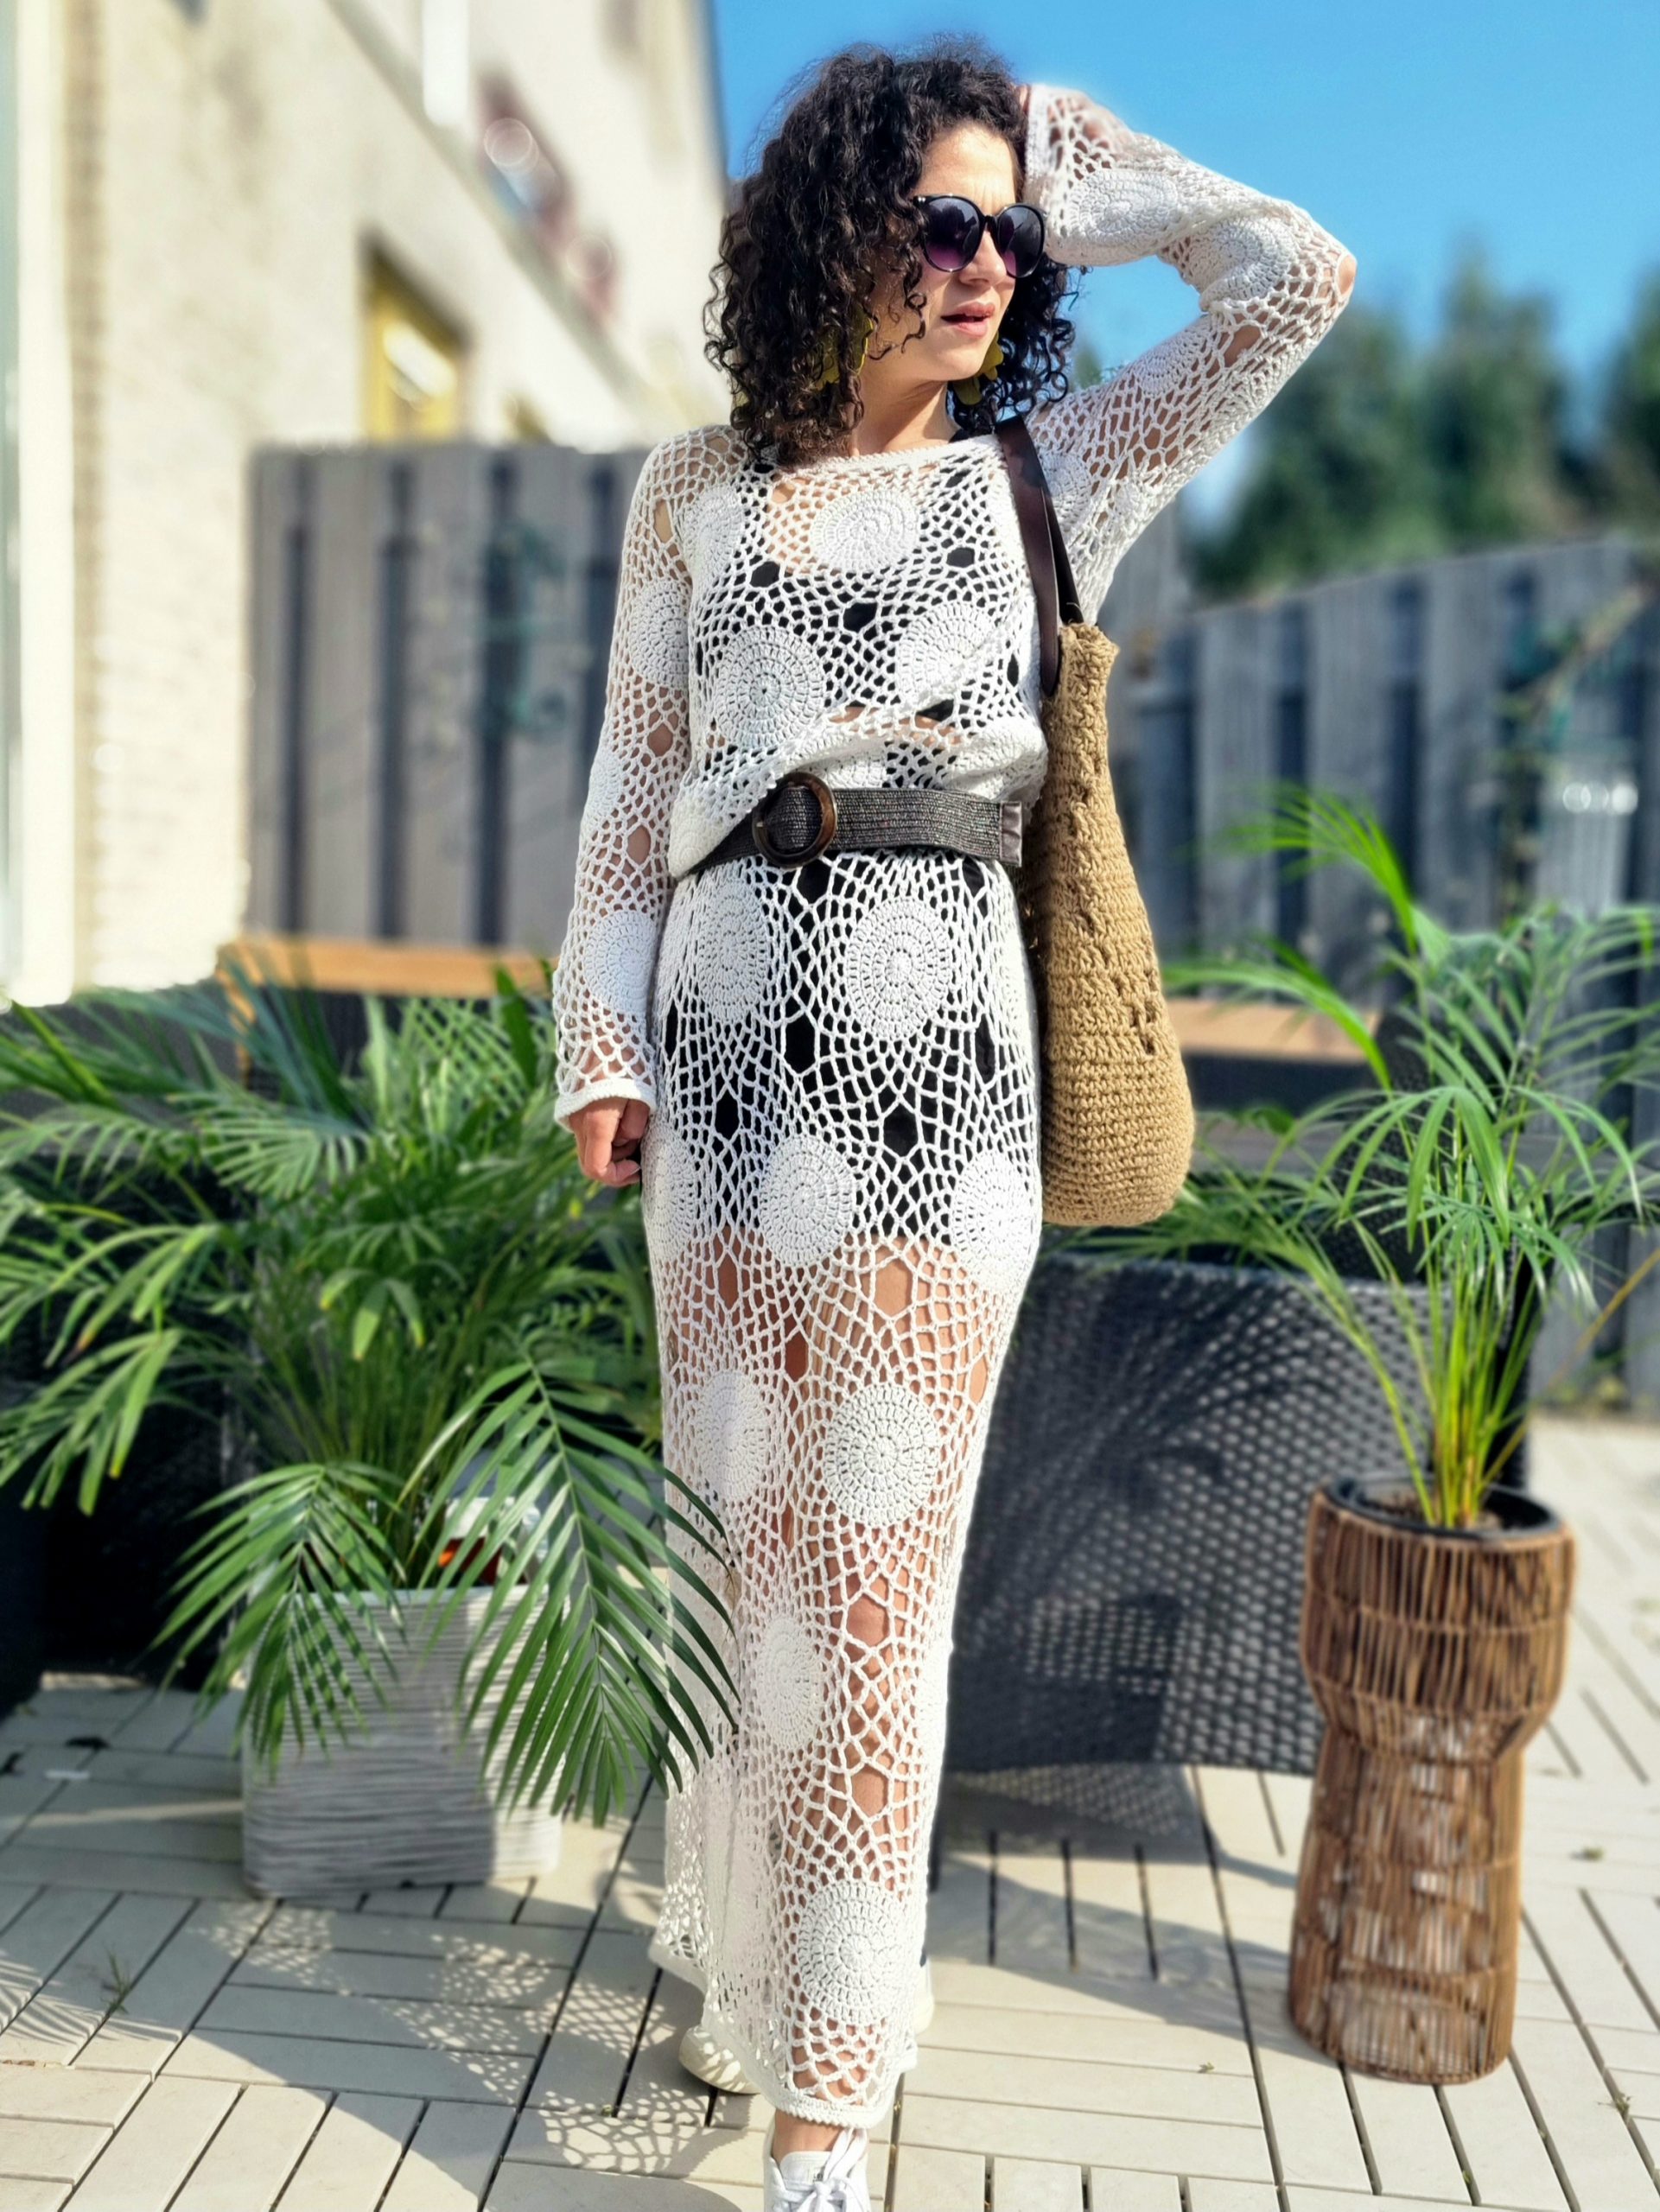
I know that you are so curious to see the pattern that I will jump in 🙂
MATERIALS
• Yarn: Size 1, Super Fine (Fingering) weight yarn
• Crochet Hook:
o 3.5 mm crochet hook
• yarn needle for weaving in ends
• Scissors
NOTES ABOUT DESIGN
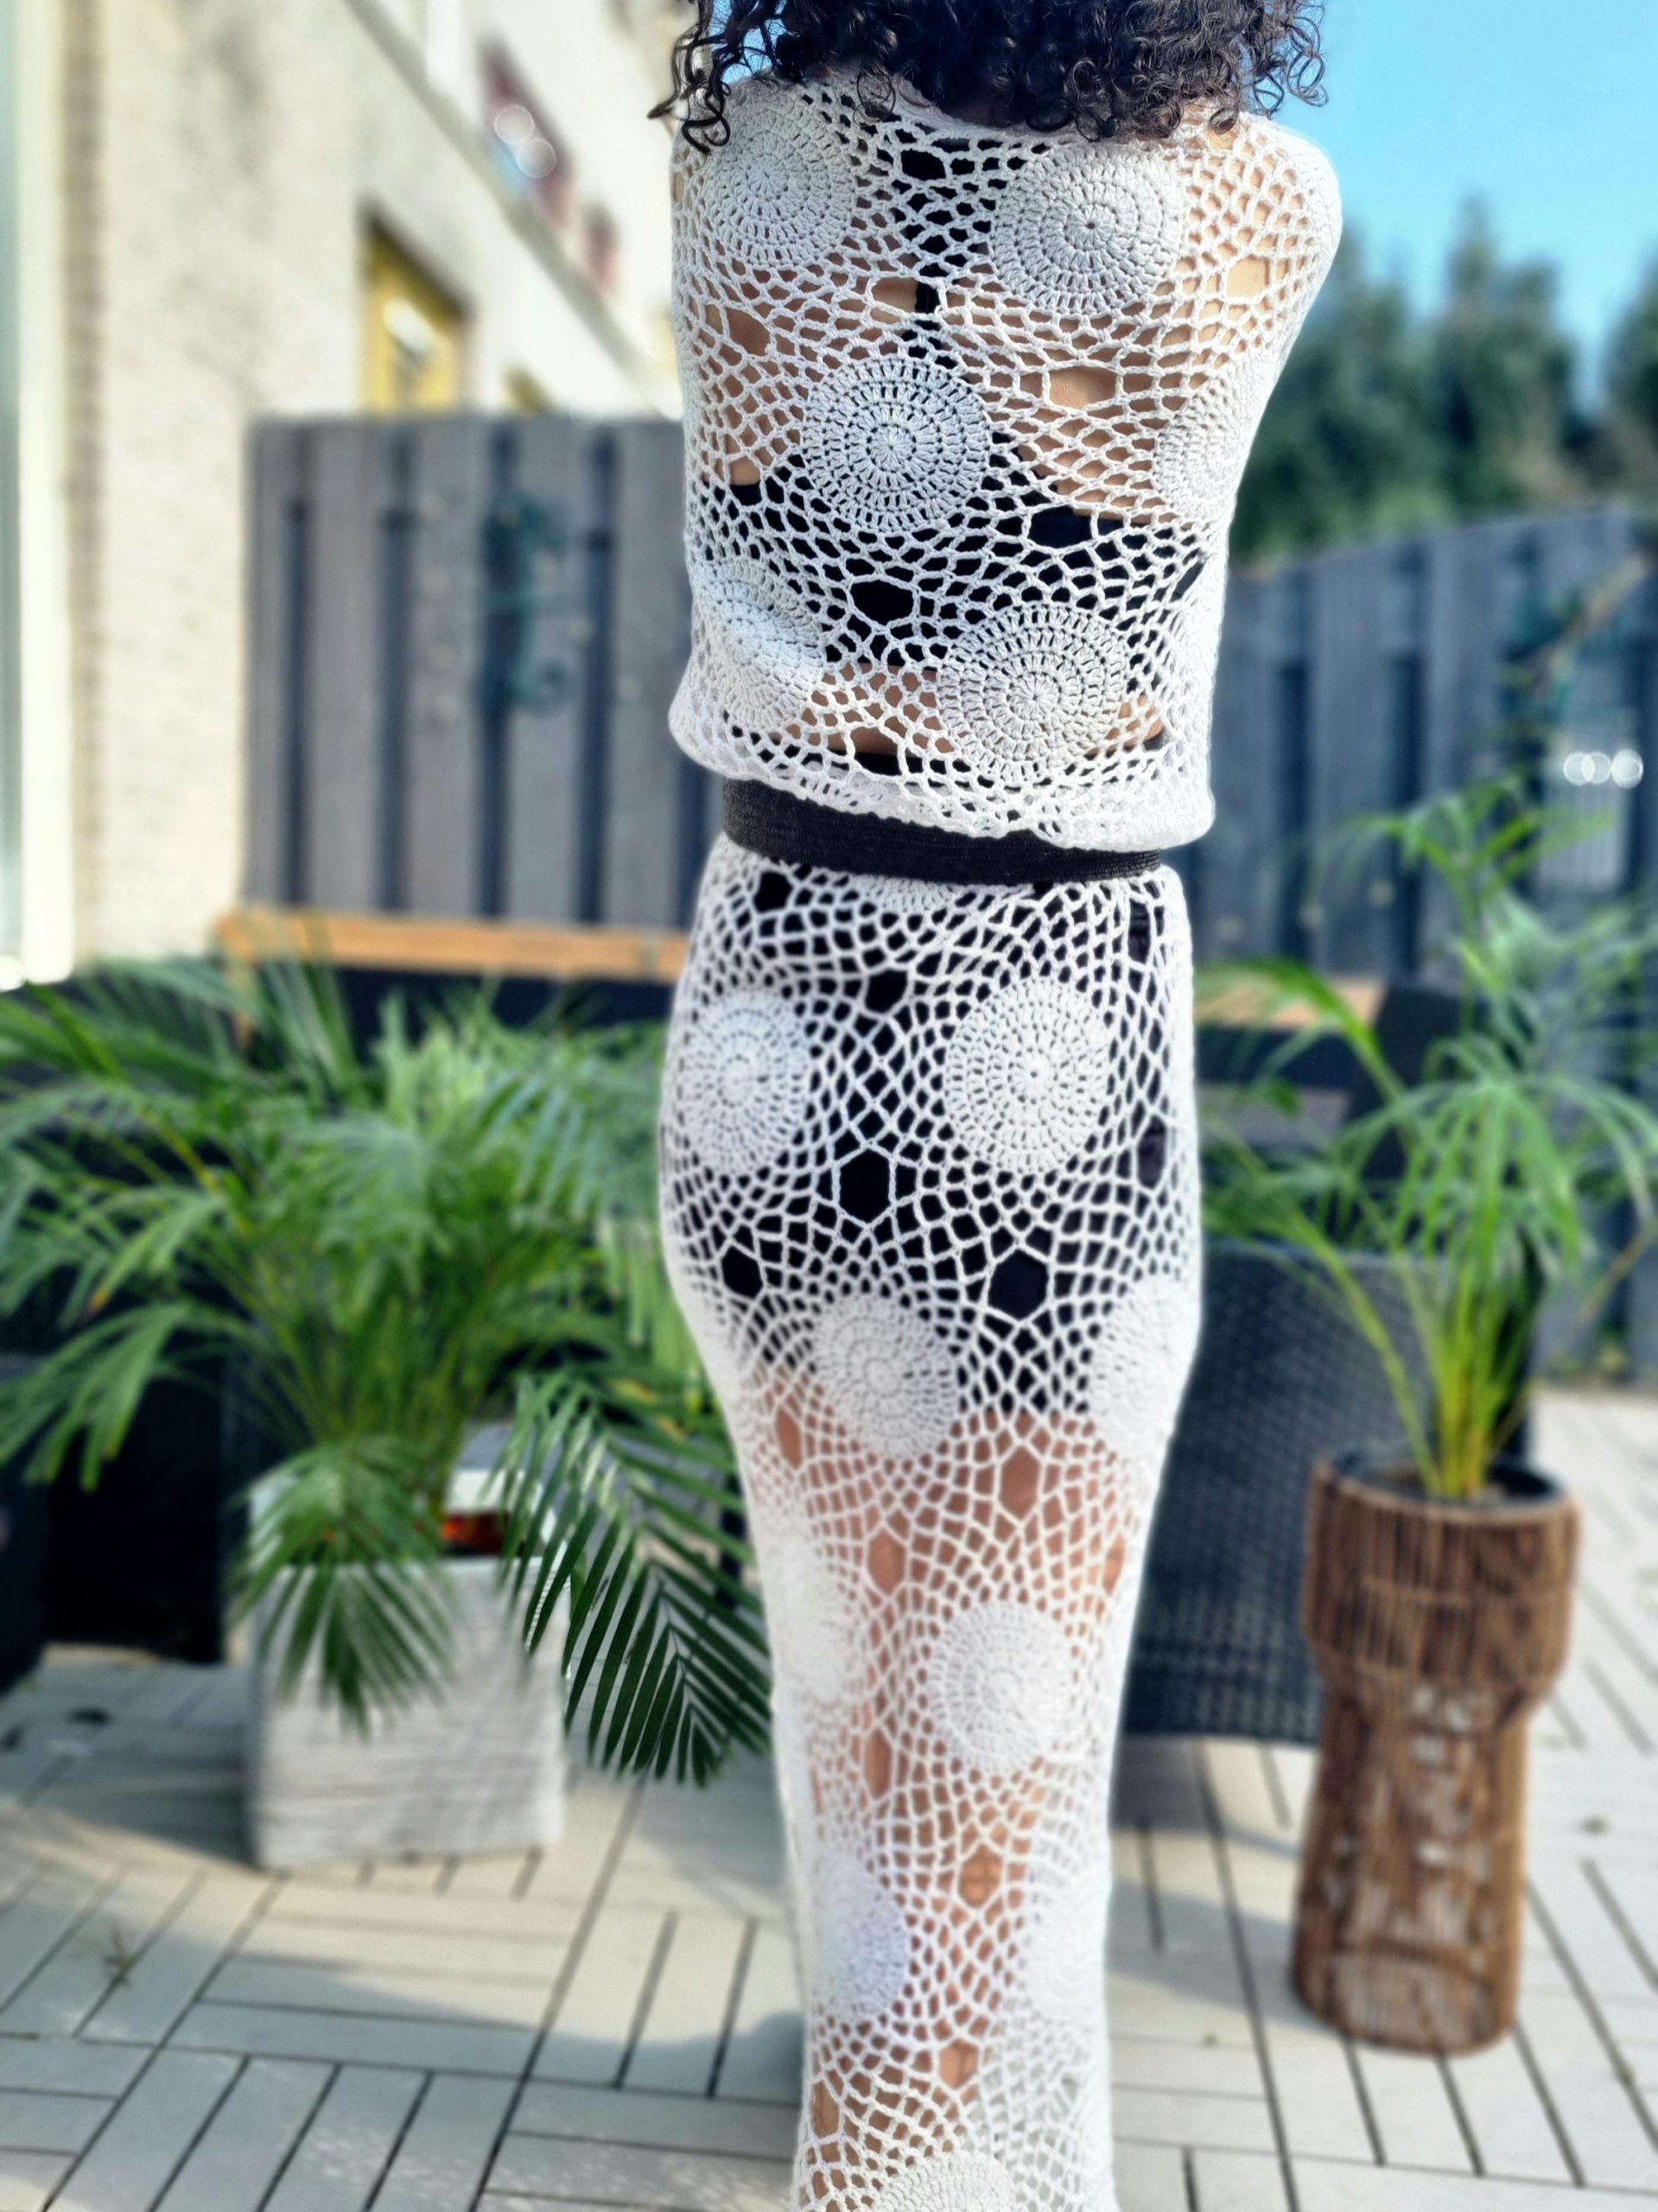
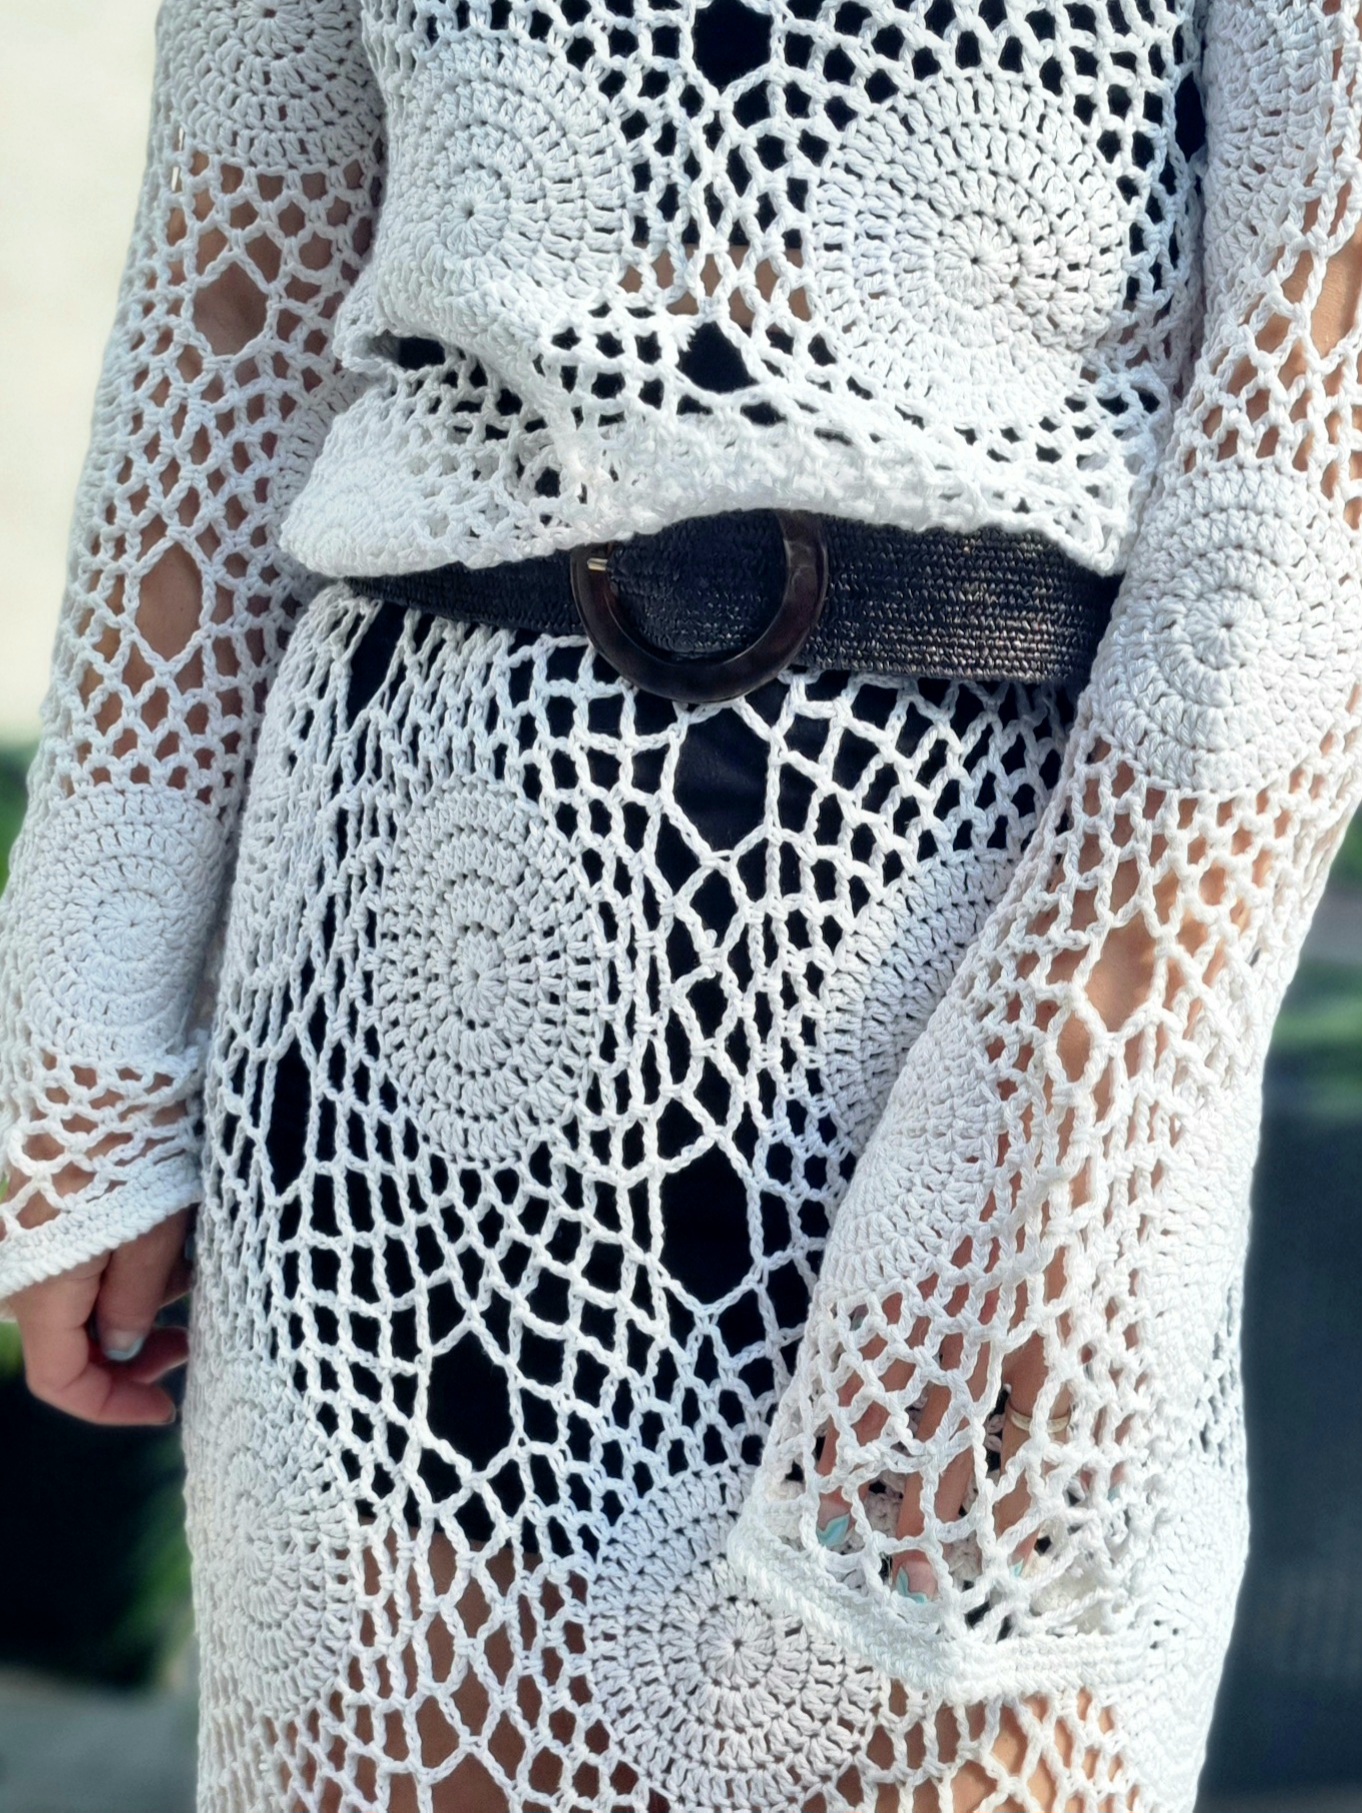
The Desire Dress design has a modular construction. Each circle motif is crocheted individually, and the final round serves as the joining element, seamlessly connecting them.
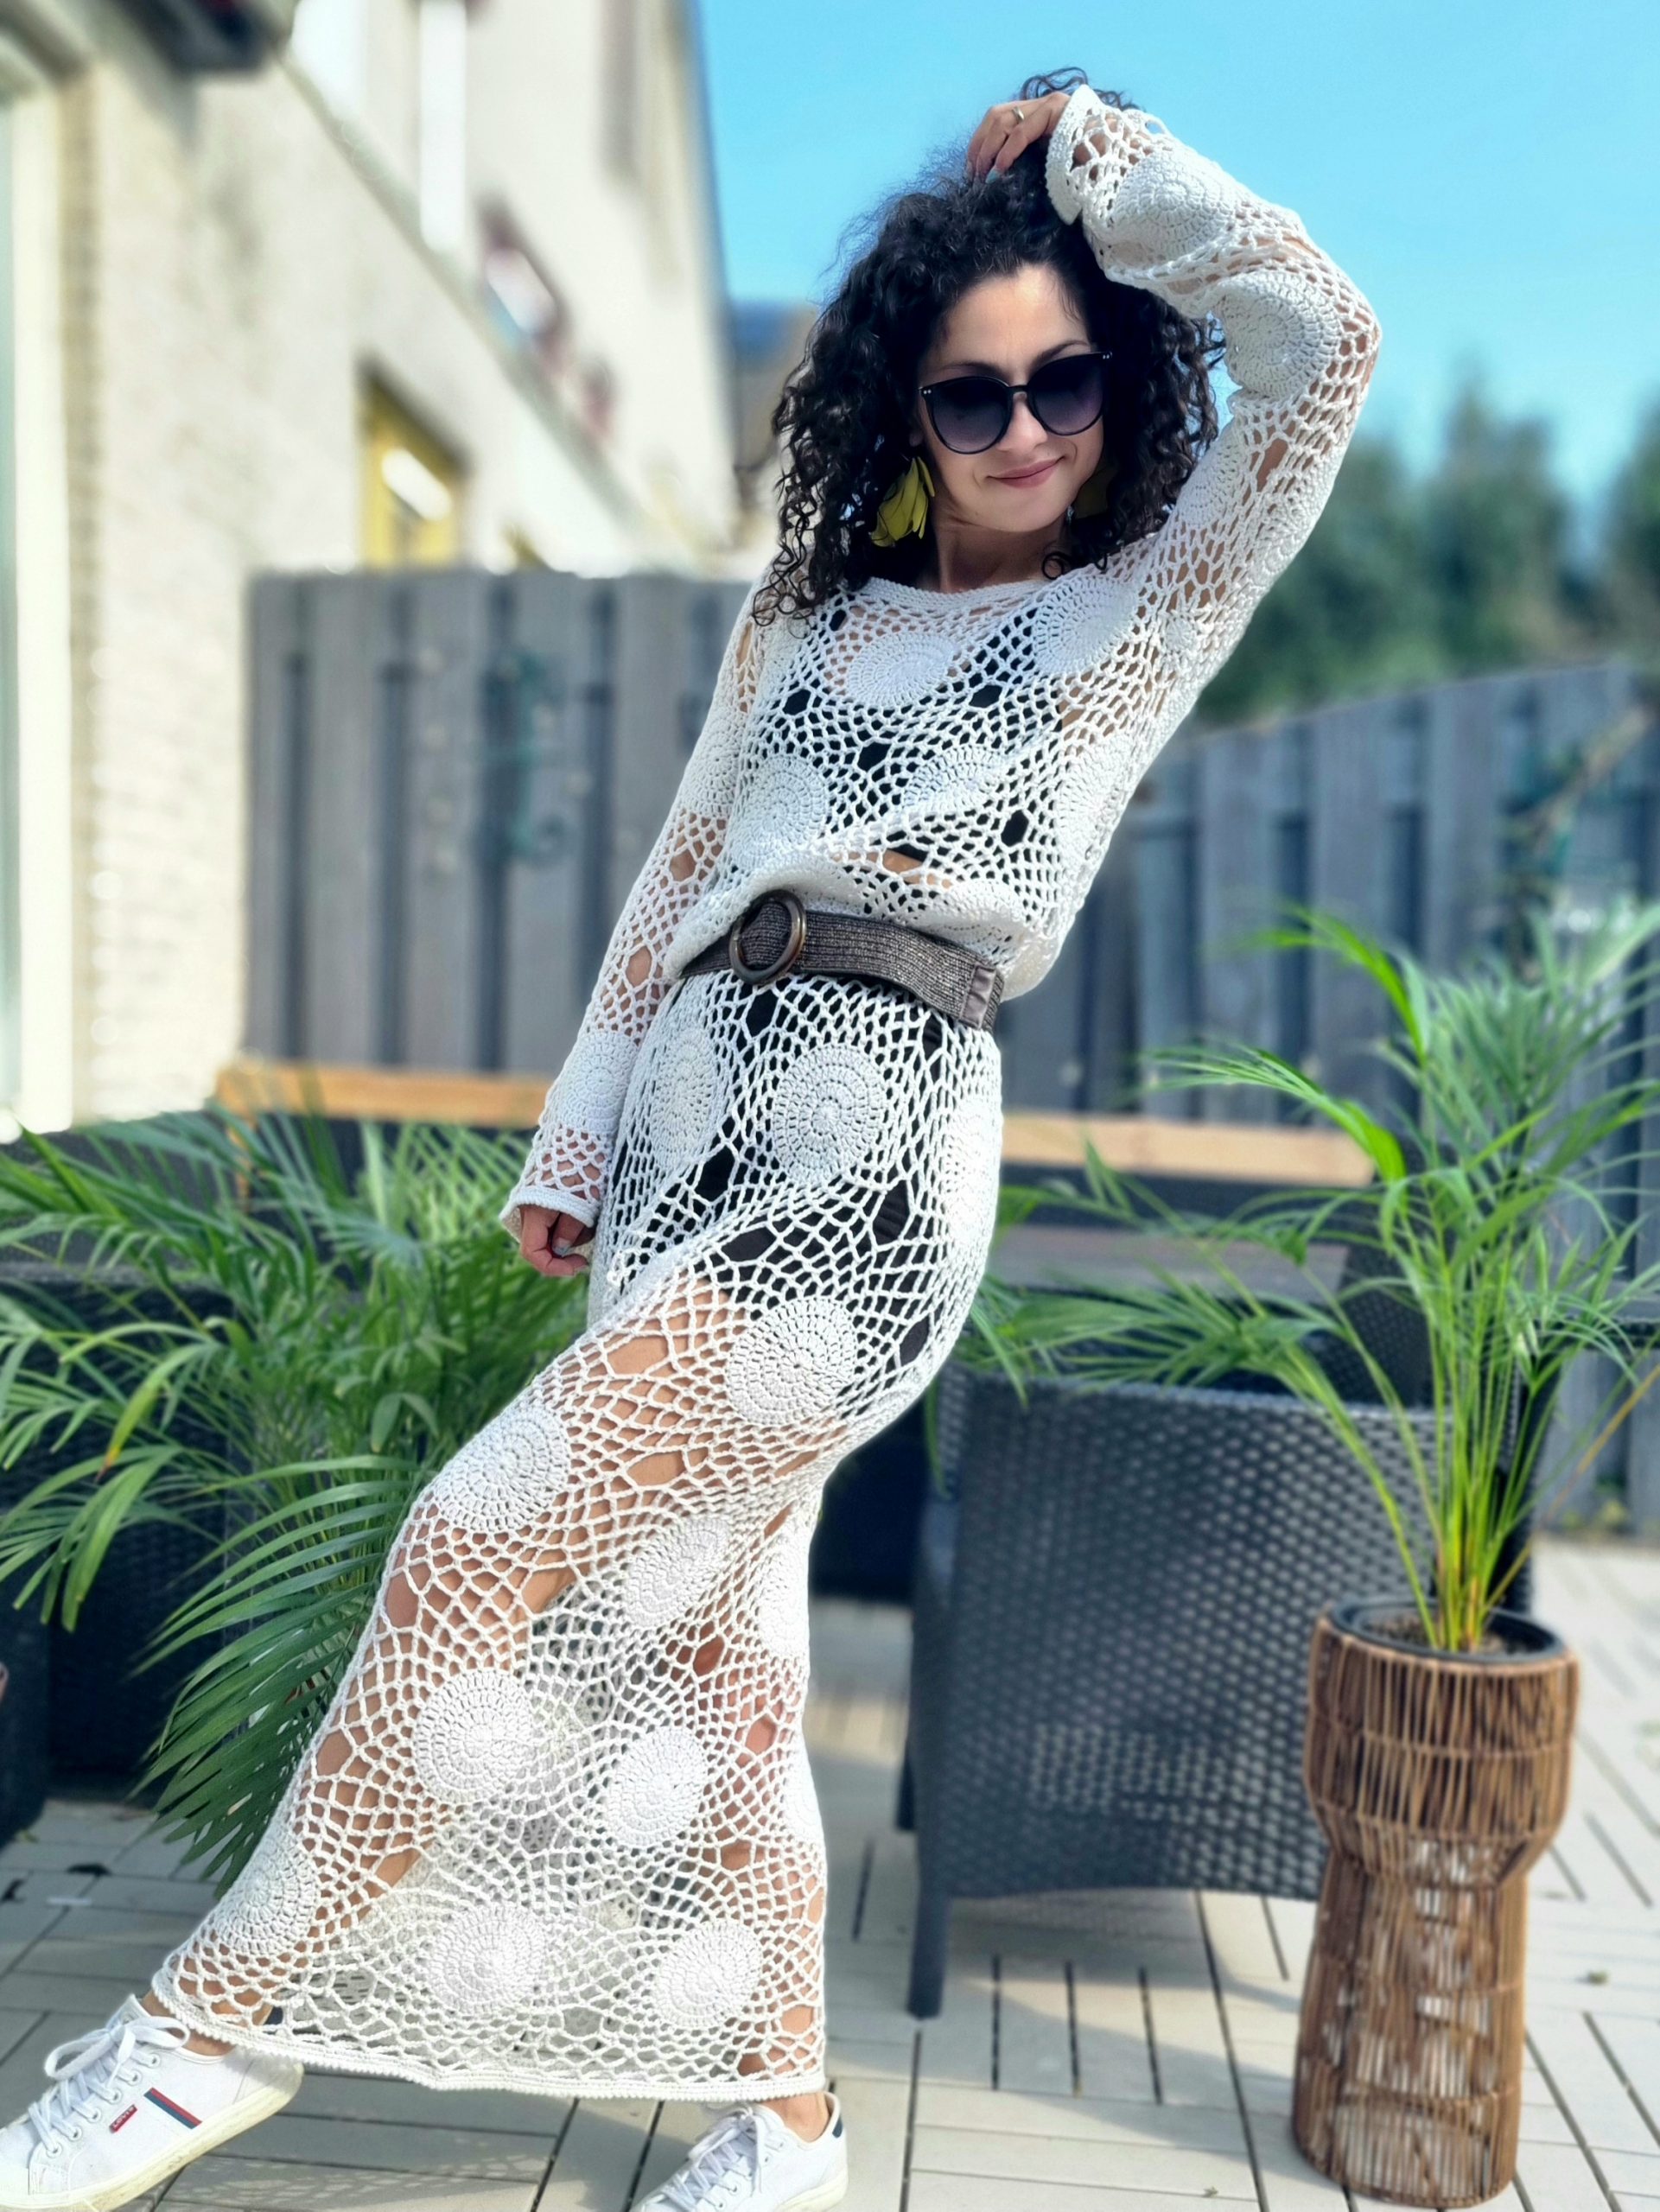
The beauty of this design lies in its versatility. You can customize the length by joining the motifs from top to bottom according to your preference. Whether you envision a stylish top, a trendy tunic, or an elegant maxi dress, this pattern accommodates all three versions flawlessly. Moreover, the dress’s sleeves can be tailored to your liking, allowing you to choose between short, 3/4, or long sleeves.
As you progress to the waist length, an additional round is introduced to the motifs, enhancing the dress’s width around the hips. This thoughtful detail adds a flattering silhouette and ensures a comfortable fit.
MEASUREMENTS AND SIZES
The Desire Dress pattern is written in 4 sizes, sizes S, M, L, and XL, but you will find tips on adjusting the size.
Final Measurements of the Desire Dress
Neck width* a: 23 cm (26, 28, 30)
Bust width b: 43 cm (48.5, 53, 57)
Hips and bottom width c: 53 cm (60, 65, 70)
**Sleeve length d: 64cm (72, 78, 84)
Sleeve circ. e: 28 cm (32, 35, 38)
***Length f: 140 cm (157, 172, 185)
*The neck width is measured across the back panel; it can be adjusted if you work more rounds on the neckline and make a few decreases
**the sleeve length it’s measured from the shoulder and includes the same number of motifs as for size S; it can be adjusted and make it shorter by working less motifs
*** The length is measured from the back of the neck and includes same number of motifs for all sizes; it can be adjusted and make the dress shorter, by working less motifs rounds;
YARN
For the Desire Dress, I used: Catona by Scheepjes; Yarn composition: 100% mercerized cotton; Each ball has 50 grams and is approximately 125 meters
Color 105 – Bridal White
For each size, you will about need:
1650 (1840, 2270, 2450)
The amount of yarn is calculated for the maxi version, considering the same number of motifs for all sizes;
ABBREVIATIONS
Ch – chain
Sc – single crochet
dc – double crochet
ss – slip stitch
tsc – twisted single crochet
St(s) – stitch(es)
R – round
** – repeated section.
TENSION
Using a 3.5mm crochet hook working 1 motif for the corresponding size
Size S: 1 motif = 14.5 cm
Size M: 1 motif: 16 cm
Size L: 1 motif: 17.5 cm
Size XL: 1 Motif = 19 cm
The motifs are measured in diameter
For a comprehensive guide to constructing the dress, refer to the PDF version of this pattern, which includes a detailed stitch chart for every step. The PDF is available for purchase at the provided links below:
For a comprehensive guide to constructing the dress, refer to the PDF version of this pattern, which includes a detailed stitch chart for every step. The PDF is available for purchase at the provided links below:
STITCH PATTERN AND TECHNIQUES
The Desire Dress showcases a combination of stitch patterns. The motifs are created using a simple stitch pattern, incorporating double crochet stitches for the initial rounds, followed by a mesh stitch pattern for the final three or four rounds, depending on the size.
The mesh stitch pattern is created using single crochet and chain stitches.
When working on the dress, you have the flexibility to choose between two approaches. You can either complete multiple motifs individually and join them at the end, or opt for joining them as you progress.
Each size has a unique motif design while maintaining the same stitches. The larger sizes incorporate additional double crochet or mesh stitch rounds to accommodate the sizing requirements.
To customize the length of the dress, the motifs are joined from top to bottom, allowing for adjustments based on your preferences and the size of each motif. Additionally, if further length is desired, the mesh stitch pattern can be utilized to extend it. The pattern provides comprehensive details on this process.
For a more comprehensive understanding, please refer to the pattern below, which includes further instructions and guidelines.
HOW TO ADJUST THE DESIRE DRESS PATTERN SO IT CAN FIT YOUR BODY
The Desire Dress design takes into account your bust measurements as a reference for creating the perfect fit. To ensure you achieve the desired result, please follow the steps below:
Step 1: Using a measuring tape, accurately measure your bust.
Step 2: Divide the measurement by 2 to obtain the bust width, which will serve as the reference for starting your dress.
Step 3: Select the yarn and hook size that you prefer for the dress.
Step 4: The bust width should be covered by three motifs joined together. Within this pattern, you will find different motif patterns to choose from. If you opt for a thinner yarn and a smaller hook size, you may need a larger motif to cover the same size effectively.
Step 5: Once you have decided on the pattern for your motif, you are ready to proceed by following the sketches and instructions provided below.
One crucial consideration, especially if you wish to incorporate a different stitch pattern for the motifs, is that the last round of each motif should consist of a multiple of 6 chain spaces. Each circle within the motif will have 6 equal segments around it, enabling seamless joining with other motifs.
Upon reaching the waist length, the motifs are expanded by adding an extra round, serving as a joining round. If you require additional width, you can add another round while maintaining the 6 equal segments. If you have already joined the motifs up to the waistline with 4 chain spaces on each join, continue using the same number of spaces for joining.
PATTERN NOTES
– Each motif is worked in the round exclusively on the right side.
– The 2 chain stitches at the beginning of a double crochet round do not count as the first double crochet.
– The 1 chain stitch at the beginning of a round starting with single crochet does not count as the first double crochet.
– The last round of a motif serves as the joining round, which you will work on while joining the motifs together.
For a comprehensive guide to constructing the dress, refer to the PDF version of this pattern, which includes a detailed stitch chart for every step. The PDF is available for purchase at the provided links below:
– To increase the width around the hips, add an extra round. In this particular pattern, the last round for all motifs of all sizes is 1 single crochet, 5 chain stitches*. This round will be used for joining (more details in the pattern). When you want to increase the width, work the joining round as the last round of the motif and add an extra round for joining, which will be 1 single crochet, 7 chain stitches.
INSTRUCTIONS
MOTIF PATTERN SIZE S
Start: make a magic ring
R1: 2ch, 12dc inside the ring; ss into the first dc;
R2: 2ch, 2dc in each st around; ss into the first dc (24 dc)
R3: 2ch, *2dc in next st, 1dc in next st; *rep. until the end of the round; ss into the first dc. (36 dc);
R4: 2ch, *1dc in next 2sts, 2dc in next st; *rep. until the end of the round; ss into the first dc. (48 dc)
R5: 1ch, *1sc, 4ch, skip 1 st; *rep. until the end of the round; ss into the first sc (24 4ch-sps)
R6: 2ss to start the round from the first 4ch-sp; 1ch, *1sc into the next 4ch-sp, 4ch; rep. until the end of the round; ss into the first sc (24 4ch-sps).
MOTIF PATTERN SIZE L
Start: make a magic ring
R1: 2ch, 12dc inside the ring; ss into the first dc;
R2: 2ch, 2dc in each st around; ss into the first dc (24 dc)
R3: 2ch, *2dc in next st, 1dc in next st; *rep. until the end of the round; ss into the first dc. (36 dc);
R4: 2ch, *1dc in next 2sts, 2dc in next st; *rep. until the end of the round; ss into the first dc. (48 dc)
R5: 1ch, *1sc, 4ch, skip 1 st; *rep. until the end of the round; ss into the first sc (24 4ch-sps)
R6: 2ss to start the round from the first 4ch-sp; 1ch, *1sc into the next 4ch-sp, 4ch; rep. until the end of the round; ss into the first sc (24 4ch-sps).
R7: rep. R6
MOTIF PATTERN SIZE L
Start: make a magic ring
R1: 2ch, 12dc inside the ring; ss into the first dc;
R2: 2ch, 2dc in each st around; ss into the first dc (24 dc)
R3: 2ch, *2dc in next st, 1dc in next st; *rep. until the end of the round; ss into the first dc. (36 dc);
R4: 2ch, *1dc in next 2sts, 2dc in next st; *rep. until the end of the round; ss into the first dc. (48 dc)
R5: 2ch, *2dc in next st, 1dc in next 3sts; *rep. until the end of the round; ss into the first dc; (60 sts)
R6: 1ch, *1sc, 4ch, skip 1 st; *rep. until the end of the round; ss into the first sc (30 4ch-sps)
R7: 2ss to start the round from the first 4ch-sp; 1ch, *1sc into the next 4ch-sp, 4ch; rep. until the end of the round; ss into the first sc (30 4ch-sps).
MOTIF PATTERN SIZE XL
Start: make a magic ring
R1: 2ch, 12dc inside the ring; ss into the first dc;
R2: 2ch, 2dc in each st around; ss into the first dc (24 dc)
R3: 2ch, *2dc in next st, 1dc in next st; *rep. until the end of the round; ss into the first dc. (36 dc);
R4: 2ch, *1dc in next 2sts, 2dc in next st; *rep. until the end of the round; ss into the first dc. (48 dc)
R5: 2ch, *2dc in next st, 1dc in next 3sts; *rep. until the end of the round; ss into the first dc; (60 sts)
R6: 1ch, *1sc, 4ch, skip 1 st; *rep. until the end of the round; ss into the first sc (30 4ch-sps)
R7: 2ss to start the round from the first 4ch-sp; 1ch, *1sc into the next 4ch-sp, 4ch; rep. until the end of the round; ss into the first sc (30 4ch-sps).
R8: Rep. R7
For a comprehensive guide to constructing the dress, refer to the PDF version of this pattern, which includes a detailed stitch chart for every step. The PDF is available for purchase at the provided links below:
HOW TO JOIN THE MOTIFS
We will utilize the last round for joining the motifs together. The joining segments will consist of 4 spaces for sizes S and M, and 5 spaces for sizes L and XL.
In the last round, the pattern is 1 single crochet, 5 chain stitches (1sc, 5ch). We will use these 5 chain stitches to join the current motif with one or more motifs.
Always ensure that the motif you are currently working on is facing the right side, while the motif you are joining is facing the wrong side.
To initiate a joining round, follow these steps:
Step 1: After making the first single crochet in the round, ch2.
Step 2: Insert your hook into the 4-ch-sp of motif B and work a sc.
Step 3: Ch2 and proceed to the next 4-chsp of motif A, making a single crochet.
Repeat this process until you have joined 4 4-ch-sps (for sizes S and M) or 5 4-ch-sp (for sizes L and XL).
If you need to join with another motif, simply repeat the process for an additional 4 (or 5) 4-chain spaces.
Once you have completed the joining, continue working the round as follows: Chain 5, *1 sc into the next 4-ch-sp, ch5; repeat from * until you finish the round.
If you require additional width, such as for the length after the waistline, you will work the motifs with the joining round as the last round. This means that you will need to work one more round, repeating the pattern: 1 single crochet in the next 4-chain space, followed by 5 chain stitches.
For the joining round, you will use 7 chain stitches. The steps for joining will remain the same, with the only difference being that you will chain 3 instead of 2.
After familiarizing yourself with the process of creating and joining the motifs, you are now ready to construct the dress.
Below, you will find a sketch illustrating the joining pattern for the front and back panels, as well as the sleeves. Please note that the sketch depicts the motifs in a flat layout, but they will be joined in the round (with a single round for both the back and front panels).
This visual reference will provide you with a clear understanding of how the motifs come together to form the different sections of the dress.
By following the sketch and utilizing the knowledge you have gained, you can confidently proceed with building the dress, ensuring a beautiful and well-fitted final result.
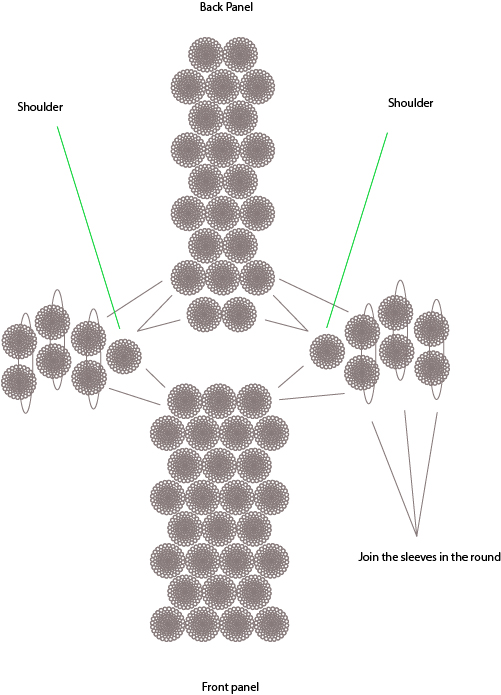
The top part of the dress holds significant importance in its construction. Once you have successfully completed this section, working on the length and sleeves will become relatively easier.
Once you have successfully completed the top part, proceed to work on the desired length of the dress. You can follow the instructions provided earlier in the pattern for adjusting the length according to your preference.
Similarly, when you are ready to tackle the sleeves, utilize the knowledge and techniques you have gained thus far to determine the desired length and style. You can refer to the instructions for customizable sleeve lengths and follow them accordingly.
SLEEVES
The sleeves of the dress consist of two motifs in circumference.
To begin the sleeves, the first two motifs will be joined with the shoulder and the front and back panels, seamlessly integrating them into the overall design.
In the sample I worked on, I completed a total of three rounds for each sleeve, with two motifs in each round. For the final round, I increased the width of the motifs to create a flared appearance, adding a touch of elegance to the sleeves.
Note: at the armpit, after joining the sleeves, a whole will remain. Please refer to the video tutorial to see how to fill those holes
FINISHING THE EDGES
The dress will end up with wavy edges because of the circles. But we will make them straight.
This is an important step, especially for the neckline. Working this border will allow us to make some decreases as well if we want a narrower neckline
To ensure a polished finish, we need to fill the gaps between the motifs for all the edges, including the neckline, sleeves, and bottom hem. Follow these steps to achieve a seamless result:
For the following instructions, let’s consider Motif A as the motif on the right and Motif B as the motif on the left.
Row 1: Begin by rejoining the yarn into the second 4-chain space of Motif A, counting from the join to the right. Make 1 chain stitch (1ch), then work 1 single crochet (1sc) into the 5-chain space. Chain 2 (ch2) and make 1sc into the next 5-chain space of Motif A. Next, work 5 chain stitches (5ch) and make 1sc into the first 5-chain space after the joining of Motif B. Chain 2 (2ch) and make 1sc into the next 5-chain space of Motif B. Turn.
Row 2: Chain 5 (5ch), make 1sc into the next 5-chain space, chain 5 (5ch), and slip stitch (ss) into the next single crochet (sc) (the first one you made after joining the yarn). Chain 2 (2ch) and make 1sc into the next 5-chain space of Motif A. Turn.
Row 3: Repeat the sequence (5ch, 1sc into the next 5-chain space) two times, then work 5 chain stitches (5ch) and make 1sc into the next 5-chain space of Motif B.
Fasten off and cut the yarn.
Repeat these steps to fill all the gaps between the two motifs. Please note that when working on the sleeves and bottom, where the last round motifs have 7 chain stitches, you will need to chain 7 instead of 5.
NECKLINE EDGE
Rejoin yarn in one of the 5ch-sps.
Round 1: 1ch, 1sc, 3ch, *1sc into the next 5ch-sp, 3ch; *rep. until the end of the round; ss into the first sc.
Note: if you want to decrease even more, and make the neckline smaller, you can add one more round following the pattern 1sc into the next *3ch-sp, 2ch.
Round 2: 1ch, 3sc in each 3ch-sp.
Round 3: 1ch, 1sc in each st
Round 4: rep. Round 3
Round 4: 1tsc (twisted single crochet) in each st around.
SLEEVES AND BOTTOM EDGES
If you need to add more length to these parts of the dress:
Rejoin yarn in one of the 5ch-sps.
Round 1: 1ch, 1sc, 7ch, *1sc into the next 5ch-sp, 3ch; *rep. until the end of the round; ss into the first sc.
Round 2: ss into the next 7ch-sp, 1ch, 1sc, 7ch, *1sc in next 7ch-sp, 7ch. *rep until the end of the round
Rep. Round 2 to the desired length
Finishing the edge
Round 1: ss into the next 7ch-sp, 1ch, 1sc, 4ch, *1sc in next 7ch-sp, 4ch. *rep until the end of the round
Round 2: 1ch, 1sc in each st around (1sc into the sc sts, 4sc into the 4ch-sp.)
Round 3: 1ch, 1sc in each st
Round 4: rep. Round 3
Round 4: 1tsc (twisted single crochet) in each st around.
TO FINISH
Weave in all the ends and block to measurements.
You can also find a video tutorial to guide you through the process of making the Desire Dress here
For a comprehensive guide to constructing the dress, refer to the PDF version of this pattern, which includes a detailed stitch chart for every step. The PDF is available for purchase at the provided links below:




Comments are closed.