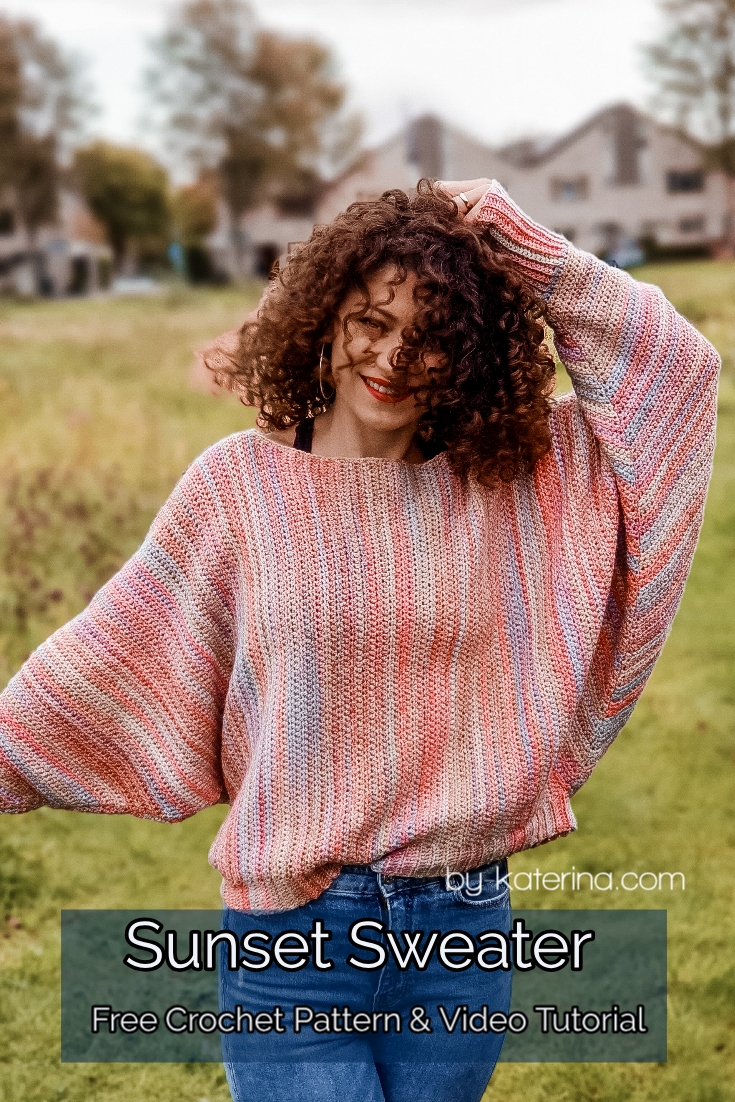
Well, well, well the Sunset Sweater is finally here!
This sweater is the crocheted version of Sunshine Sweater which I designed this spring. Many of you requested a crocheted version and I couldn’t made it back then, but I am happy that I can share it with you now!
The design of these sweaters is inspired by one of my favorite sweaters I ever bought. It was my go to sweater and I loved it so much. Back then when I bought the sweater I couldn’t realize that I will be able to knit and crochet one and now I am happy that I have 2 favorite sweaters to wear 😁
What I love the most is that you can wear the Sunset Sweater with so many things! I just paired it with a pair of jeans from Zaful, but it can be worn with other type of pants or a skirt, whatever you will feel in the mood to wear.
I really hope you will love it as much as I do and you will make it. In case you unsecure about trying this design, be sure that you can count on my full support.

You can Purchase the easy printable PDF version of this pattern here:
I know that you are excited to see how the Sunset Sweater is made and what you will need to make it, so I won’t talk to much about and just let’s see what is all about.
MATERIALS
- Yarn
- Category 3 ( Light weight, DK)
- Crochet Hook
- 4 mm
- You will need a yarn needle for assembling and to wave in ends
- Scissors
ABOUT DESIGN
The Sunset Sweater uses techniques like half double crochet, single crochet worked in the back loop only for ribbing, increasing and decreasing
Skill Level required is beginner. You don’t need any experienced skills to make this sweater, only a lot of patience.
This Sunset Sweater is worked from cuff to cuff working the back and front panels at ones. When we are getting to the neck line, we split the number of stitches in half and work the 2 panels individual. Then we are joining again and working the other half of the sweater.

The pattern is available in 8 sizes, from Small to 5 X Large and is written in US terms
MEASUREMENTS
Final measurements of the sweater are listed below.

Neck Line a: 25 cm (25, 25, 25, 25, 25, 25, 25)
Bust width: 46 cm (51, 56, 61, 66, 71, 76, 81)
Sleeve length c: 55 cm (55, 57, 57, 58, 58, 59, 59)
Length d: 56 cm (58, 60, 61, 64, 64, 67, 68)
This measurements will fit:
| To Fit cm | S | M | L | XL | 2XL | 3XL | 4XL | 5XL |
| Bust
Width |
43 | 48 | 53 | 58 | 63 | 68 | 73 | 78 |
How much yarn do you need?
For the Sunset Sweater, I used Concept Yoga by Katia Yarns which is a blend of Cotton, Extra Fine Merino and Polyamide. Each ball has 50 grams and approximate 200 meters
For each size you will approximate need:
| Concept Yoga | S | M | L | XL | XXL | 3XL | 4XL | 5XL |
| 50 g/200 m | 9 | 10 | 11 | 12 | 13 | 14 | 15 | 17 |
STITCH PATTERN
The Sunset sweater is worked entirely in half double crochet except the cuffs and bottom hem ribbing. Those are worked in single crochet in the back loop only
ABBREVIATIONS
- Ch – chain
- Sc – single crochet
- Sc blo – single crochet in the back loop only
- Hdc – half double crochet
- St(s) – stitch(es)
- Inc – Increase: 2 hdc in the same st
- Dec – Decrease: yarn over, insert the hook into the next st, yarn over pullout a loop, insert the hook into the next st, yarn over and pull out a loop, yarn over and pull it through all loops on your hook
- R| – row
- * – repeated section
TENSION
- 16 hdc = 10 cm
- 15 hdc rows = 10 cm
- 21 sc blo = 10 cm
- 18 sc blo rows = 10 cm
*the tension is measured after blocking
How to measure and adjust the pattern in case you need/want it.
I added this part to the pattern, because not all of us has standard measurements and I want to help you customize this sweater to your own body.
Scroll down for the pattern in case you want to skip this part.
Before to start any measurements, you have to make a swatch. Work a few stitches and rows, a square of about 10/10 cm.
This sweater is worked from cuff to cuff.
Here is a diagram with all the sections of the sweater:

Measure your cuff to cuff length, or measure the neck to cuff and multiply by 2.
This length that you have includes the sleeves length and bust width.
Because we are increasing from the cuff, the bust circumference of the sweater will be wide enough to fit, but we have to make sure that the hem of the sweater will be wide enough to fit our bust when dressed.
The sweater is designed with the bottom having the standard bust width for each size with a positive ease of 6 cm.
To adjust this in case you need that the bottom of the sweater to be wider, measure your bigger part of your body, bust or waist.
Then from the cuff to cuff length, you have to decrease the bust or waist width; Divide by 2 and this will be the length of the sleeve.
To put all in a math formula:
Sleeve length = (cuff to cuff length – bust or waist width)/2
Now measure your cuff circumference. Having the swatch you will know with how many sts to start.
Work the elastic ribbing for the cuff, in single crochet stitches in the back loop only. The first row of the sleeve will be worked in the side rows and then start increasing at the beginning and at the end of the row. Keep increasing until you have the sleeve length (from the formula above)
Fold the piece in half, horizontally, and measure from top to bottom. This is your sweater length. To add extra length you will have to add some stitches on each side. On the sample I added only the ribbing sts, but in case you need extra length you can add a few sts more.
After adding the extra sts, you will start working on the body of the sweater. First you will work the shoulder. To know how many rows to work on each shoulder you have to calculate how many rows you will need for the neck line. Subtract this number from the total number of rows needed for the bust width and divide the result by 2. The result will be the number of rows you will have to work for the shoulder, before splitting for neck line.
To make the neck line hole, you will have to work the front panel and back panel separately.
After working separately the back and front to create the neck hole, you will have to work in the mirror, what you made before.
After neck hole, join and work the same number of rows you made for the shoulder. Then decrease the number of sts you made for ribbing and start decrease with 1 st at the beginning and at the end of the row to work the other sleeve. When you have worked the same number of rows as for the other sleeve and you have the same number of sts as you start with, start working the ribbing cuff.
Fold the piece horizontally and sew the sides.

You can Purchase the easy printable PDF version of this pattern here:
PATTERN NOTES
Ch 2 at the beginning of the row does not count as first hdc
Increases are made in second and second to last st. Each row starts and ends with a hdc.
Decreases are made in second and third st and third and second to last st. The same as increasing rows, when decreasing, each row starts and ends with a hdc.
INSTRUCTIONS
Numbers for sizes M, L, XL, 2XL, 3XL, 4XL and 5 XL are written between brackets. If not, pattern applies for all sizes
Cuff
Start| ch 26
R1| start with 2nd st, 1 sc in each st to the end of the row. Ch 1 and turn
R2| 1 sc blo in each st to the end of the row
Repeat R2 until you have 36 (40, 44, 48, 52, 54, 58, 62) rows
1st SLEEVE
R1| work in the side rows sc. Each side row sc represents 1 st
Ch 2, 1 hdc in each st to the end of the row. Ch 2 and turn.
R2| 1 hdc in 1st st, 1 inc in next st, 1 hdc in each of the next sts except the last 2 st, 1 Inc, 1 hdc in the last st. Ch 2 and turn. (38 sts)
Repeat R2 until you have in total 64 (64, 66, 66, 68, 68, 69, 69) rows.
You will increase with 2 sts per row. After finishing the sleeve you will have in total 162 (166, 174, 178, 186, 188, 196, 200) sts
Cut the yarn.
BODY
1st Shoulder
R1| ch 10 on the hook (the ribbing sts), 1 hdc in each st to the end of the row ch 11 and turn.
R2| Starting with the 2nd st, 1 sc in next 10 sts, 1 hdc in each of the next sts, except the last 10 ch sts, 1 sc in each of the last 10 sts. Ch 1 and turn.
R3| 1 sc blo in 1st 10 sts, 1 hdc in each of the next sts, exept the last 10, 1 sc blo in the last 10 sts. Ch 1 and turn.
Repeat R3 until you have in total for the shoulder 16 (20, 24, 27, 31, 35, 39, 42) rows.
Neck line
For all sizes
Divide the total number of sts by 2, and place a stitch marker in the middle stitch.
Front panel
R1|1 sc blo in first 10 sts, 1 hdc in each of the next sts, until you have 3 sts left to the stitch marker. Ch 2 and turn.
R2| 1 hdc in each st except the last 10, 1 sc blo in the last 10 sts.
R3| 1 sc blo in the first 10 sts, 1 hdc in each st to the end of the row. Ch 2 and turn.
R4 – R37| repeat R2 and R3

Back panel
Rejoin yarn in the marked stitch
R1| ch 2, 1 hdc in each st, except the last 10, 1 sc blo in the last 10 sts.
R2| 1 sc blo in the first 10 sts, 1 hdc in each st to the end of the row. Ch 2 and turn
R3| 1 hdc in each st, except the last 10, 1 sc blo in the last 10 sts. Ch 1 and turn.
R4 – R37| repeat R2 and R3
2nd Shoulder
R1| 1 sc blo in the 1st 10 sts, 1 hdc in each st to the last st of the front panel, ch 3, 1 hdc in the first st of the front panel, 1 hdc in each of the next sts, except the last 10, 1 sc blo in the last 10 sts, ch 1 and turn.
R2| 1 sc blo in the first 10 sts, 1 hdc in each of the next st (including the ch sts), except the last 10, 1 sc blo in the last 10 sts.
Repeat R2 until you have in total for the second shoulder 15 (19, 23, 26, 30, 34, 38, 41) rows.
Next row (last BODY row)
Slip 11 sts, until you are on the top of the first hdc, ch 2, 1 hdc in each of the next sts, except the last 10 sts. Ch 2 and turn.
2nd SLEEVE
R1| 1 hdc in 1st st, 1 dec, 1 hdc in each of the next sts, except the last 3, 1 dec, 1 hdc in the last st. ch 2 and turn.
Repeat R1 until you have in total 63 (63, 65, 65, 67, 67, 68, 68) rows
Next row (last row of the sleeve)
1 hdc in each st to the end of the row.
CUFF
Start| ch 26
R1| starting with the 2nd st, 1 sc in each sts (25 sc), sl st with 1st 2 sts from the sleeve’s hem. Turn
R2| 1 sc blo in each st to the end of the row. Ch 1 and turn.
R3| 1 sc blo in each st to the end of the row, sl st with next 2 sts of the sleeve’s hem.
Repeat R2 and R3 until you complete the entire sleeve width.
Fasten off
ASSEMBLING
Fold the piece in half horizontally and stitch the edges, start from the bottom hem and finish with the cuff.
TO FINISH
Wave all ends and block to measurements.
And here is how you have made a modern and fashionable sweater 😀
You can Purchase the easy printable PDF version of this pattern here:
You can also find a video tutorial here


Comments are closed.