I don’t know about you, but I just love left over yarn projects. I always try to find something to do with what I have left and each time I am getting in love with the final item.
It’s all about experimenting and play with whatever colors or yarn you have. I found this so relaxing, because every time when I start a left over yarn project, it’s just about being creative. I am not following any sketches of ideas, I just let my mind and hands go with the flow and this is what I love more about it.

You can Purchase the easy printable PDF version of this pattern here:
You can now have the PDF version with 20% Discount or even for FREE if you want to support ByKaterina on Patreon
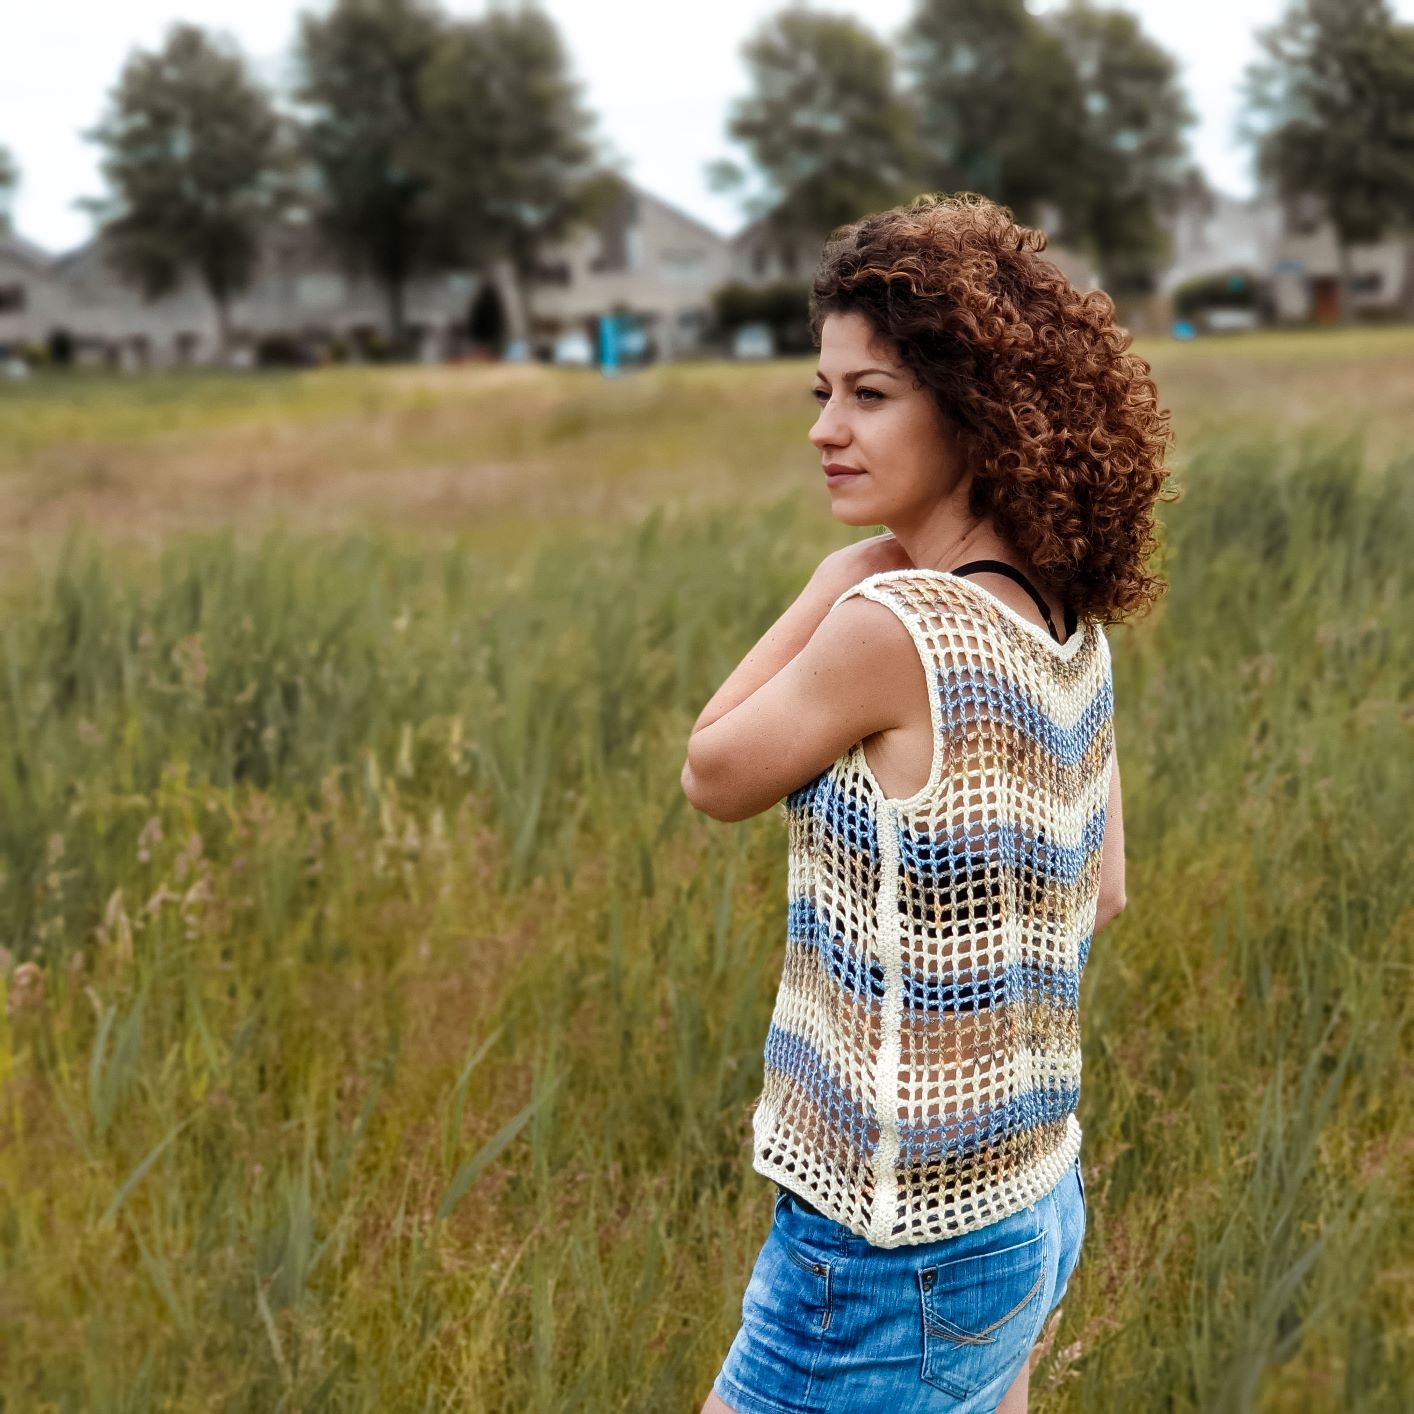
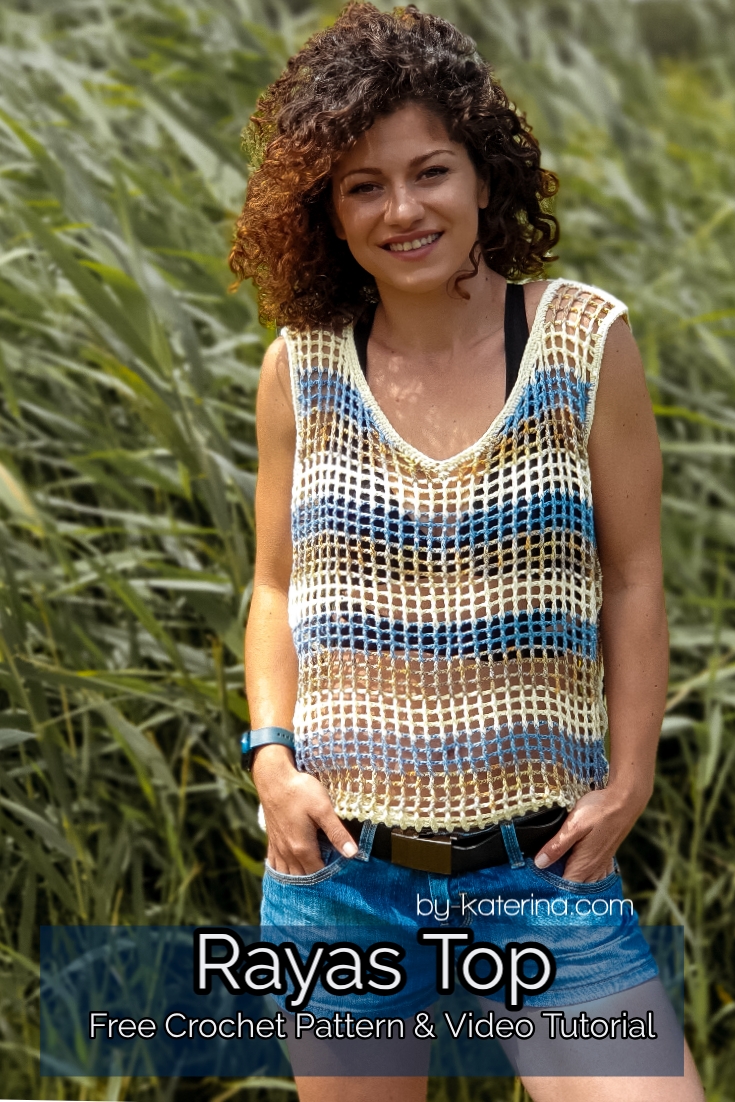
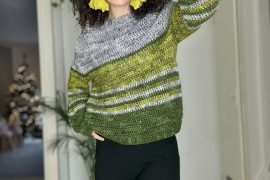
And this is how Rayas Top came to life and I am in love with it and it’s one of my favorite designs this summer (Am I saying this with every new design? 😁)
Why Rayas Top and what is Rayas? Rayas means in Spanish stripes and because I used yarn from Katia, a Spanish Yarn Brand, I said that a Latin, vibrant word will work great with this top.
The good thing about this design is that you can use any yarn you have left, from DK to worsted weight yarn and even combine them.
I used 3 different types of yarn. 2 of them are in DK category and 1 is worsted weight. You can use even thinner yarn, if you like looser stitches.
So, I invite you to play along, with whatever you have and see what we will get in the end.

Materials you will need
- Category 3 or 4, light, DK weight yarn or worsted weight yarn (it is important to be a light fiber for summer like cotton, or cotton mix
- 4.5 (G+, 7 size) mm crochet hook
- 4 mm (G) hook size for edging and assembling
- Yarn needle for wave in ends
- Scissors
- 1 stitch markers
Notes about design
This pattern requires techniques as single crochet, chain stitches, front post double crochet and back post double crochet.
The entire top is worked in a mesh stitch, but using instead of regular double crochet stitches, front post and back post double crochet.
The top constructions is of 2 panels, back and front joined together using single crochet stitches.
The top can be worked in rounds from bottom to the armpit and then work the back and front separately and join at the end shoulders.
Final Measurements
Final measurements of the top are listed below. All measurements are taken after blocking.
The pattern is available in 8 sizes form S up to 5XL and is written in US terms.
Measurements for sizes M, L, XL, 2XL, 3XL, 4XL and 5XL are written between brackets.

Neck width a: 26 cm (26, 28, 29, 30, 31, 32, 33)
Bust width b: 49 cm (54, 59, 65, 69, 74, 79, 84)
Length to armpit c: 34 cm (34, 34, 34, 34, 34, 34, 34)
Armhole Depth d: 19 cm (23, 23, 26, 26, 31, 31 ,31)
Length e: 53 cm (57, 57, 60, 60, 65, 65, 65)
This measurements will fit:
| To Fit | S | M | L | XL | 2XL | 3XL | 4XL | 5XL |
| Bust | 86 | 96 | 106 | 116 | 126 | 136 | 146 | 156 |
How much yarn do you need?
For this design I used 3 types of yarn from Katia. You can work with different colors or use just one.
I used SeaCell Cotton in color 102 Pastel Yellow, Concept Veganette by Katia in color 100 – Fawn brown-Mustard and Concept Versailles by Katia in color 90 jeans Silver.
Each ball of yarn has 50 grams and approximate 100 (Versailles), 120 (Seacell cotton) and 140 (veganette) grams.
For each size you will approximate need:
| yarn | S | M | L | XL | 2XL | 3XL | 4XL | 5XL |
| SeaCell | 2 | 3 | 3 | 3 | 3 | 4 | 4 | 4 |
| Veganette | 1 | 1 | 2 | 2 | 2 | 2 | 2 | 2 |
| Versailles | 1 | 2 | 2 | 2 | 2 | 2 | 3 | 3 |
You can Purchase the easy printable PDF version of this pattern here:
You can now have the PDF version with 20% Discount or even for FREE if you want to support ByKaterina on Patreon
Abbreviation used in the pattern
- Ch – chain
- Sc – single crochet
- Fpdc – front post double crochet
- Bpdc – Back Post double crochet
- Fp/Bp dc 2 tog – yarn over, insert the hook around the next st, yarn over and pull out a loop, yarn over and pull through 2 loops (you have 2 loops on tour hook), skip 2 ch sp and repeat one more time around the next available st, yarn over and pull it through all 3 loops on your hook.
- St(s) – stitch(es)
- ** – repeated section
- R| – row
Gauge
Notes about the gauge
Before start working on the top make a swatch and wet block it. I recommend wet blocking because the yarn behaves differently and it’s important to see how much you fabric will stretch after blocking.
To give you the gauge, I counted the windows (2 ch spaces) both for stitches and rows
Gauge before blocking:
8 windows in width = 10 cm
9 windows in length = 10 cm
Gauge after blocking
7 windows in width = 10 cm
8 windows in length = 10 cm

Notes about the pattern
For a narrower bottom I started with the number of stitches needed for windows with 1 ch between double crochet stitches. So I needed a multiple of 2+1.For example:
For size S, to get to the width of the top, I needed 34 windows. So my starting chain was 34 x 2 +1 = 69 sts.
Ch 3 at th beginning of each row, counts as first double crochet.
Numbers for sizes M, L, XL, 2XL, 3XL, 4XL and 5XL are written between brackets. If not, pattern applies for all sizes.
You can adjust the length of the top, by working more rows to the armpit.
Colors are changed at every 3 rows, not counting the foundation row (R1) in single crochet.
Change the color at the end of the row, finishing the last st with the next color you want to use.
Instructions
Front Panel
Start| ch 69 (77, 85, 89, 105, 113, 117)
R1| ch 1, starting witn 2nd st, 1 sc in each st to the end of the row. Ch 5 amd turn.
R2| skip 1 ch st, *1 FPdc in next st, ch 2, skip 1. * Repeat to the end of the row. Finsih the row with 1 dc in 3rd st of the starting ch. Ch 5 and turn.
R3| skip 2ch sp, *1 Bpdc in next st, ch 2, skip 2 ch – sp. * Repeat to the end of the row. Finish the row with 1 dc in the 3rd st of the turning ch. Ch 5 and turn.
R4| skip 2ch – sp, *1 FPdc in the next st, ch 2, skip 2 ch – sp. * Repeat to the end of the row. Finish the row with 1 dc in the 3rd st of the staritng ch. Change the color, ch 5 and turn.
Repeat R3| and R4| to the armpit for 27 rows, not counting the 1st foundation row.
R28| ch 3, skip 2ch-sp,* 1 FPdc in the next st, h 2, skip next 2ch-sp. *Repeat to the end of the row, except last window (1 FPdc, ch 2, turning chain), 1 Fpdc in next st, skip 2ch-sp, 1 dc in the 3rd st of the turning ch. Ch 3 and turn.
R29| skip 2ch sp, *1 Bpdc in next st, ch 2, skip next 2 ch-sp. * Repeat to the end of the row, except last window (1 Bpdc, ch 2, (1 Bpdc , ch 3 turning ch), 1 BPdc 2 tog. Ch 3 and turn.
R30| skip next 2ch-sp, *1 Fpdc in next st, ch 2, skip next 2ch-sp. *Repeat to the end of the row except last window (1 Fpdc, ch 2, Fpdc2tog), 1 Fpdc2tog.
For sizes 2XL
R31| Repeat R28
For sizes 3XL, 4XL, 5XL only
Repeat R29| and R30 until you have 33 rows in total (or 6 since you start decreasing for armpit)
Next, we will start working on the V neck. After decreasing for the armpit you have now in total 28 (32, 36, 38, 40, 40, 44, 46) windows.
Place a stitch marker in the middle st. You should have on the left side and right side 14 (16, 18, 20, 20, 22, 23) windows.
The left and right side will be worked separately and we will call them side A and B
Side A
R31 (31, 31, 31, 32, 34, 34, 34) A
*we will name below the FPdc or BPdc, post st. For size S, M, L, XL will be a FPdc and for sizes 2XL, 3XL, 4XL, 4XL will be a BPdc.
Next you will make the stitch post required by your previous rows.
From where you yarn is ch 5, skip next 2 ch-sp, * 1 post st in the next, ch 2, skip next 2ch-sp. Repeat to the end of the row except the last window to the stitch marker, post st 2 tog, ch 3 and turn.
R32 (32, 32, 32, 33, 35, 35, 35) A
Skip next 2 ch-sp, *1 post st in next, ch 2, skip next 2ch – sp. * Repeat to the end of the row. Finish the row with 1 dc in the 3rd st of the starting ch.
Repeat previous 2 rows until you have in total 39 (39, 40, 40, 42, 44, 44, 45) rows.
R40 (41, 41, 43, 45, 45, 46) A| ch 5, skip next 2ch-sp, *1 post st in next, ch 2, skip next 2 ch-sp. Repeat to the end of the row. Finish the row with 1 dc in the 3rd st of the turning ch. Ch 5 and turn.
Repeat previous row until you have in total 42 (45, 45, 48, 48, 52, 52, 52) rows.
Fasten off.

You can Purchase the easy printable PDF version of this pattern here:
You can now have the PDF version with 20% Discount or even for FREE if you want to support ByKaterina on Patreon
Side B
Start| Rejoin the yarn into the marked stitch.
R31 (31, 31, 31, 32, 34, 34, 34) B
Ch 3, skip next 2 ch-sp, *1 post st in next, ch 2, skip next 2ch – sp. * Repeat to the end of the row. Finish the row with 1 dc in the 3rd st of the starting ch. Ch 5 and turn.
R32 (32, 32, 32, 33, 35, 35, 35) B
skip next 2 ch-sp, * 1 post st in the next, ch 2, skip next 2ch-sp. Repeat to the end of the row except the last window to the stitch marker, post st 2 tog, ch 3 and turn.
Repeat previous 2 rows until you have in total 39 (39, 40, 40, 42, 44, 44, 45) rows.
R40 (41, 41, 43, 45, 45, 46) B| ch 5, skip next 2ch-sp, 1 post st in next, ch 2, skip next 2 ch-sp. Repeat to the end of the row. Finish the row with 1 dc in the 3rd st of the turning ch. Ch 5 and turn.
Repeat previous row until you have in total 42 (45, 45, 48, 48, 52, 52, 52) rows.
Fasten off.

Back Panel
Repeat the pattern for the front panel until you have 30 (30, 30, 30, 31, 33, 33, 33) rows.
R31 (31, 31, 31, 32, 34, 34, 34)
ch 5, skip next 2ch-sp, *1 post st in next, ch 2, skip next 2 ch-sp. Repeat to the end of the row. Finish the row with 1 dc in the 3rd st of the turning ch. Ch 5 and turn.
Repeat previous row until you have in total 42 (45, 45, 48, 48, 52, 52, 52) rows.
Fasten off.
Assembling
Before assembling
Step 1
Wave in all ends
Step 2
Chose 1 color (in the sample it’s used pastel yellow) and working on the right side of your work make 1 row edging in sc around both panels. On side rows, work 2 sc in each 3ch – or dc.
*when working in side rows work as many sc as you need, depending on you tension.
Make sure you follow the same pattern and have same number of sc stitches on back as on the front panel.
After making the singe crochet edging, place panels one over the other, facing the wrong side.
Join them on sides and shoulder working single crochet stitches.
*you can simply sew the shoulders and sides without making a single crochet edging. At the end just add an edge on the neck line, arm holes and bottom.
To finish
Wave in all ends and block to measurements.
And the top it’s done and ready to wear and put it aside with your favorite clothes for summer.
As usual, you can find a video tutorial here
You can Purchase the easy printable PDF version of this pattern here:
You can now have the PDF version with 20% Discount or even for FREE if you want to support ByKaterina on Patreon


Comments are closed.