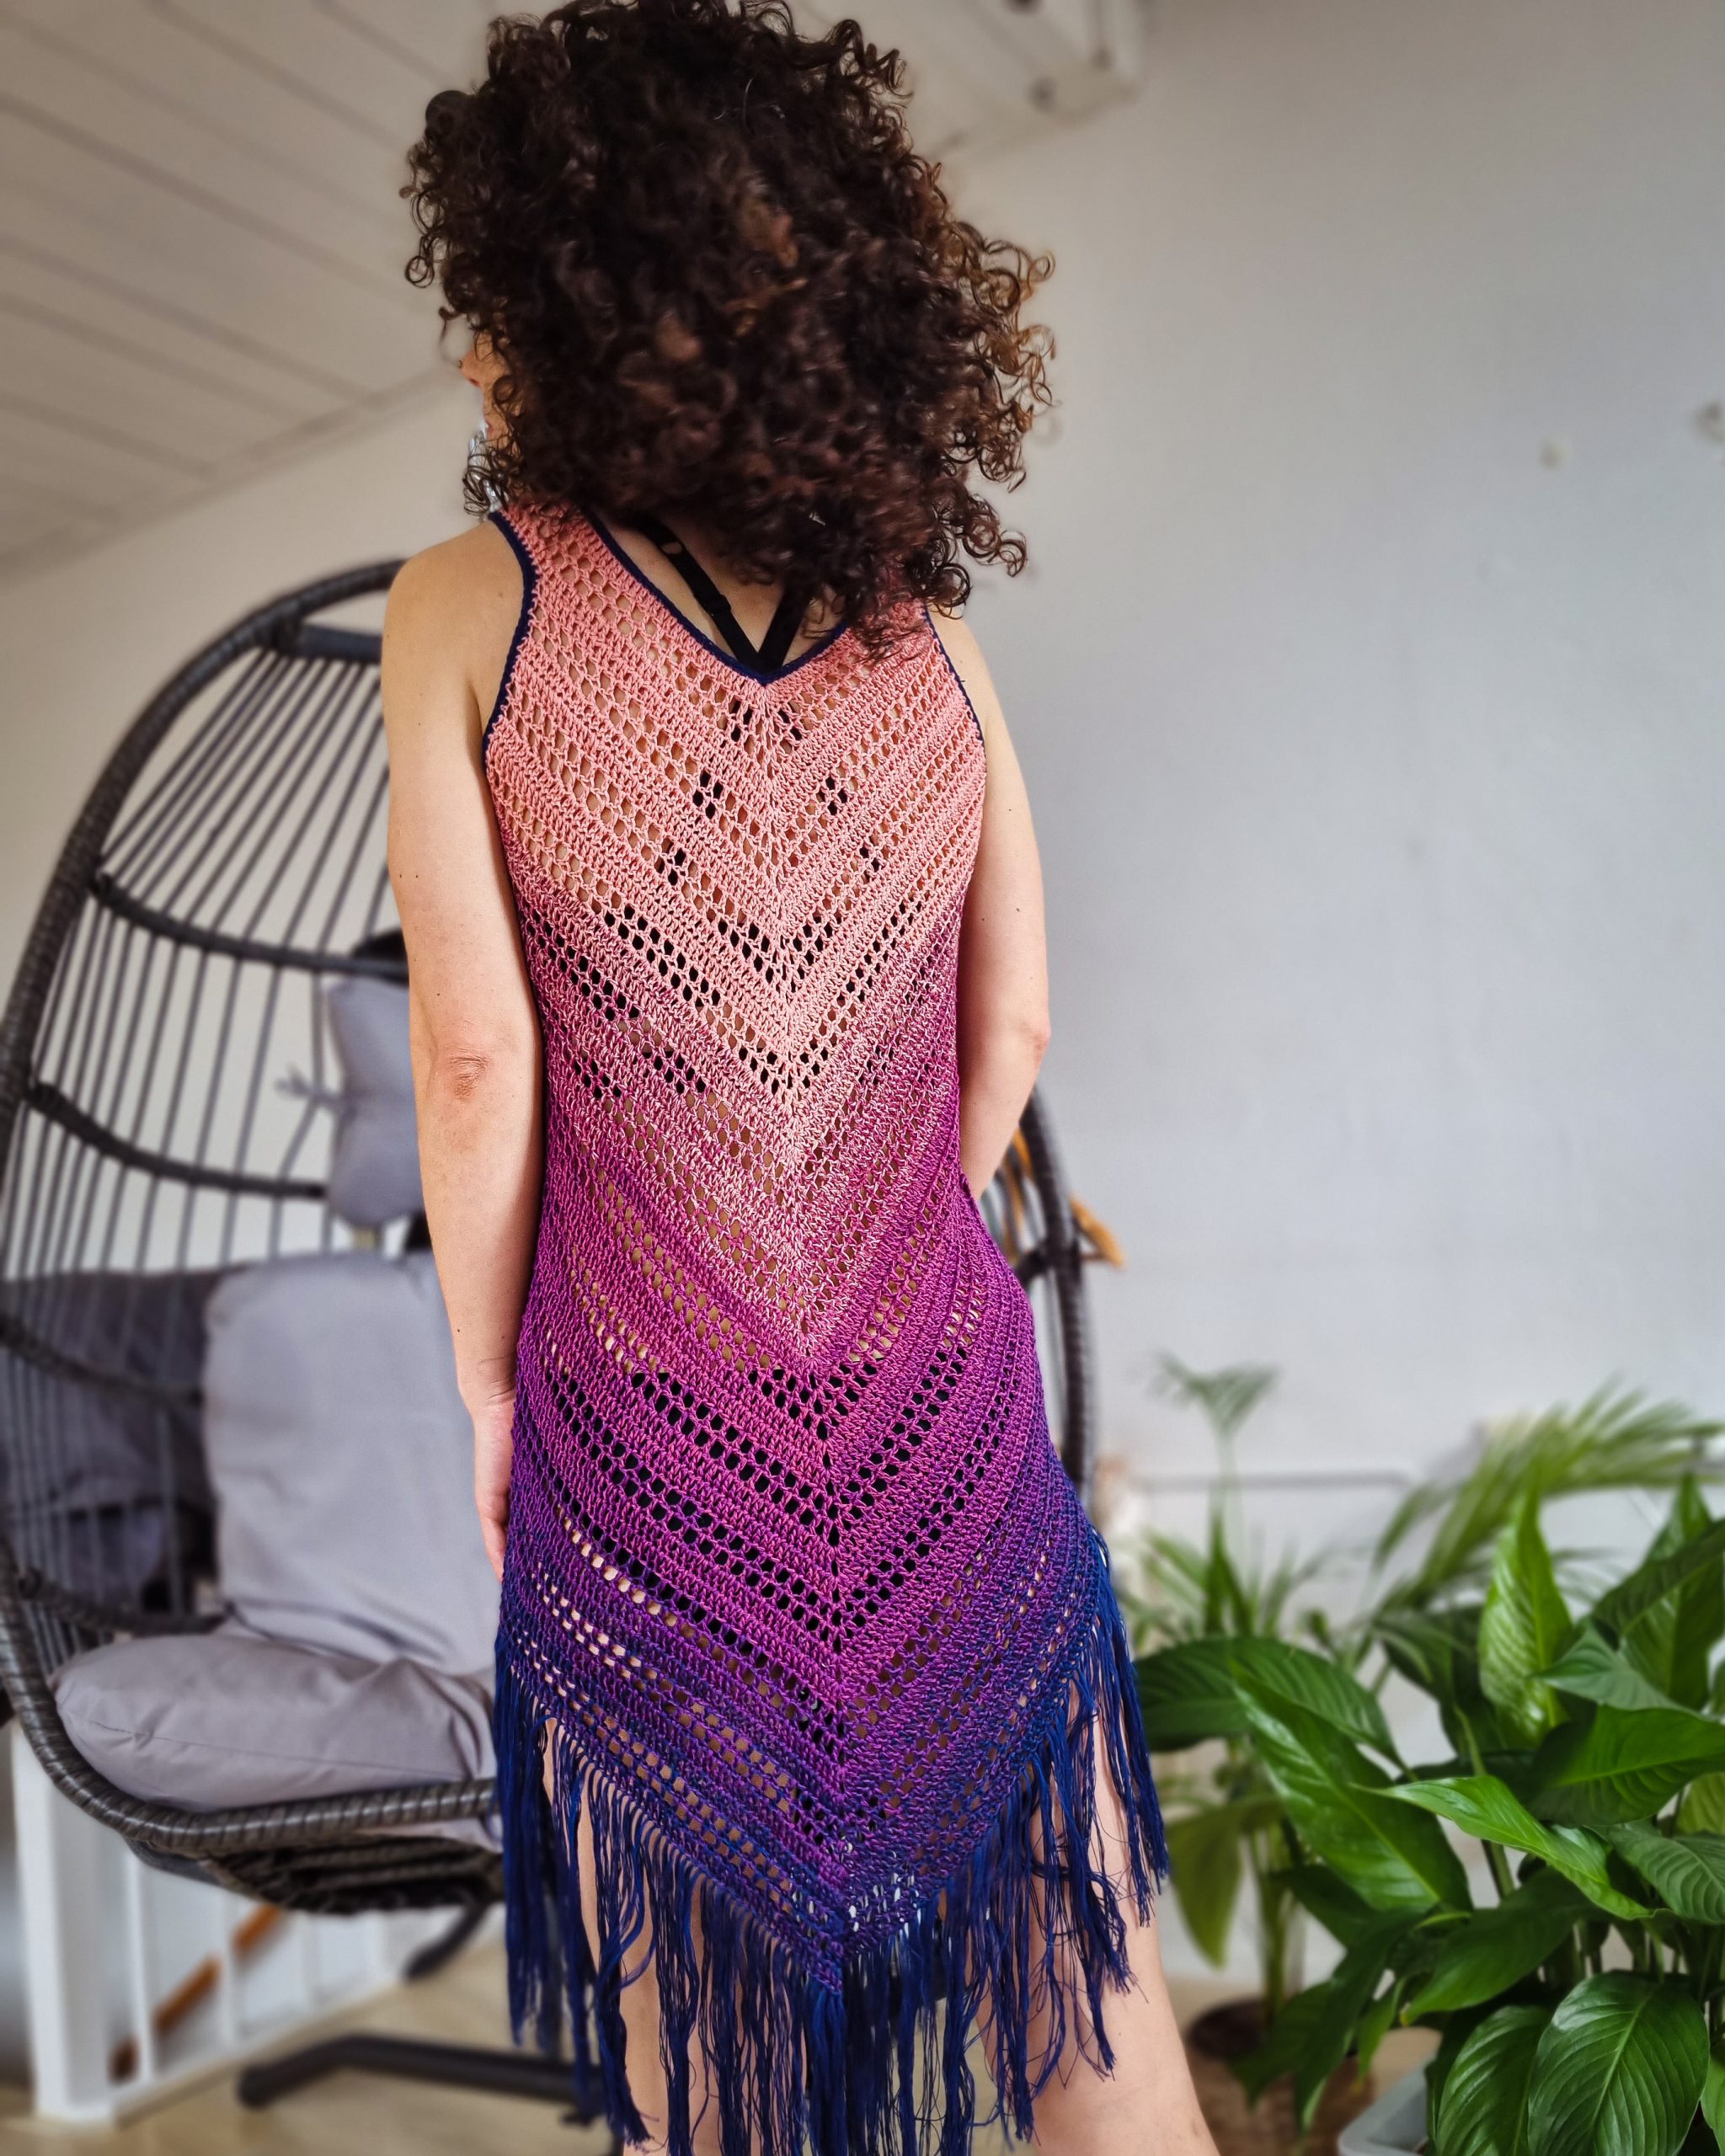
After 4 years since I designed the original Sea Breeze Cover-Up Dress, I finally managed to update the pattern and use all the knowledge I have now to improve it.
This design is fantastic and means a lot to me. It was my first design that was “seen” and made by so many of you, and I could not be more grateful.
I must admit that knowing many things about sizing and grading didn’t help me update this pattern 😅! I found it quite challenging to write it again, even if the design itself is straightforward to make. But after a few long hours, I manage, and I am happy to share with you the new version.
The PDF version of this pattern includes stitch charts. You can Purchase the easily printable PDF pattern here:
MATERIALS
• Yarn: Size 1 or 2, Fingering or Sport Weight yarn
• Crochet Hook:
o 3.5 mm crochet hook
• yarn needle for weaving in ends
• Scissors
• stitch markers
NOTES ABOUT DESIGN
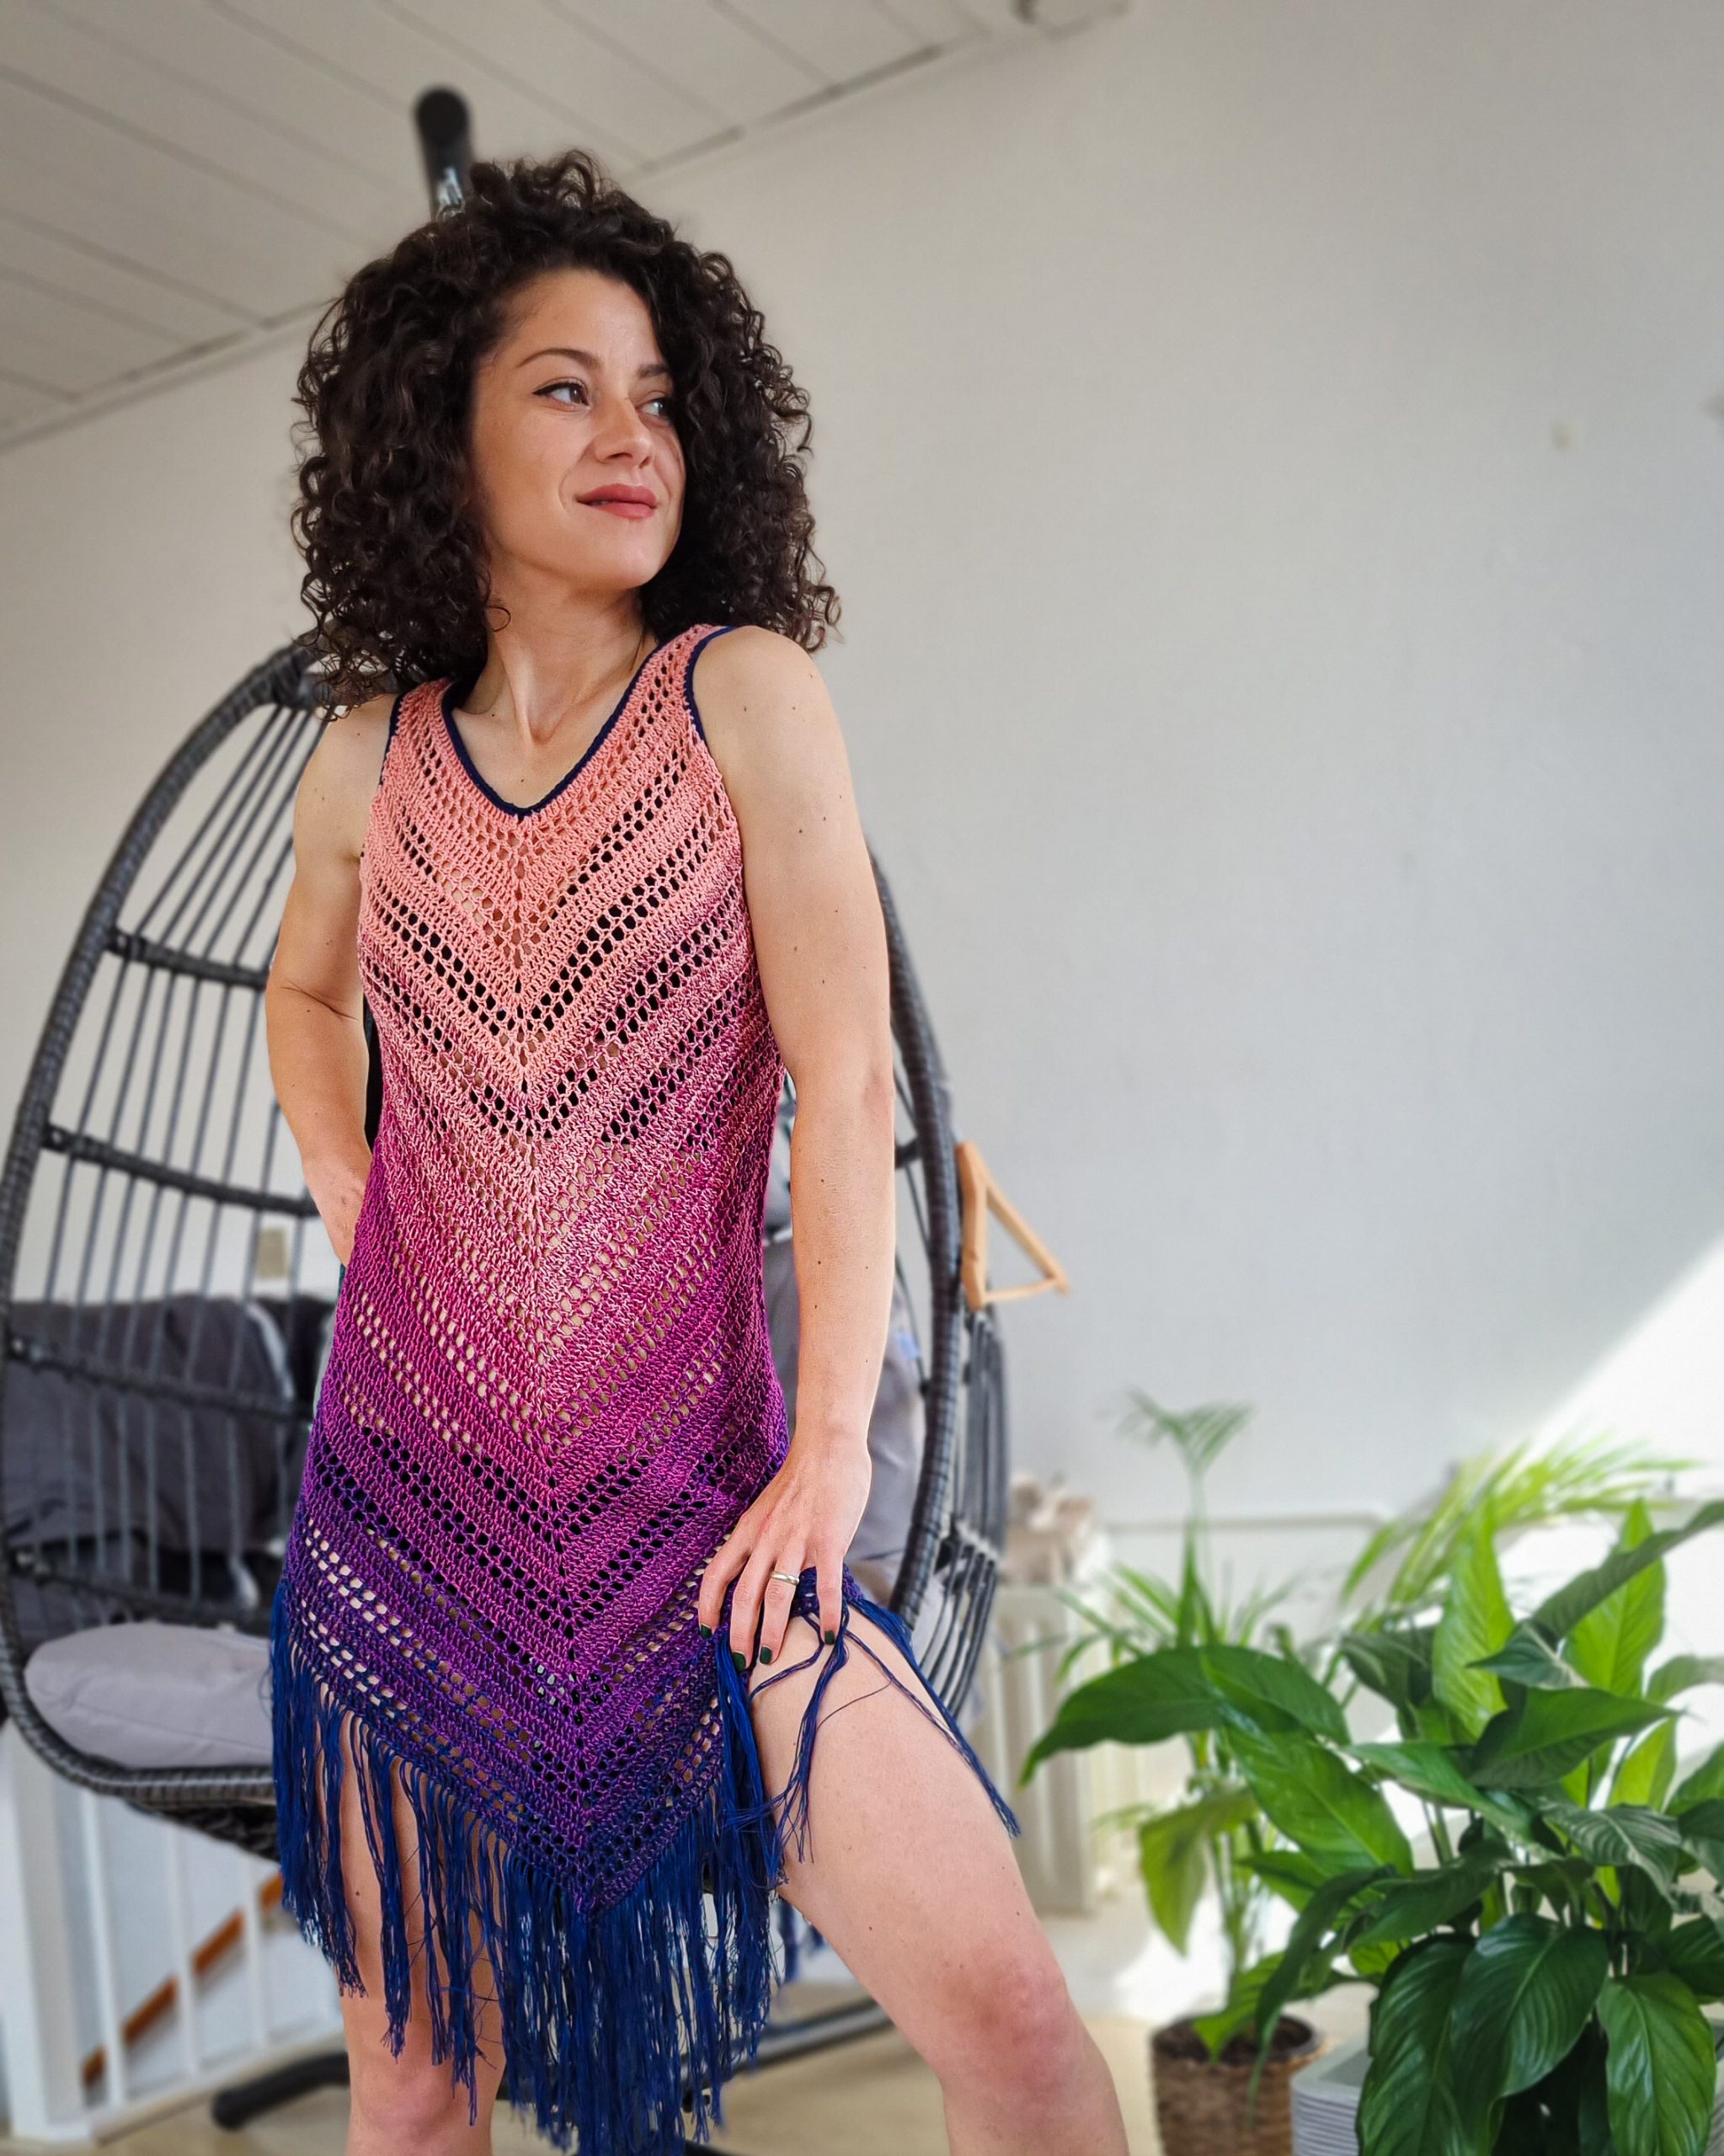
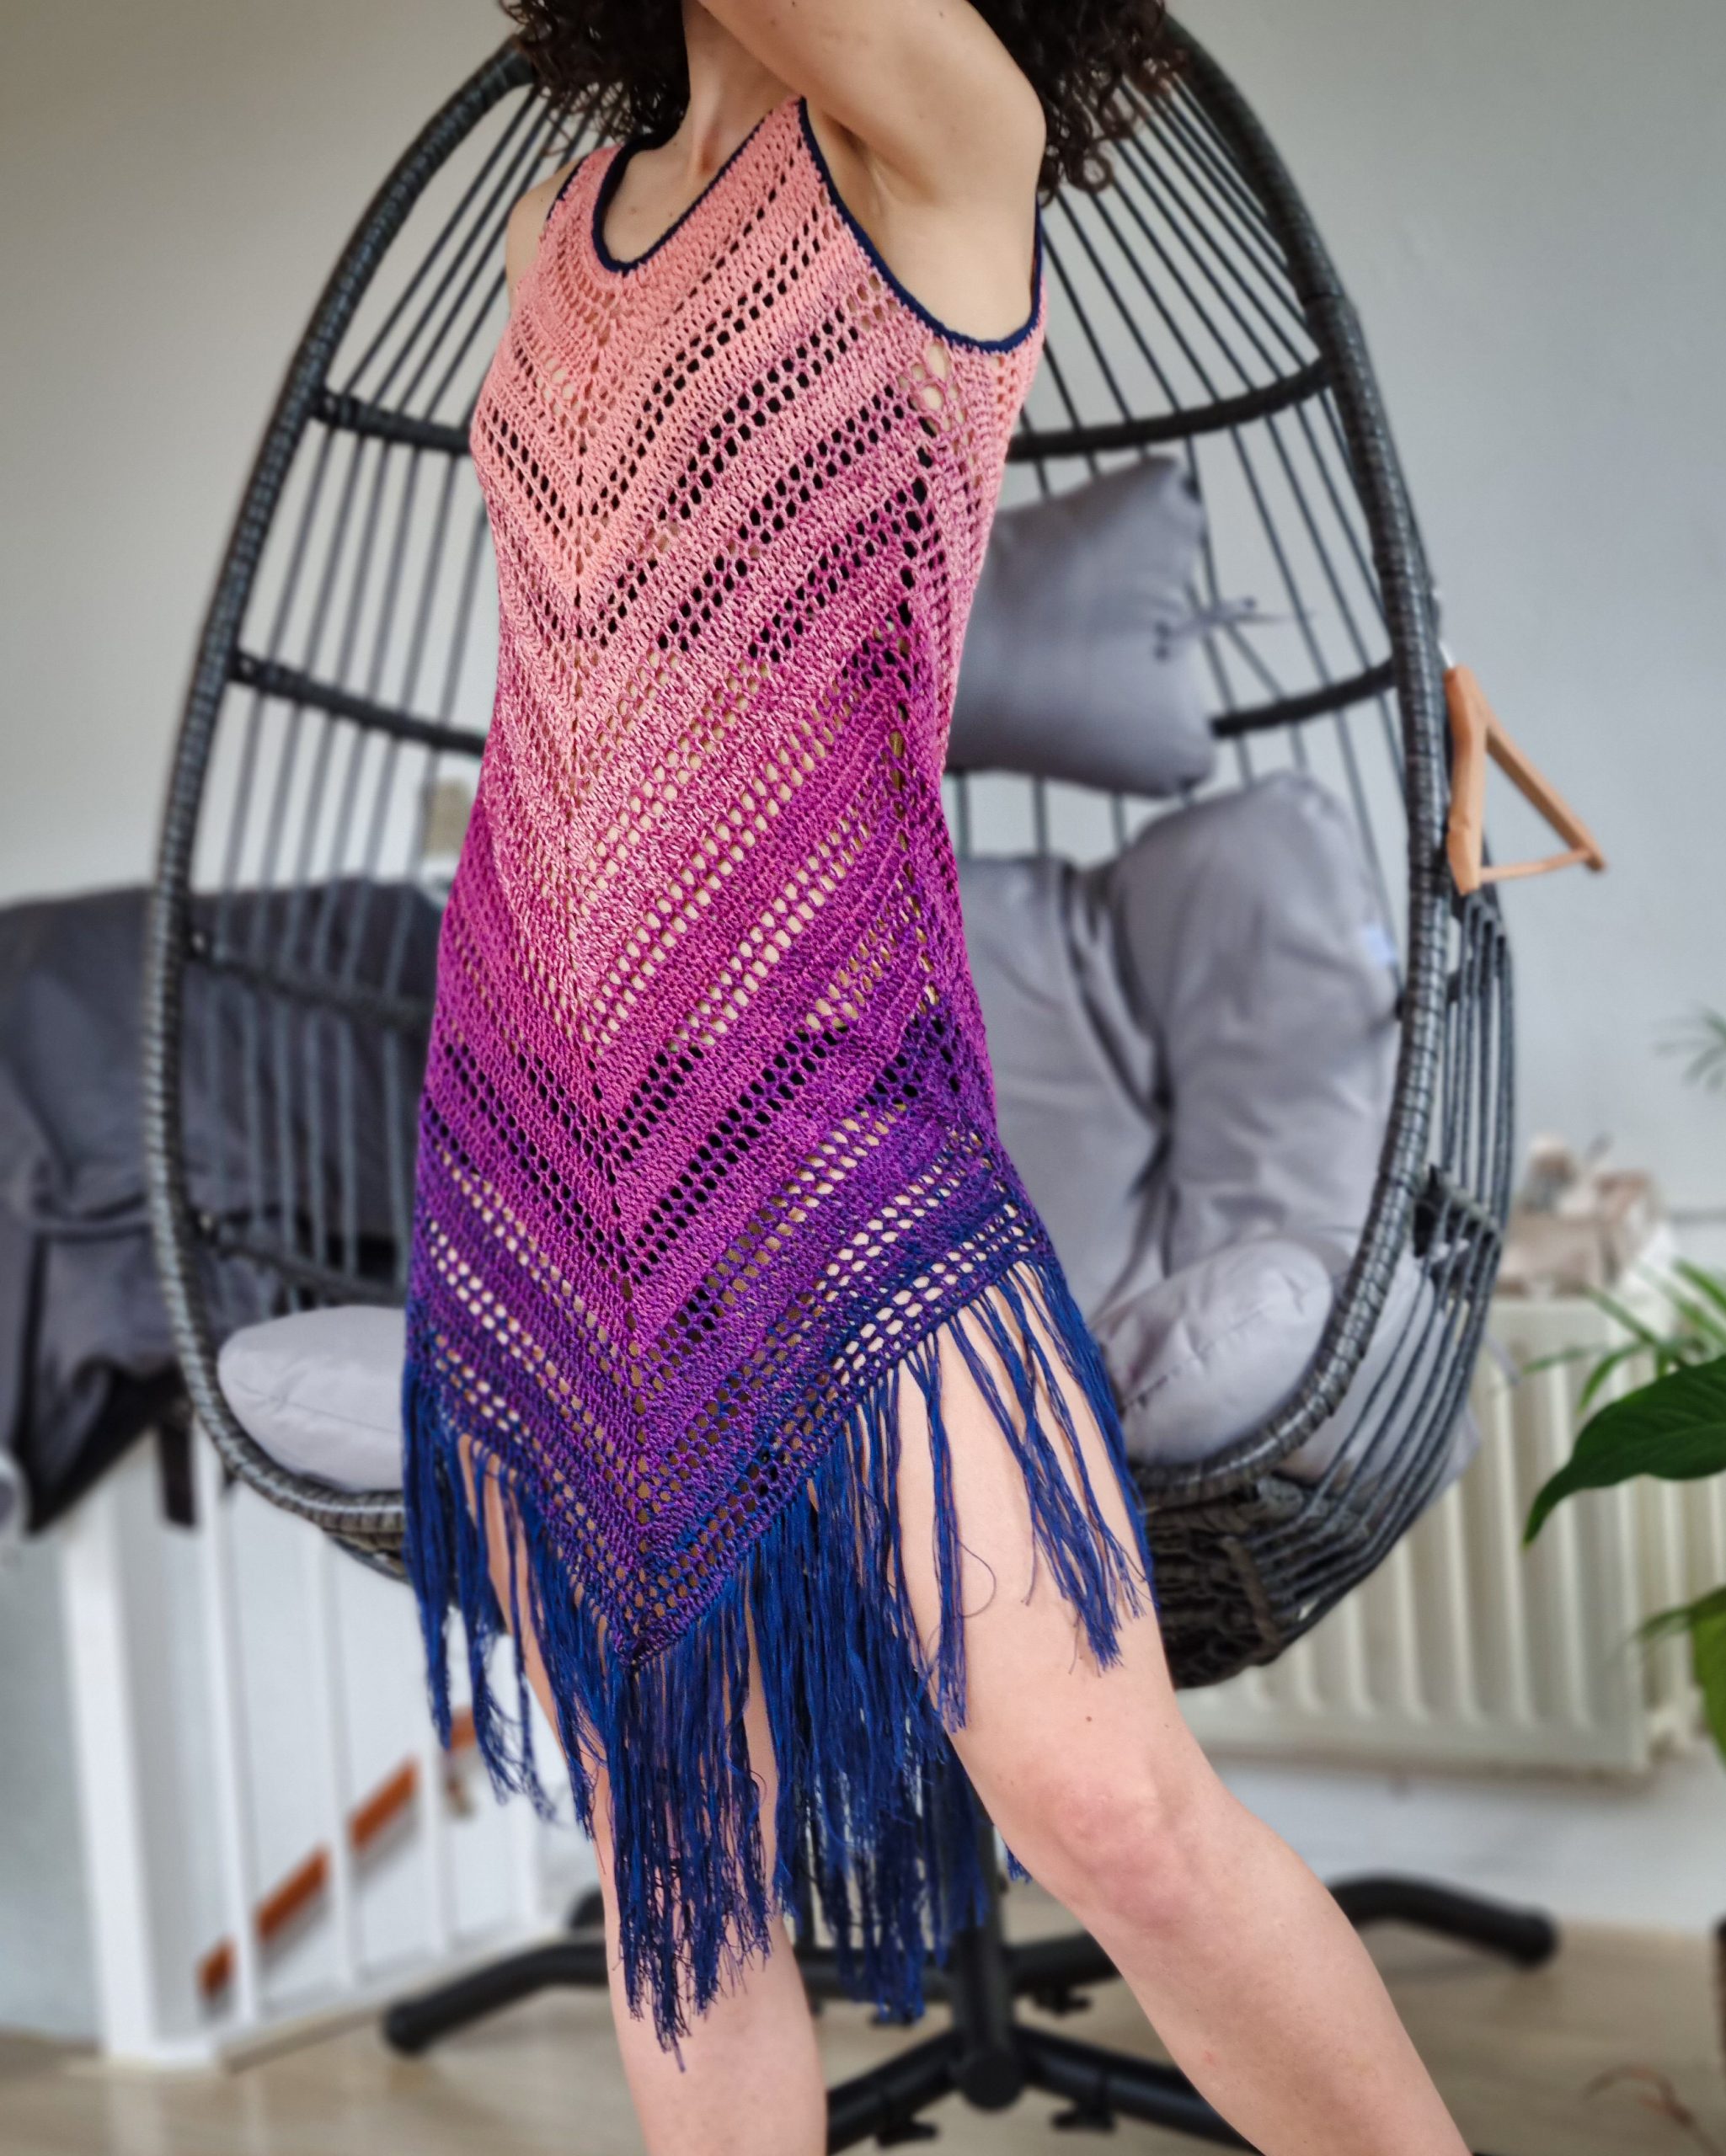
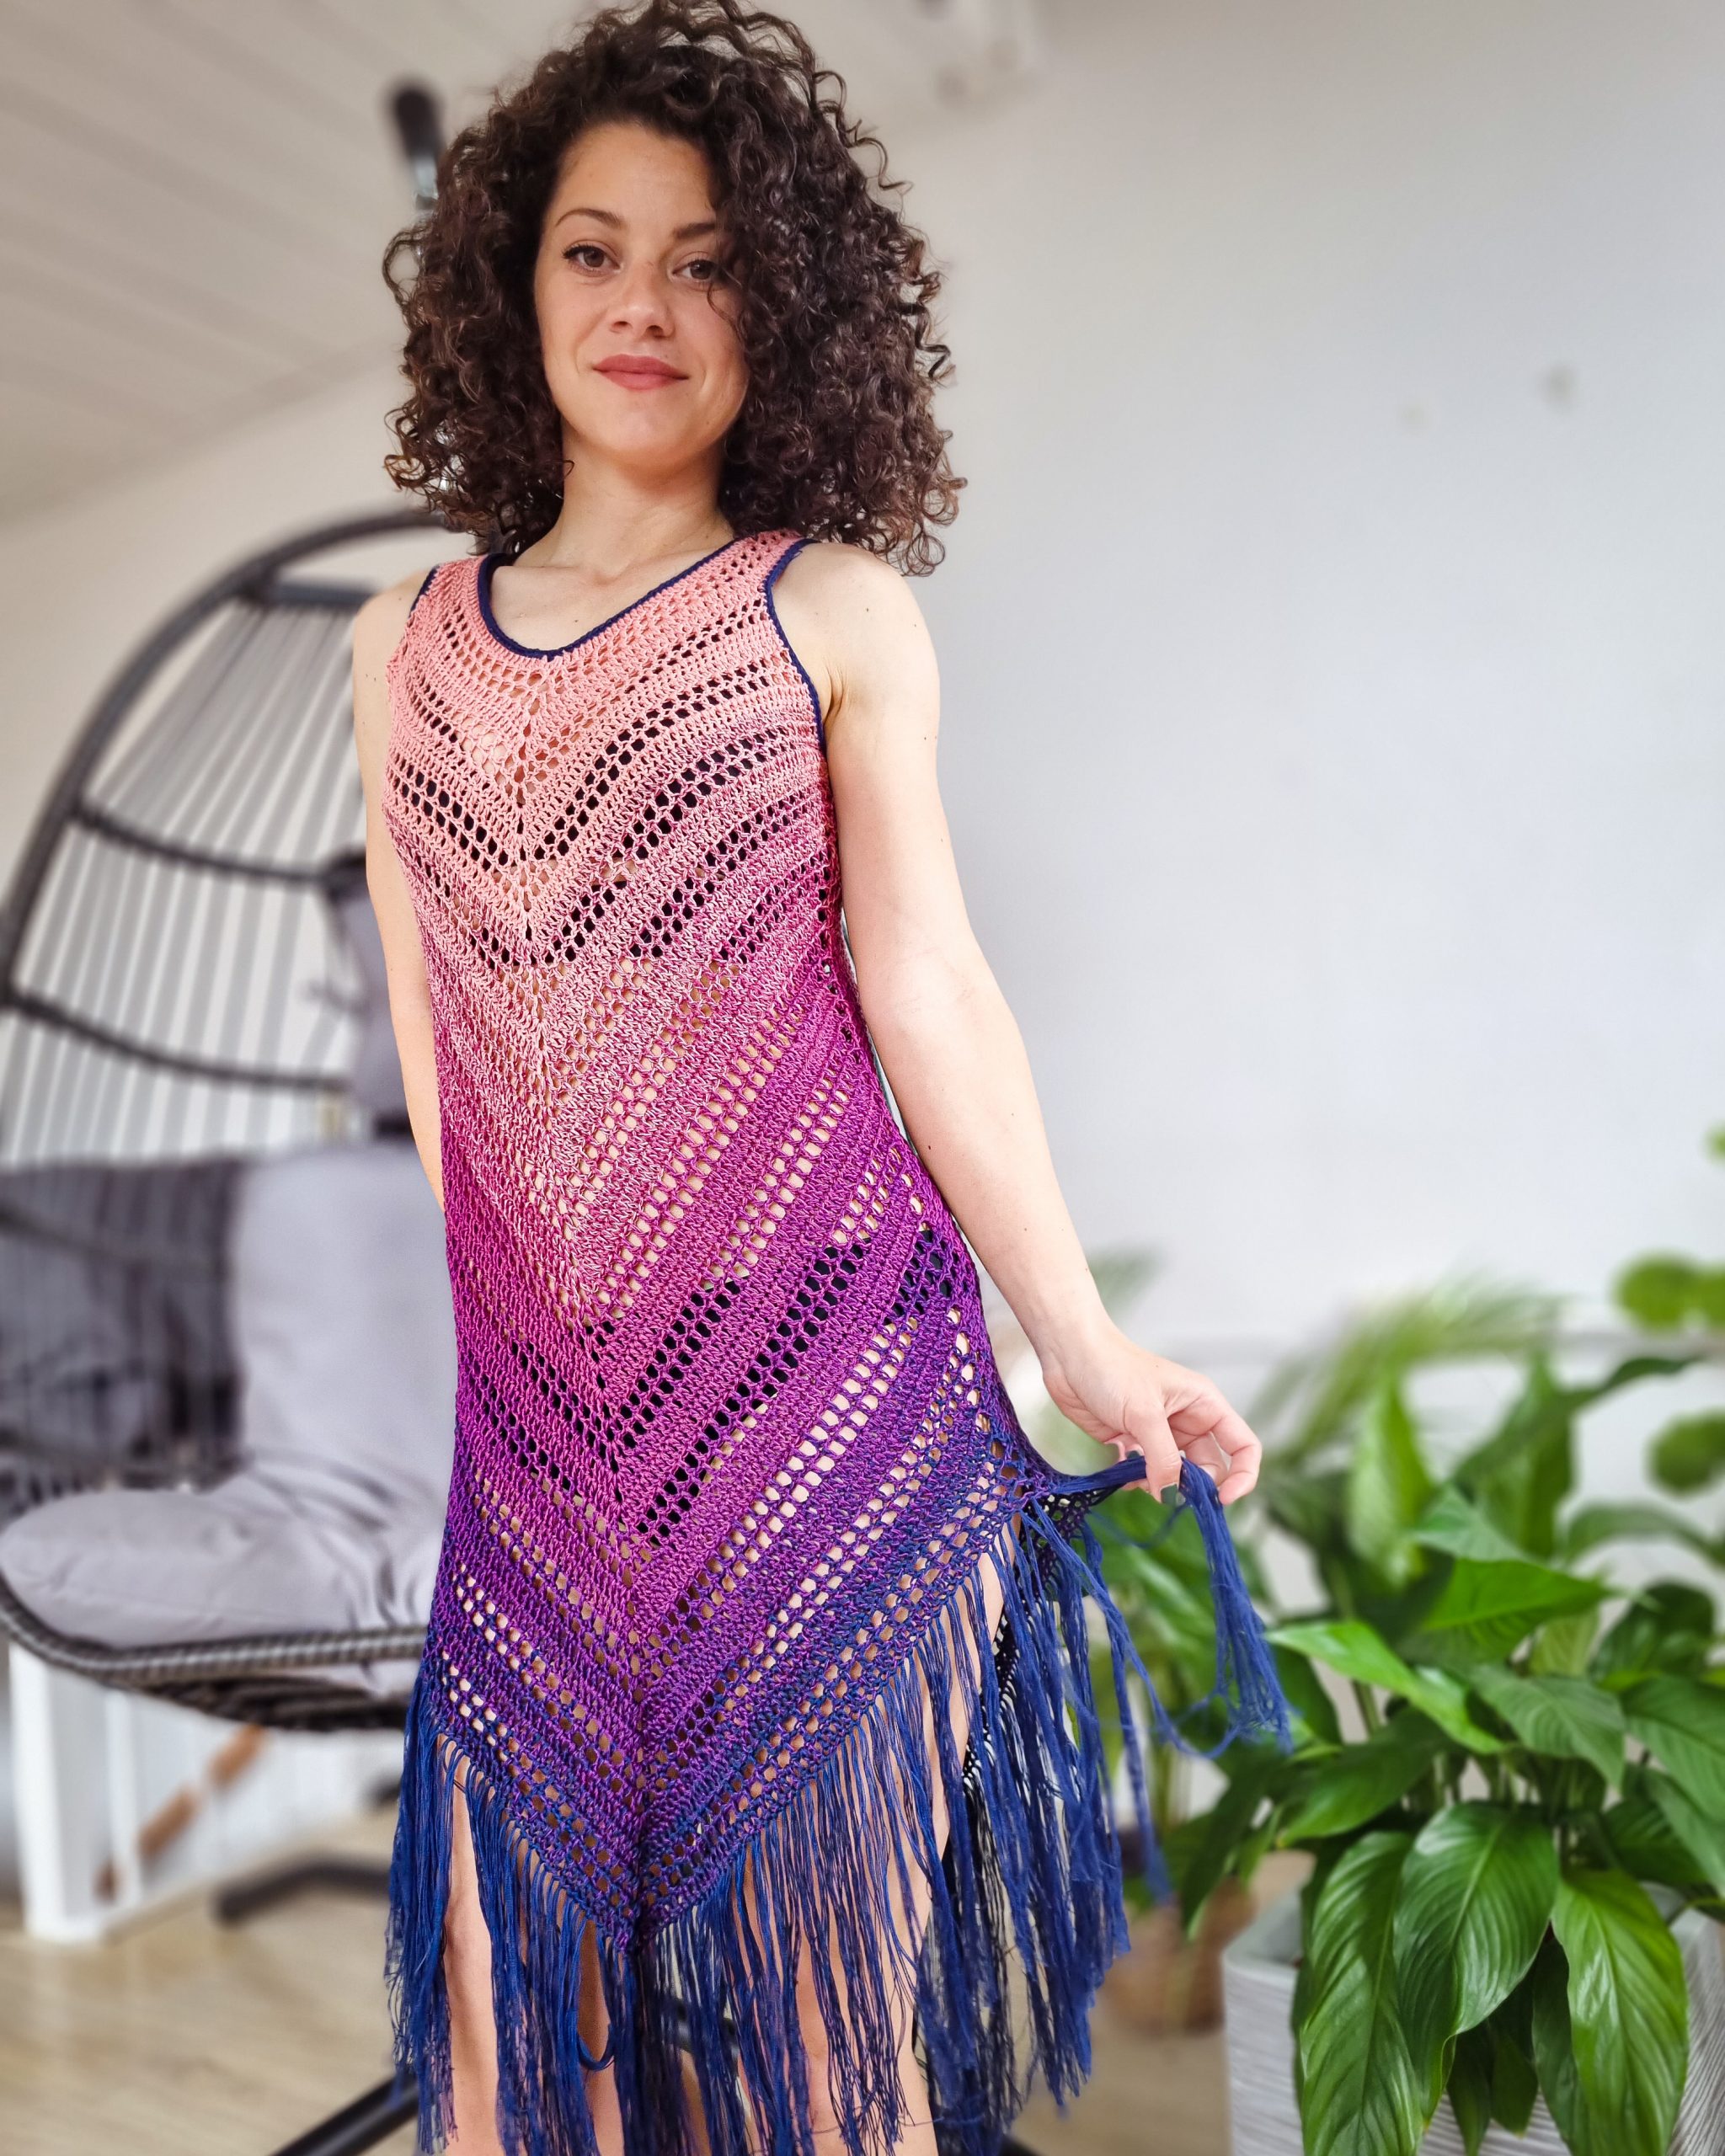
The Sea Breeze Cover-Up Dress has a top-down construction with a V pattern on the front and back panels. The dress is worked in the round, except when working front and back panels across the armholes.
The Sea Breeze Cover-Up Dress has a closer fit with no positive or negative ease.
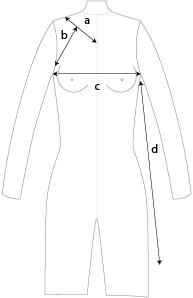
MEASUREMENTS AND SIZES
The Sea Breeze Cover-Up Pattern is available in 9 sizes, from XS to 5X Large. The model is 168 cm tall, with an 86 cm Bust circumference, and wears a size XSmall.
The numbers are written below as follows: XS (S, M), (L, XL), (2XL, 3XL, 4XL, 5XL); the US sizes 0/2 (4/6, 8/10), (12/14, 14/16W), (18/20W, 22/24W, 26/28W, 30/32W)
All the measurements use as reference Standard Body Measurements by ASTM International.
Final Measurements of the Sea Breeze Cover-Up
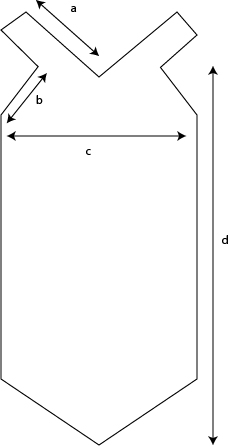
Neck to Bust Center a: 19cm (19, 20), (21, 22), (23, 25, 27, 30)
Armhole depth b: 12cm (14, 14), (16, 16), (17, 19, 21, 23)
Bust width c: 41cm (44, 46.5), (50, 53.5), (58.5, 63.5, 68.5, 73.5)
Length. d: 72cm (72, 72), (72, 72), (72, 72, 72, 72)
How much yarn do you need?
For the Sea Breeze Cover-Up, I used:
Hobbii Azalea in Color Berry Rose (07). Yarn composition: 52% cotton, 48% acrylic. One cake has 200 grams and 800 meters.
For bigger sizes, you can use a solid color in the same shade as the cake’s beginning or end. For the color I used, one suggestion is Hobbii Twister Solid in color Dark Denim (126)
Other yarn suggestions: Hobbii Twister, Scheepjes Whirl
For each size, you will need:
*785 (845, 890), (960, 1025) ,(1120, 1220, 1310, 1405) meters
For sizes S, M L, XL, XXL, and 3XL, you can use 1 variegated cake yarn and one cake solid. For sizes 4XL, 5XL you can use 2 cakes of variegated yarn
ABBREVIATIONS
Ch – chain
sc – single crochet
dc – double crochet
ss – slip stitch
St(s) – stitch(es)
R – rows
*,**,***,**** – repeated section.
TENSION
Using 3.5 mm crochet hook in the main stitch pattern
21sts (dc) = 10 cm
10 rows = 10 cm
4 rows (1 pattern repeat) = 4cm
The PDF version of this pattern includes stitch charts. You can Purchase the easily printable PDF pattern here:
STITCH PATTERN AND TECHNIQUES
The stitch pattern is created by alternating solid rows with mesh stitch rows.
Solid Row: 3ch, 1dc in each of the indicated stitches
Mesh st row: 4ch, skip 1st, 1dc in next st, *1ch, skip 1st, 1dc in next st. *rep. until indicated.
Pattern repeat:
R1: a solid row
R2: Mesh st row
R3: mesh st row
R4: a solid row
Rep. R1 – R4 as indicated.
PATTERN NOTES
- work the first 4 rows in the round;
- work front and back panels, across the armholes flat; turn after each row
- ch3 at the beginning of each row/round; ch3 counts as the first dc;
- when working the first 4 rounds, after each round you will have 8 sts more;
- when working front and back panels, after each row, you will have 4 stitches more
- if you use a variegated yarn, work for the front and back panels alternatively, 4 rows on each;
The PDF version of this pattern includes stitch charts. You can Purchase the easily printable PDF pattern here:
If the indicated measurements in this pattern don’t fit you, you can adjust this pattern according to your measurements and gauge.
Here is how:
Step 1: Make a gauge swatch and count the number of sts and rows you have in a 10/10 cm square
Step 2: Calculating the number of stitches to start with:
1. Measure Neck to Bust center length (a); Bust Center can be as high or low as you wish, depending on how deep you want the V Neck to be.
2. Multiply the result by 4; the result will be the starting circumference in measuring units;
3. Transform cm (inches) into stitches:
circ. in cm x number of sts from your gauge / 10 (this is your swatch width in cm)
4. Adjust the total number of stitches to match the stitch pattern requirements;
The mesh stitch pattern requires a multiple of 2+1 stitches.
so, the next result: (total number of sts – 2)/2, needs to be a multiple of 2+1.
Now that you have the number of stitches to start, you can follow the stitch pattern for the first 4 rows.
- Step 3: Measure the armhole depth (b):
the starting point should be perpendicular to the Neck to Bust center line; the endpoint should be at the middle of your armpit, with 2-3 cm below for comfortable wearing. - use the first 4 rows you already worked as a reference, and use a stitch marker to mark the starting point
- mark the same number of sts on the left and right of the center point of your work (3ch-sp)
- measure bust width (c)
- transform length (b) into rows
- start working the armhole rows and keep measuring the bust width on your work.
- if after finishing the total number of rows, the bust width is too small, you can
1. either work a few more rows, or
2. add extra armpit sts, when joining front and back panels, to work the trunk - measure the armpit length (d) and transform the length into rows (according to your gauge)
INSTRUCTIONS
Start: ch 161 (161, 169), (177, 185),
(193, 217, 233, 257)
Foundation row: start with the second st, 1sc in each st until the end of the row; join with an ss into the first sc.
Total: 160 (160, 168), (176, 184),
(192, 216, 232, 256) sc
Use 2 st markers and mar the first st and the st number 81 (81, 85), (89, 93),
(97, 109, 117, 129); you should have between stitch markers 79 (79, 83), (87, 91), (95, 107, 115, 127);
R1: 3ch, 1dc in the same st, 1dc in next 79 (79, 83), (87, 91), (95, 107, 115, 127) sts, (2dc, 3ch, 2dc) in the next st (the marked st), 1dc in next 79 (79, 83), (87, 91), (95, 107, 115, 127), 2dc into the first st, 3ch, ss into the third ch.
Total: 168 (168, 176), (184, 192),
(200, 224, 240, 265)
R2: 4ch, skip next st, 1dc in next st, *1ch, skip next st, 1dc in next st. *rep. until the 3ch-sp, 1ch, (1dc, 3ch, 1dc) into the 3ch-sp, 1ch, 1dc into the next dc, **1ch, skip next st, 1dc in next st. **rep. until the 3ch-sp, 1ch, (1dc, 3ch, 1dc) into the 3ch-sp, 1ch and ss into the third ch.
Total: 176 (176, 184), (192, 200),
(208, 232, 248, 272)
R3: 4ch, 1dc in next dc, *1ch, 1dc in next dc; rep. until the 3ch-sp, 1ch, (1dc, 3ch, 1dc) into the 3ch-sp, **1ch, 1dc in next dc; **rep. until the next 3ch-sp, 1ch, (1dc, 3ch, 1dc) into the 3ch-sp, 1ch, 1dc into the next dc, 1ch and ss with the third ch.
Total: 184 (184, 192), (200, 208),
(216, 240, 256, 280)
R4: 3ch, 1dc in each of the following dc and 1ch-sp, until the 3ch-sp, (2dc, 3ch, 2dc) into the 3ch-sp, 1dc in each of the following dc and 1ch-sp until the next
3ch-sp, (2dc, 3ch, 2dc) into the 3ch-sp, 1dc into the last 4sts, ss into the third ch.
Total: 192 (192, 200), (208, 216),
(224, 248, 264, 288);
Cut the yarn.
FRONT AND BACK PANELS
- work front and back panels, across the armholes flat; turn after each row
- if you use a variegated yarn, work for the front and back panels alternatively, 4 rows on each;
- use stitch markers and mark the front and back panels stitches following the instructions below;

Your 4rows collar folded will look something similar to the sketch above.
Count the sts for the back and front panel, from the 3ch-sp center point to the right and left.
33 (35, 37), (37, 43), (45, 49,53, 55);
You will have in total for the front and back panels 66 (70, 74), (74, 86), (90, 98,106, 110) sts, and 1 ch3-sp.
BACK PANEL
Rejoin yarn into the right marked st; 3ch
R1: 1dc in each st until the 3ch-sp, (2dc, 3ch, 2dc) into the 3ch-sp, 1dc in each st until the end of the row; 4ch and turn
Total: 70 (74, 78), (78, 90), (94, 102,110, 116)
R2: skip next st, 1dc in the next st, *1ch, skip next st, 1dc into the next st. *rep. until the 3ch-sp, 1ch, (1dc, 3ch, 1dc) into the 3ch-sp, 1ch, 1dc into the next dc, **1ch, skip next st, 1dc into the next st; **rep. until the end of the row. 4ch and turn.
Total: 74 (78, 82), (82, 94), (98, 106,114, 120)
R3: 1dc in next dc, *1ch, 1dc in next dc; *rep. until the 3ch-sp, 1ch, (1dc, 3ch, 1dc) into the 3ch-sp, **1ch, 1dc into the next dc; **rep. until the end of the row; 3ch and turn
Total: 78 (82, 86), (86, 98), (102, 110,118, 124)
R4: 1dc in each dc and 1ch-sp until the 3ch-sp, (2dc, 3ch, 2dc) into the 3ch-sp, 1dc in each dc and 1ch-sp until the end of the row. 3ch and turn
Total: 82 (86, 90), (90, 102), (106, 114, 122, 128)
Rep. R1 – R4 until you will have for BACK PANEL 11 (13, 13), (15, 15), (16, 18, 20, 23)
At the end of the last row you will have
110 (122, 126), (134, 146), (154, 170, 186, 198) sts.
The PDF version of this pattern includes stitch charts. You can Purchase the easily printable PDF pattern here:
FRONT PANEL
Repeat the same pattern as for the BACK PANEL
JOINING ROUND
- depending on the size you are making, the joining round will be a solid row or a mesh stitch row;
- you will follow the same joining technique but in the required pattern
Joining Round – Solid
Start from where your yarn is, 3ch, and turn
1dc in each st until the 3ch-sp, (2dc, 3ch, 2dc) into the 3ch-sp, 1dc in each st until
1dc into the last st, 1dc into the first st of the back/front panel, 1dc in each of the next sts, until the 3ch-sp, (2dc, 3ch, 2dc) into the 3ch-sp, 1dc in each of the next sts until the last st of the back/front panel, 1dc in the last st, ss with the third ch of the front/back panel.
Continue with the BODY section.
Joining Round – Mesh Stitch
Start from where your yarn is; 4ch and turn.
skip 1st (ch-sp or dc), 1dc in next, *1ch, skip next st, 1dc in next; rep. until the 3ch-sp, 1ch, (1dc, 3ch, 1dc) into the 3ch-sp, 1ch, **1dc into the next dc, 1ch, skip next st; ** rep. until the last st of the front/back panel, 1dc into the last st, 1dc into the first st of back/front panel, ***1ch, skip next st, 1dc into the next st; *** rep. until the 3ch-sp, 1ch, (1dc, 3ch, 1dc) into the 3ch-sp, 1ch, 1dc into the next dc, ****1ch, skip next st, 1dc into the next st; ****rep. until the end of the round, ss with the third ch.
Continue with the BODY section.
BODY
continue working in the round;
the first round of the body will be a solid or a mesh stitch round; follow the exact 4 rows pattern, repeat, and continue with the required type of row;
the pattern is written for solid row and mesh stitch row and
Solid Round
2ss (to start the round from the third st), 3ch, 1dc in each of the next sts until the 3ch-sp, (2dc, 3ch, 2dc) into the 3ch-sp, 1dc in each of the next sts until you have 2sts left from the front/back panel, skip the last 2sts, skip the first 2sts from the back/front panel, 1dc in each of the next sts until the next 3ch-sp, (2dc, 3ch, 2dc) into the 3ch-sp, 1dc in each of next sts until you have 2sts left from the back/front panel, skip the last 2sts and ss into the third ch.
Mesh Stitch Round
2ss (to start the round from the third st), 4ch, skip next st, 1dc into the next, *1ch, skip next st, 1dc into the next st; *rep. until the 3ch-sp, 1ch, (1dc, 3ch, 1dc) into the 3ch-sp, 1ch, 1dc into the next dc, **1ch, skip next st, 1dc into the next st; **rep. until you have 2sts left from the front/back panel, skip the last 2sts, skip the first 2sts from the back/front panel, 1dc into the next st, ***1ch, skip next st, 1dc into the next st; ***rep. until the next 3ch-sp, 1ch, (1dc, 3ch, 1dc) into the 3ch-sp, 1ch, 1dc into the next dc, ****1ch, skip next st, 1dc into the next st; ****rep. until you have 2sts left from the back/front panel, skip the last 2sts and ss into the third ch.
Next, keep repeating these two rows, following the same pattern, 1solid row, 2mesh stitch rows, 1solid row, until you have the desired length, or until you have in total, counting from R1, 72 rounds, or 12 pattern repeats.
FINISHING
Neckline and armhole edging
Rejoin yarn in one of the sts.
*1ch, 1sc in each st around, ss into the first sc.
*when working into the armholes, work 2sc in each dc or 3ch side row.
Fringe
Cut the yarn into strands of about 20 cm.
Fold one strand in half; insert the hook into the st, grab the loop of the folded strand and pass it through the st; take the ends and pass them through the loop and tie.
Repeat in every stitch.
Note: you can work with many strands at once and make the fringe thicker; if you prefer, skip a few sts between the fringe.
TO FINISH
Weave in all looser ends and block to measurements.
I hope you like it! 🙂
The PDF version of this pattern includes stitch charts. You can Purchase the easily printable PDF pattern here:


2 Comments
I have the older version of this pattern on ravelry. Will there be an update?
I purchased the Sea Breeze crochet pattern from Etsy. It is quite different than this version. I don’t see the decreases at the sides that are mentioned in the pdf version from Etsy. Can you please clarify this for me?